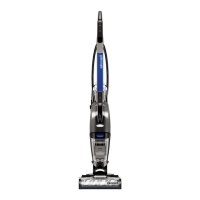
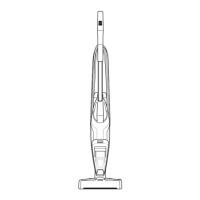
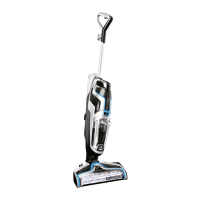
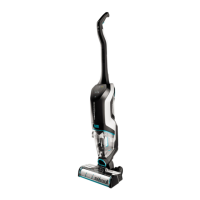
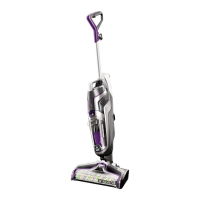
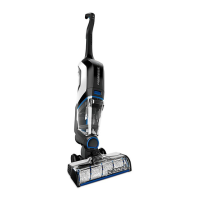
The BISSELL CrossWave HydroSteam is an all-in-one multi-surface cleaner designed for household use, combining the functions of a wet and vacuum hard floor cleaner. It is suitable for cleaning various sealed hard floors and refreshing area rugs. The device features multiple cleaning modes, including SteamWash™ Mode, Hard Floor Mode, and Area Rug Mode, allowing users to tackle different types of messes and surfaces effectively.
Function Description
The primary function of the CrossWave HydroSteam is to clean floors by simultaneously vacuuming dry debris and washing with a cleaning solution, which can be enhanced with steam in SteamWash™ Mode. This mode is particularly effective for tough, stuck-on messes on hard floors, leveraging HydroSteam™ Technology for deeper cleaning. The Hard Floor Mode is designed for everyday messes on sealed hard floors, such as tracked-in mud, spilled cereal and milk, coffee, and cooking splatters. For area rugs, the Area Rug Mode helps refresh them and clean dry messes like crumbs, dirt, and pet hair. The machine uses BISSELL cleaning formulas specifically designed for wet and vacuum hard floor cleaners, ensuring optimal performance and preventing damage to internal components.
The device operates with fingertip controls located on the upper handle, allowing users to easily switch between cleaning modes, power the machine ON and OFF, and initiate a Clean Out Cycle. The mode selection is displayed on the foot of the machine, providing clear visual feedback to the user. A solution and steam spray trigger is integrated into the handle, enabling controlled dispensing of cleaning formula and steam.
Usage Features
To begin cleaning, the user first fills the clean water tank with warm tap water (up to 140°F/60°C MAX) and the appropriate BISSELL formula. The tank has distinct fill lines for "Large Area" (up to 55m²) and "Small Area" (up to 27m²), allowing users to tailor the amount of solution to the size of the cleaning task. After plugging the machine into a properly grounded outlet, the power button is pressed to turn it ON, which defaults to SteamWash™ Mode. If SteamWash™ Mode is selected, a 30-second warm-up period is required for the steam to be ready, indicated by an illuminating steam ready light.
Once powered on and the desired mode is selected, the machine is reclined to activate the brush roll. The brush roll does not spin when the machine is in an upright position. Before each use, especially for the first time or after a brush roll change, the solution spray trigger should be held for about 10 seconds to wet the brush roll, ensuring proper solution flow. Bubbles appearing in the brush roll window confirm that the solution is flowing. During steam cleaning, it is normal for water to be present on the floor.
For cleaning, the trigger is held to dispense formula (and steam in SteamWash™ Mode) while moving the machine back and forth across the floor. To dry the floor, the trigger is released to stop dispensing solution and steam, and then forward and backward passes are made to suction up excess water.
The device also offers a sanitizing feature for hard floors using specific Hard Floor Sanitise formula. After removing surface dirt and debris, the trigger is held to apply the sanitizing solution, allowing the floor to remain visibly wet for five minutes (which may require additional wet passes). After the dwell time, the trigger is released, and the machine is moved back and forth to extract the solution.
The CrossWave HydroSteam is designed with interchangeable brush rolls to optimize cleaning for different surfaces. Options include a Multi-Surface Brush Roll for tough, sticky messes and dry debris, a Wood Floor Brush Roll for gently cleaning sealed hard floors, an Area Rug Brush Roll for dry debris and pet hair on rugs, and a PET Multi-Surface Brush Roll for pet-related messes. Changing the brush roll involves removing the brush window, pulling a tab to release the brush roll, and then reinstalling the new brush roll and window.
Maintenance Features
Regular maintenance is crucial for the longevity and performance of the CrossWave HydroSteam. After each use, the dirty water tank needs to be emptied. This involves pressing a button to remove the tank, pulling up the filter and strainer to discard debris, and then pouring the dirty water into a utility sink. The tank should be thoroughly rinsed.
A key maintenance feature is the Clean Out Cycle, which is recommended after every use. To perform this cycle, the dirty water tank must first be emptied, and the strainer and filter kept dry. The clean tank is then filled with water and formula up to the "Clean Out" fill line. Optionally, 2 fluid ounces of FreshStart™ formula can be added to the Clean Out Tray if the unit is removed from the tray. The machine is placed on the storage tray and plugged into a grounded outlet. The Clean Out Cycle button on the handle will light up blue when ready, and pressing it initiates the automatic self-cleaning cycle. For best results, this cycle should not be run more than twice.
Beyond the Clean Out Cycle, several after-cleaning care steps are recommended. The brush roll should be removed, placed in the tray to dry, and the steam bar checked for clogs and wiped with a cloth. The machine is removed from the tray, and any excess water or dirt is wiped away (the tray should not be rinsed under a faucet). The dirty water tank and strainer are emptied and rinsed as described above. The filter from the lid of the dirty water tank should be removed, cleaned with warm water and mild detergent, and dried after each use, with replacement recommended every three months. The bottom of the tank cover should also be rinsed to remove wet debris. All parts should be allowed to air dry for 24 hours before the next use. Reassembly involves reinstalling the brush roll, filter, strainer, and tank lid, ensuring the tank clicks securely into place.
For storage, the cord should be wrapped around the cord wrap, and the machine stored indoors in a dry location where it is not likely to be damaged. It is important not to store the machine where freezing may occur, as this can damage internal components. The manual also provides troubleshooting tips for common issues such as streaking, loss of suction, no spray or steam, leaking, brush roll not turning, and the Clean Out Cycle not working, guiding users through potential causes and remedies.