Do you have a question about the Bosch 4100 and is the answer not in the manual?
Safety guidelines for maintaining a safe and organized workspace.
Essential safety precautions for the operator's well-being during use.
Guidelines for proper and safe operation of the power tool.
Safe practices for maintaining the tool to ensure performance and safety.
Methods to prevent kickbacks and potential injuries during operation.
Recommendations for protective clothing and gear to ensure operator safety.
Guidelines for safe operational procedures, avoiding hazards.
Importance of using sharp, appropriate cutting tools and proper maintenance.
A concise review of critical safety instructions for immediate attention.
Emphasizes constant operator awareness and common sense for safety.
Explanation of double insulation safety features and servicing requirements.
Guidelines for selecting and using extension cords safely to prevent hazards.
Definitions of technical terms used throughout the manual for clarity.
Lists the necessary tools for assembling the table saw and its components.
Details the power switch, its safety features, and related components.
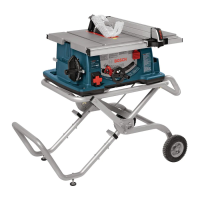
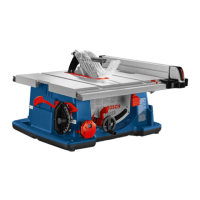
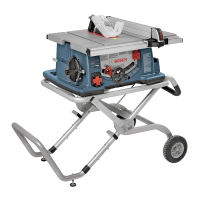
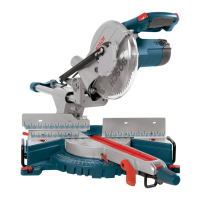
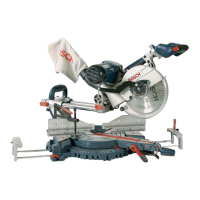
Describes the table surface, base, and sub-base for stability and support.
Explains components for adjusting blade bevel angle and scale.
Details components related to the rip fence and miter gauge for guiding cuts.
Describes storage features for accessories and vacuum hook-up.
Details the rip fence, its self-aligning feature, and storage.
Describes the components of the Smart Guard system and their functions.
Explains the table insert and the digital carriage for precise measurements.
Describes the push stick accessory for safer feeding of smaller workpieces.
Lists all loose parts included with the table saw for verification.
Step-by-step guide for attaching the Smart Guard safety system.
Instructions on how to correctly position the riving knife for the guard system.
Steps for attaching the main barrier guard assembly to the saw.
Instructions for attaching the anti-kickback device to the riving knife.
Detailed procedure for safely replacing the saw blade, including correct blade selection and safety warnings.
Guidance on selecting the correct replacement blade for optimal performance and safety.
Warnings regarding the selection of appropriate blade types to prevent injury.
Instructions for correctly attaching and aligning the rip fence.
Guidelines for securely mounting the table saw to a workbench or stand.
Steps to set precise 90 and 45 degree stops for accurate blade positioning, including 0 and 45 degree adjustments.
Procedure to ensure blade parallelism with miter gauge slots for accurate cuts.
Instructions for adjusting the miter gauge for 90 and 45 degree accuracy, including angle adjustments.
Steps to ensure the rip fence is parallel to the blade for safe ripping operations.
Procedure to set the rip fence pointer for accurate rip cut measurements.
Instructions for adjusting the table pointer relative to the rip fence pointer.
How to adjust the table insert for proper height alignment with the table surface.
Steps to check the factory alignment of the riving knife before adjustments.
Detailed procedure for adjusting the riving knife's alignment with the blade and fence.
Explanation of the power switch and its safety features to prevent accidental starting.
Details the Smart Guard system components, attachment, removal, and operation.
How to adjust and lock the blade's bevel angle using the designated controls.
Instructions for extending and securing the table extension for wider workpieces.
Overview of carriage features, buttons, display, and battery installation.
Explains ON/OFF button, memory, auto shut-off, and their functions.
Explains operation of UNITS and RESET buttons for measurement selection and zeroing.
Step-by-step zeroing instructions and explanation of display changes.
Explains the meaning of the minus sign and battery icons on the digital carriage display.
Guides for connecting the digital carriage for rip cuts on both sides of the fence.
Instructions for parking and disconnecting the digital carriage when not in use.
Steps for setting the fence for various rip cuts (0-13.5", 13.5-25", left side) using the digital carriage.
Instructions for performing bevel rip cuts on the right side with the digital carriage.
Guidance on placing the digital carriage in its parking position for safety and convenience.
Instructions for cleaning the digital carriage to ensure smooth operation.
Explains how to use the pre-cut locator to mark precise blade entry points.
Guides on using rip fence and table pointers for accurate rip cut measurements.
Instructions for rip cuts exceeding 25 inches, including limitations without scale.
Instructions for making and using push sticks and push blocks for safer cuts.
Instructions for making and using an auxiliary fence for improved guidance.
Instructions for making a featherboard to help secure workpieces.
Details the various cutting applications where the miter gauge is used.
Steps to accurately adjust the miter gauge to the desired cutting angle.
Instructions for creating and attaching an auxiliary facing for the miter gauge.
Instructions for performing repetitive crosscuts efficiently and safely.
Steps for constructing a facing block to aid repetitive crosscuts.
Detailed steps for executing repetitive crosscuts using the facing block.
Instructions for performing miter cuts at various angles with the miter gauge.
How to perform crosscuts with an added bevel angle using the miter gauge.
Guide to performing cuts that combine miter and bevel angles.
Overview of operations that utilize the rip fence for guiding cuts.
Instructions for performing bevel rips, including fence positioning and push stick use.
How to make and use an auxiliary facing for the rip fence, especially for dado/molding.
Detailed guidance on ripping, including using push sticks, blocks, and auxiliary fences.
How to use featherboards for non-thru-sawing operations when guards are removed.
Detailed steps for making rabbets along edges or ends using the saw.
Step-by-step guide for installing and using stacked dado sets for grooves and laps.
Critical safety warnings specific to dado cutting operations.
Steps to return the saw to its original configuration after dado cuts.
Warning against using adjustable or wobble dado sets due to potential interference.
Safety warnings and precautions specific to using molding head sets.
Steps to revert the saw to normal thru-cutting after using molding heads.
Information on the limitations of the saw for cutting metals and masonry materials.
General guidelines for maintaining the table saw, including cleaning and cord care.
Recommends returning the tool to a service center for specific maintenance tasks.
Lists parts requiring periodic oiling with specific lubricant types.
Lists recommended accessories for enhancing saw functionality and safety.
Troubleshooting steps for when the saw fails to start.
Troubleshooting steps for issues with the blade not reaching optimal operating speed.
Troubleshooting steps for addressing excessive vibration during operation.
Troubleshooting steps for issues with inaccurate crosscuts.
Troubleshooting steps for problems encountered during ripping operations.
Troubleshooting steps for inaccuracies in 90° or 45° cuts.
Troubleshooting steps for difficulty operating tilt lock or elevation controls.
A template for drilling mounting holes for attaching an auxiliary facing to the miter gauge.
Details the limited warranty terms for Bosch portable and benchtop power tools.
| Type | Table Saw |
|---|---|
| Blade Diameter | 10 inches |
| Max. Depth of Cut at 90 Degrees | 3-1/8 inches |
| Max. Depth of Cut at 45 Degrees | 2-1/4 inches |
| Motor | 15 Amp |
| Voltage | 120V |
| Arbor Size | 5/8 inches |
| No-Load Speed | 3650 RPM |
| Table Size | 21-1/2 inches x 27 inches |
| Dust Collection Port Size | 2.5 Inches |