Do you have a question about the Braun AESCULAP 3D EinsteinVision 3.0 and is the answer not in the manual?
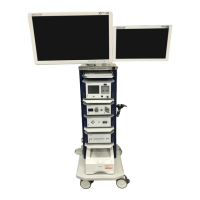
Steps to prepare the system before starting a surgical procedure.
Sequence of actions to begin the surgical procedure, including connections and initial settings.
Initial system startup and selection of surgical indications or modes.
Adjusting insufflation pressure and flow rates, including safety thresholds.
Starting, stopping, and resetting the insufflation process.
Procedure for plugging the light lead into the aperture and activating light output.
How to increase or decrease the light output using the rotation switch.
Procedure for disconnecting the light lead from the light source.
Overview of camera control buttons and the camera port connection.
Performing white balance using either the camera head or CCU button.
Information on connecting and swapping different 2D and 3D camera heads.
Detailed functions of the buttons on the 3D integrated camera head.
Detailed functions of the buttons on the 2D camera head.
Monitor displays 3D and 2D images based on the input signal.
Do not change monitor settings; use the camera head to swap between 3D and 2D.
| Category | Medical Equipment |
|---|---|
| Product Name | AESCULAP 3D EinsteinVision 3.0 |
| Manufacturer | Braun |
| Application | Surgical Visualization |
| Type | 3D Visualization System |
| Resolution | 1920 x 1080 |