EasyManua.ls Logo

Brinly PP-510 - User Manual

Brinly PP-510
18 pages
Print Icon
To Next Page IconTo Next Page
Loading...
1 L-1043-3-BEnglish Manual
Call Customer Service, Toll-Free: 877-728-8224
Important: This manual contains information for the safety
of persons and property. Read it carefully before
assembly and operation of the equipment!
Visit us on the web!
www.brinly.com
OWNER'S MANUAL
This implement is designed for
use with garden tractors equipped with
a sleeve hitch.
Tire chains and wheel weights are recommended.
English, Spanish &
French Manual
Assembly
• Installation
• Operation
• Repair Parts
MOLDBOARD PLOW, 10-Inch
MODEL:
PP-510
PP-510-A
Question and Answer IconNeed help?

Do you have a question about the Brinly PP-510 and is the answer not in the manual?

Summary

INTRODUCTION AND SAFETY

CUSTOMER RESPONSIBILITIES

Key duties for proper product operation and maintenance.

RECORD PURCHASE INFORMATION

Section to log purchase details for warranty and service.

TOOLS REQUIRED FOR ASSEMBLY

List of necessary tools for assembling the equipment.

SAFETY LABELS

Explanations of safety symbols and warnings found on the product.

SAFETY

GENERAL SAFETY NOTES

Essential precautions for safe operation of the plow and tractor.

TOWING VEHICLE AND TOWING SAFELY

Guidelines for safe towing practices, including speed and hitch use.

PROTECT THOSE AROUND YOU

Measures to ensure the safety of bystanders and pets during operation.

KEEP RIDERS OFF THE TOWED ATTACHMENT AND TOWING VEHICLE

Warning against carrying passengers on the plow or tractor.

ASSEMBLY

Assembly Tips

Advice for efficient and safe assembly of the plow.

Step 1 PLOW FRAME

Instructions for assembling the main plow frame components.

Step 2 CRANK HANDLE

Steps to assemble the crank handle mechanism.

Step 3 HITCH BRACKET

Instructions for attaching the hitch bracket to the beams.

Step 4 PLOW BOTTOM AND STANDARD

Assembling the plow bottom and standard parts.

Step 5 PLOW FRAME AND BOTTOM

Connecting the plow frame to the bottom assembly.

Step 6-A COULTER BLADE

Initial steps for mounting the coulter blade.

Step 6-B COULTER BLADE

Completing the coulter blade assembly.

Step 7 COULTER ASSEMBLY

Attaching the complete coulter assembly to the plow.

USE AND CARE

SPECIFICATIONS

Technical details and dimensions of the plow.

PRE-ADJUSTMENT

Initial setup and adjustments required before plowing.

Adjust the Plow Coulter

Instructions for adjusting the coulter's position for optimal plowing.

Make your first two furrows

Guidance on starting plowing and making initial passes.

Position your tractor

How to align the tractor for plowing into the furrow.

Start plowing for a short distance

Checking and setting the correct plowing depth.

TRACKING ADJUSTMENT

Adjusting plow alignment for straight plowing and proper width.

TIPS

Practical advice and best practices for effective plowing.

PLOW DEPTH ADJUSTMENT

Fine-tuning the plowing depth for optimal results.

TRACTION

Recommendations for tire weights and chains for improved traction.

COULTER ADJUSTMENT

Detailed steps for coulter adjustment and its role in plowing.

MAINTENANCE

Procedures for keeping the plow in good condition and preventing rust.

SERVICE

Information on customer service, contact details, and quality.

TROUBLESHOOTING

Solutions for common plowing difficulties and their remedies.

MANUFACTURERS LIMITED WARRANTY

WARRANTY PERIOD

Details the duration of coverage for different plow parts.

Overview

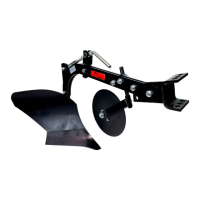
This document is an owner's manual for the Brinly PP-510 and PP-510-A 10-Inch Moldboard Plow. It provides comprehensive information on assembly, installation, operation, and repair parts for the equipment.

Function Description:

The Brinly Moldboard Plow is an accessory designed for use with garden tractors equipped with a sleeve hitch. Its primary function is to turn over soil, preparing it for planting. The moldboard plow cuts a furrow, inverting the soil to bury weeds and crop residue, bringing fresh nutrients to the surface. The manual emphasizes that tire chains and wheel weights are recommended for optimal performance, suggesting the device is intended for demanding soil-tilling tasks.

Important Technical Specifications:

  • Model: PP-510, PP-510-A
  • Working Width: 8" - 10"
  • Primary Material: Steel
  • Compatibility: All garden tractor models (must be equipped with a sleeve hitch, purchased from the tractor manufacturer).
  • Settings / Speed: 3rd Gear, Full Throttle, Steady Pace (recommended for operation).
  • Dimensions:
    • Length: 42"
    • Width: 12"
    • Height: 23"
  • Plowing Depth: Approximately 5"-6" (pre-set and adjustable).

Usage Features:

The manual outlines detailed steps for assembly, pre-adjustment, and operation to ensure safe and effective use.

Assembly:

The assembly process is broken down into several steps, starting with the plow frame, then the crank handle, hitch bracket, plow bottom and standard, and finally the coulter blade. Illustrations are provided to scale for easier hardware identification. Key components include:

  • Plow Frame: Assembled with adjusting brackets and beams.
  • Crank Handle: Used for depth adjustment, threaded through a trunnion and secured with jam nuts. Proper adjustment ensures the crank moves freely without binding.
  • Hitch Bracket: Aligned between the beams based on the tractor's rear wheel width, with a chart provided for selecting the correct mounting hole (1R, 2L, 3L).
  • Plow Bottom and Standard: The landside, frog, and standard are assembled using plow bolts, hex nuts, and carriage bolts. A tracking adjusting bolt and square nut are used to secure the standard to the frog, allowing for tracking adjustments.
  • Coulter Blade: Inserted into a fork, secured with a drive pin, and then attached to the plow beam using a U-bolt, coulter clamp, spacers, and hex nuts. The coulter standard's position can be adjusted.

Pre-Adjustment and Operation:

  • Initial Setup: Stabilizer bolts and nuts should be removed from the sleeve hitch to allow free side-to-side movement. The tractor lift handle must be lowered and locked.
  • Mounting: The plow mounts to the sleeve hitch using the hitch pin.
  • Lift Spring Tension: Adjustment may be required based on the hitch manual.
  • Depth Adjustment: The depth crank is adjusted so the plow share point is on the ground and the rear of the plow landside is approximately 1" off the ground. This initial angle allows the plow to run level when the right tractor wheels are in the previously plowed furrow.
  • First Furrows: Instructions guide the user to make initial furrows (1-2 and 3-4 in Figure 2) with the tractor in 3rd gear and near full throttle, lifting the plow for turns.
  • Pitch (Depth) Readjustment: After initial furrows, the plow's pitch must be readjusted to a 5"-6" plowing depth. The depth crank is adjusted one turn at a time, clockwise to lower the plow and counter-clockwise to elevate it.
  • Coulter Adjustment: The coulter should slice 2"-3" deep. It is adjusted by loosening hex nuts, moving the assembly up or down, and rotating it to the left to prevent it from swinging into the plow beam. The coulter should have a normal free swing range to the left. In extremely hard soil, the coulter may need to be raised or removed.
  • Tracking Adjustment: If the plow tracks left or overcuts, the tracking adjusting bolt can be turned clockwise to correct it.
  • Traction: Wheel weights and tire chains (or rear chevron tires) are required for most plowing conditions.
  • Plowing Conditions:
    • Tall Weeds/Grass: Must be cut down with a rotary mower before plowing.
    • Soil Moisture: Avoid plowing when soil is too wet (doesn't crumble when rolled into a ball) or too dry (difficult to penetrate).
    • Packed Soil: Avoid low areas, old roadways, and paths.
    • Thick Sod: Expect difficulty; proper settings for coulter, hitch, and crank are crucial.
    • Ideal Depth: 5 to 6 inches.
    • Plowing Speed: Move steadily in 3rd gear at full throttle.
    • Light Soil: Higher gear may be used, but too fast can result in uneven furrows.
  • Safety: The "Attachment Clutch" switch on the tractor dash must be ENGAGED during operation to actuate the Operator Sensing Device. Failure to do so can cause personal injury or damage if the operator dismounts.

Maintenance Features:

  • Moldboard Condition: Keep smooth and polished. Use sandpaper, steel wool, kerosene, or naphtha to restore finish on rusty moldboards.
  • Coulter Blade: Keep sharp; use a flat file for sharpening.
  • Coulter Hub Bearing: Lubricate every 4 hours through the grease fitting with multipurpose grease.
  • Crank: Keep a light coating of oil on threads to prevent rust and ensure smooth operation.
  • Fasteners: Keep all nuts, bolts, and screws tight. Inspect for damage after striking foreign objects and repair before operating.

Troubleshooting:

The manual includes a troubleshooting guide for common plowing difficulties:

  • Slow Ground Entry: Check crank adjustment, worn plow share, dry/hard ground, or restricted hitch downward movement.
  • Plow Cutting Too Wide: Adjust tracking.
  • Tracking Issues (Plow Tracks Left/Ragged Wall): Adjust tracking.
  • Plow Bottom Won't Polish: Clean bottom frequently with turpentine, mineral spirits, old brick, pumice, or oil and sand.
  • Uneven Plowing Depth: Check soil texture/moisture, reduce tractor speed in hard spots, or adjust depth crank.

Warranty:

Brinly-Hardy Company provides a limited warranty against defects in material and workmanship.

  • Standard / Residential Use:
    • Frame Parts: 2 years
    • Moldboard Plow: 2 years
    • Other normal wear parts/component failures: 90 days
  • Commercial Application: 90 days for all parts. The warranty requires proof of purchase and proper assembly, operation, and maintenance as per the manual. It does not cover routine maintenance, normal wear, transportation/labor charges, or commercial/rental use for standard warranties. The warranty is void if a sleeve hitch is not used.

Brinly PP-510 Specifications

General IconGeneral
BrandBrinly
ModelPP-510
CategoryTractor Accessories
LanguageEnglish

Related product manuals