Do you have a question about the Brunswick Canton and is the answer not in the manual?
Connect legs to end stretchers using 3/8-16 hex head screws and 3/8 washers.
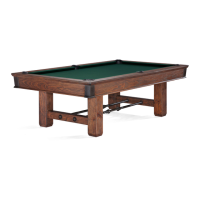
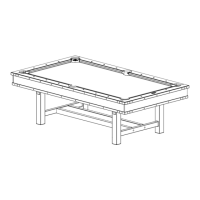
Attach side sills "A" to legs and cross supports "B" between leg posts with hardware.
Attach baseframe sills "C" and slate attach cleats to the baseframe structure.
Attach center support sill "E" and position baseframe for adequate clearance.
Assemble stretchers using threaded rods and turnbuckles, noting thread designation.
Fasten stretcher bar assemblies to the baseframe legs using 3/4" screws and washers.
Square the baseframe using a carpenter's square or diagonal measurements.
Place a level on the baseframe and use shims to ensure all legs have positive bearing.
Position the center slate section evenly between cross supports with equal overhang.
Position end slate sections, check overhang, drill pilot holes, and fasten securely.
Level end slates with wedges, fasten, shim center slate, and fill joints with putty or wax.
Cut cloth strips and glue them to pocket cutouts for cushioning and durability.
Lay bed cloth with correct nap direction, allow specific overhangs, and tack initial points.
Stretch and tack bed cloth along sides, head, foot ends, and towards pocket openings.
Cut cloth at side pocket openings, pull into opening, and tack securely to the frame.
Tack cloth at head and foot ends, maintaining uniform overhang and stretching tightly.
Tack cloth along all sides and ends at 2" centers, ensuring it is kept even.
Stretch cloth into corner pockets, tack, and trim excess cloth around the slate perimeter.
Place rail cloth with overhang, featherstrip, and stretch tightly towards ends.
Pull cloth toward the rubber cushion an additional 3/4" and tap featherstrip down.
Trim excess cloth on the cushion side of the featherstrip along its total length.
Fold cloth over rail front and featherstrip flush with the rail surface.
Fold cloth over mitred edge at corner pockets, stretch tightly, and staple.
Staple at pocket facing, trim excess, and staple end rails working towards ends.
Trim excess cloth from the bottom of the rail flush with the cloth relief groove.
At side pockets, stretch cloth tightly over cushion nose and staple three places.
Slit cloth to cushion nose edge, pull strip to rear, and staple at rear of facing.
Hold small fold in place, pull strip down, and staple at rear of facing and rail bottom.
Attach rail spacers to the end of head and foot rails, aligning flush with surfaces.
Position rails upside down, insert threaded studs, washers, lock washers, and nuts.
Attach side and end aprons to rails using screws and washers, aligning corners with brackets.
Turn assembly over, align studs with slate holes, and attach pockets using nails.
Brush bed area, position bed spot, and roll a ball over it for adhesion.
| Brand | Brunswick |
|---|---|
| Model | Canton |
| Category | Indoor Furnishing |
| Language | English |