V. DEFROST
Defrost cycle is controlled by a thermistor which is located in the
fresh-air intake passage (the thermistor unit is connected to J4 of
control module (See Fig. 27 and 28). When defrost temperature
sensor detects the need for defrost, K5 relay will close for 6
minutes while K1 and K2 remain energized.
This closes the outdoor air damper while running HRV blower on
high-speed. This process recirculates warm indoor air through heat
recovery core which melts any frost that has formed. Water created
in this process is collected by HRV and drained away. Frequency
of the defrost cycle depends on outdoor temperature (see Table
10).
If defrost is not working properly, check for proper damper
operation. To do this, turn unit to OFF position. Damper should
close.
SAFETY FEATURE
This new control has an added safety feature. If microprocessor
does not detect the thermistor or detects a short circuit, unit will
automatically go intoa6minute defrost cycle every 20 minutes.
A. Defrost Check
1. Make sure defrost cable is properly connected into J4.
2. Make sure thermistor assembly is correct. Measure ther-
mistor temperature reading with multimeter. Select multi-
meter DC measurement scale 0-20v. At connector J4
(without removing thermistor cable), measure voltage be-
tween pins of thermistor cable. Depending on temperature
of outside air intake, values should correspond with those in
Table 9.
If reading is not correct (reading 0v for short circuit or 5v
for open circuit), change thermistor assembly.
3. If thermistor is good, do a RESET and see if defrost works.
If defrost still does not work, change circuit board.
B. Advanced Debugging
Defrost can be simulated using the following procedures:
1. Unplug unit from 115vac.
2. Disconnect thermistor assembly from J4.
3. Replug unit in 115vac and select high-speed exchange.
4. Defrost should start within 2 minutes after high-speed
exchange has been initiated.
5. After test unplug unit.
6. Connect thermistor cable to J4.
7. Replug unit back in 115vac.
VI. CONTROL MODULE JUMPERS
Jumpers on the control module give exact configuration to HRV
micro-controller. If there is a mistake in the jumper configura-
tion,it can cause improper unit operation. This control has a
simplified jumper selection mode. Jumper selection is done by the
presence or absence of jumper at specific location (See Tables 11
and 12).
WARNING: ELECTRICAL SHOCK HAZARD
Failure to follow this warning could result in personal
injury or death.
Always disconnect unit from 115vac prior to making any
jumper change. If unit is not disconnected, micro-
controller will never see jumper change.
VII. ERROR SIGNALING
Two types of error can be signaled by the wall control (automatic
wall control only). In case of error, indicators on wall control will
flash.
When error occurs, set dehumidistat at 80 percent position. This
will enable you to properly troubleshoot problems.
TYPE 1—LOSS OF MEMORY (AUTO MODEL ONLY)
All indicators flash rapidly (rate of about once every sec). When
this occurs, reset power and check if problem still exists. If
indicators are still flashing, check red wire for shorting on another
component. If error still exists, wall control has lost its memory.
Replace wall control.
The defective wall control still works even when flashing, it is
working in backup mode. Original modes of wall control are
replaced by backup mode (See Table 13).
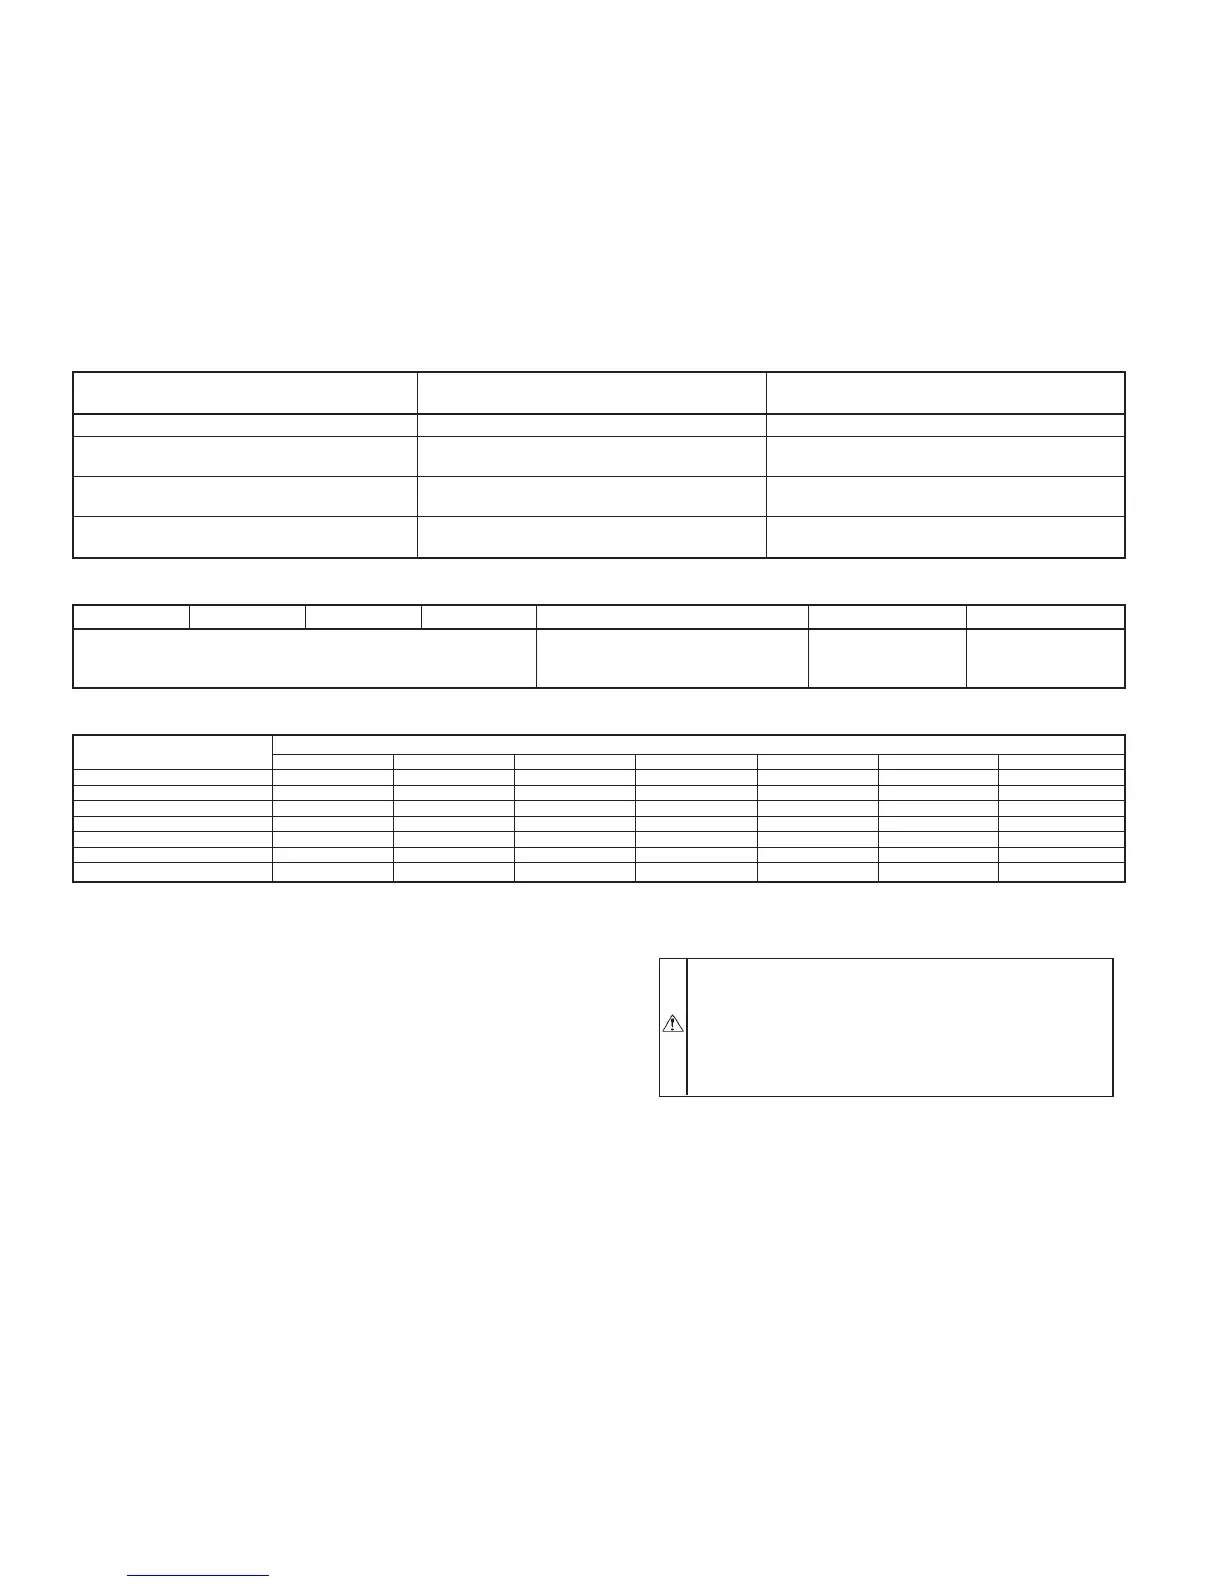
TABLE 10—DEFROST CYCLE
OUTSIDE TEMPERATURE °F
STANDARD DEFROST (AS
SHIPPED)
EXTENDED DEFROST
(JUMPER JU1-F REMOVED)
Above 23°F No Defrost No Defrost
23°Fto5°F
6 Minute Defrost/60Minute Ex-
change
10 Minute Defrost/30 Minute Ex-
change
4°F to -17°F
6 Minute Defrost/32 Minute Ex-
change
10 Minute Defrost/20 Minute Ex-
change
Below -18°F
6 Minute Defrost/20 Minute Ex-
change
10 Minute Defrost/15 Minute Ex-
change
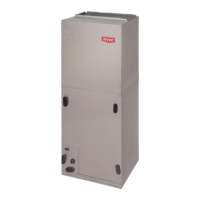
TABLE 11—JU1 JUMPER DEFINITION
JU1A JU1B JU1C JU1D JU1E JU1F JU1G
UNIT IDENTIFICATION
Reverse Damper Operation
In = Normal
Out = Inverse
Factory Set
Always In
Factory Set
Always In
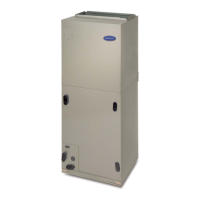
TABLE 12—JUMPER LOCATIONS
MODEL
JUMPER TABLE
JU1A JU1B JU1C JU1D JU1E JU1F JU1G
HRVBBLHU1150 OUT IN IN OUT IN IN IN
HRVBBLHU1250 OUT IN IN OUT IN IN IN
HRVBBSVU1150 OUT OUT OUT OUT IN IN IN
HRVBBSVU1250 OUT OUT OUT OUT IN IN IN
HRVBBLVU1150 OUT OUT OUT OUT IN IN IN
HRVBBLVU1200 OUT OUT OUT OUT IN IN IN
HRVBBLVU1330 OUT OUT OUT OUT IN IN IN
—16—