58
VERSASSAGE JETS MAINTENANCE
If you notice that the VERSASSAGE jets spin slower than when the spa was new, or the jets are sticking, the cause could be a build-up of deposits inside the jet
bearings. To remove the deposits, use the following instructions:
1. With the spa off, rotate the VERSASSAGE jet face counter-clockwise until it stops.
2. Once the face stops rotating, use a little extra force to rotate the face even more counter-clockwise past the locking position until it stops. Pull face with the
body away from the spa.
3. After flushing the bearing inside the body with water, spin the rotating eye. It should spin very freely. If it does not, place the bearing end in a cup of vinegar (the
vinegar will soften any deposits). Let it soak overnight. The next day, flush with water and repeat the spin test.
NOTE: If it still doesn’t spin freely, then a second night of soaking is required. If the bearing still does not spin, you will have to purchase a new bearing from
your CALDERA dealer.
4. To replace, position the cutout at the back end of the face body downward and push the face body back into the spa fitting. Slighly rotate the face body in
either direction until you feel the body align with the fitting. Then press firmly on the face body. Once seated, rotate the face clockwise using a little extra force
to overcome the locking position. If the face does not rotate, remove and rotate face body 180° and repeat this step. When you turn the jet pump on, the
VERSASSAGE jet should spin freely.
DRAINING YOUR SPA
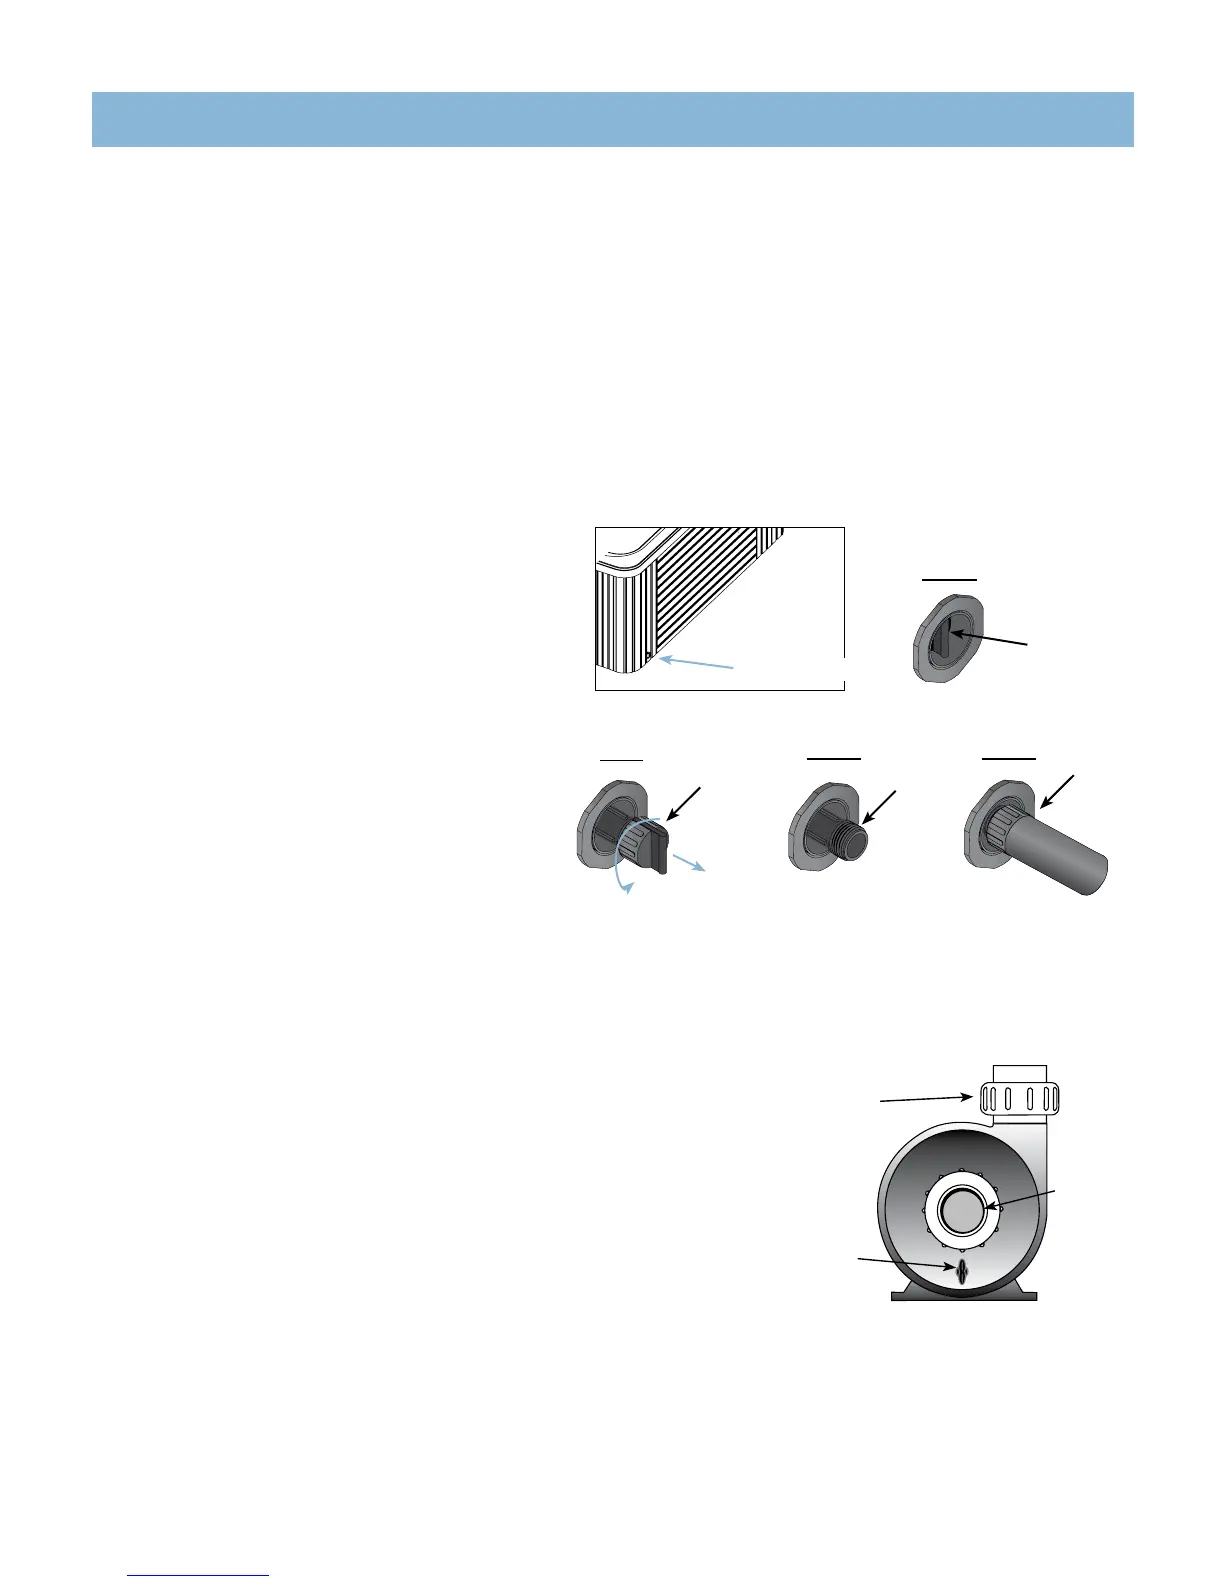
1. Locate the main drain valve for the spa. Pull on the handle (Step 1,
pliers may be used to pull handle) until you reach the mid position.
Then rotate the handle slightly to fully extended the drain tube
(drain cap and 1” of the drain tube is exposed) (Step 2). Remove
the drain cap (Step 3).
NOTE: Do not remove drain cap in mid position. Attach the garden
hose to the end of the drain (to avoid flooding of the foundation
surrounding the spa), making sure not to push the drain tube
inwards. Route the outlet of the hose to an appropriate draining area.
NOTE: Spa water with a high sanitizer level may harm plants and
grass.
2. Push the garden hose and drain tube half the way back towards the
spa (Step 4) which will start the gravitational flow. Drain tube must
be in the mid position for the spa to drain.
IMPORTANT: All models will drain almost completely through the
drain valve. Equipment such as the jet pump and heating system
will drain. Any water remaining within the plumbing or equipment after draining will only need to be removed if the spa is being winterized.
3. After your spa is empty, clean the shell and filter cartridge.
4. Pull and remove garden hose, replace the drain cap, and push drain tube back into spa as seen in Step 1.
5. Follow the “START-UP AND REFILL PROCEDURES” to refill your spa.
PREVENTION OF FREEZING
Your spa has been designed and engineered for year-round use in any climate. In some areas, extremely
cold temperatures (below -12°C or 10°F) combined with strong wind, may cause partial freezing of the jet
pump, even though the water inside the spa remains at the selected temperature. The energy efficiency
of the spa may also decrease during these cold periods, as the heater will cycle more frequently. As an
additional precaution against partial freezing of some of the components, the equipment compartment
can be insulated with an insulating kit (available from your local dealer). This insulating kit will also help to
maximize the spa’s energy efficiency.
NOTE: When warmer weather returns (approx. 16°-21°C or 60-70°F), the insulating kit must be removed
to prevent overheating of the jet pump.
WINTERIZING YOUR SPA
If you leave the spa unused for a long period of time in severely cold weather, you should drain the spa
and winterize it to avoid accidental freezing due to a power or equipment failure. Follow the directions on
the next page.
DANGER: Use only Propylene Glycol as your anti-freeze (available at most RV or marine supply stores). This is non-toxic. Never use an automobile anti-freeze
(Ethylene Glycol) since it is toxic!
WARNING: Failure to follow these instructions correctly can lead to freeze damage not covered by warranty. It is strongly recommended that you contact your local
dealer to perform this service.
1. Drain your spa following the Draining Your Spa section in the owner’s manual.
DRAIN
Step 1
Step 2
Step 3
Handle
Drain Cap
with
Handle
Garden
Hose
Drain
Tube
Step 4
PUMP DRAIN PLUG LOCATION
DISCHARGE
UNION
SUCTION
UNION
FRONT VEIW OF PUMP
PUMP PLUG
MAINTENANCE



 To Next Page