7
1
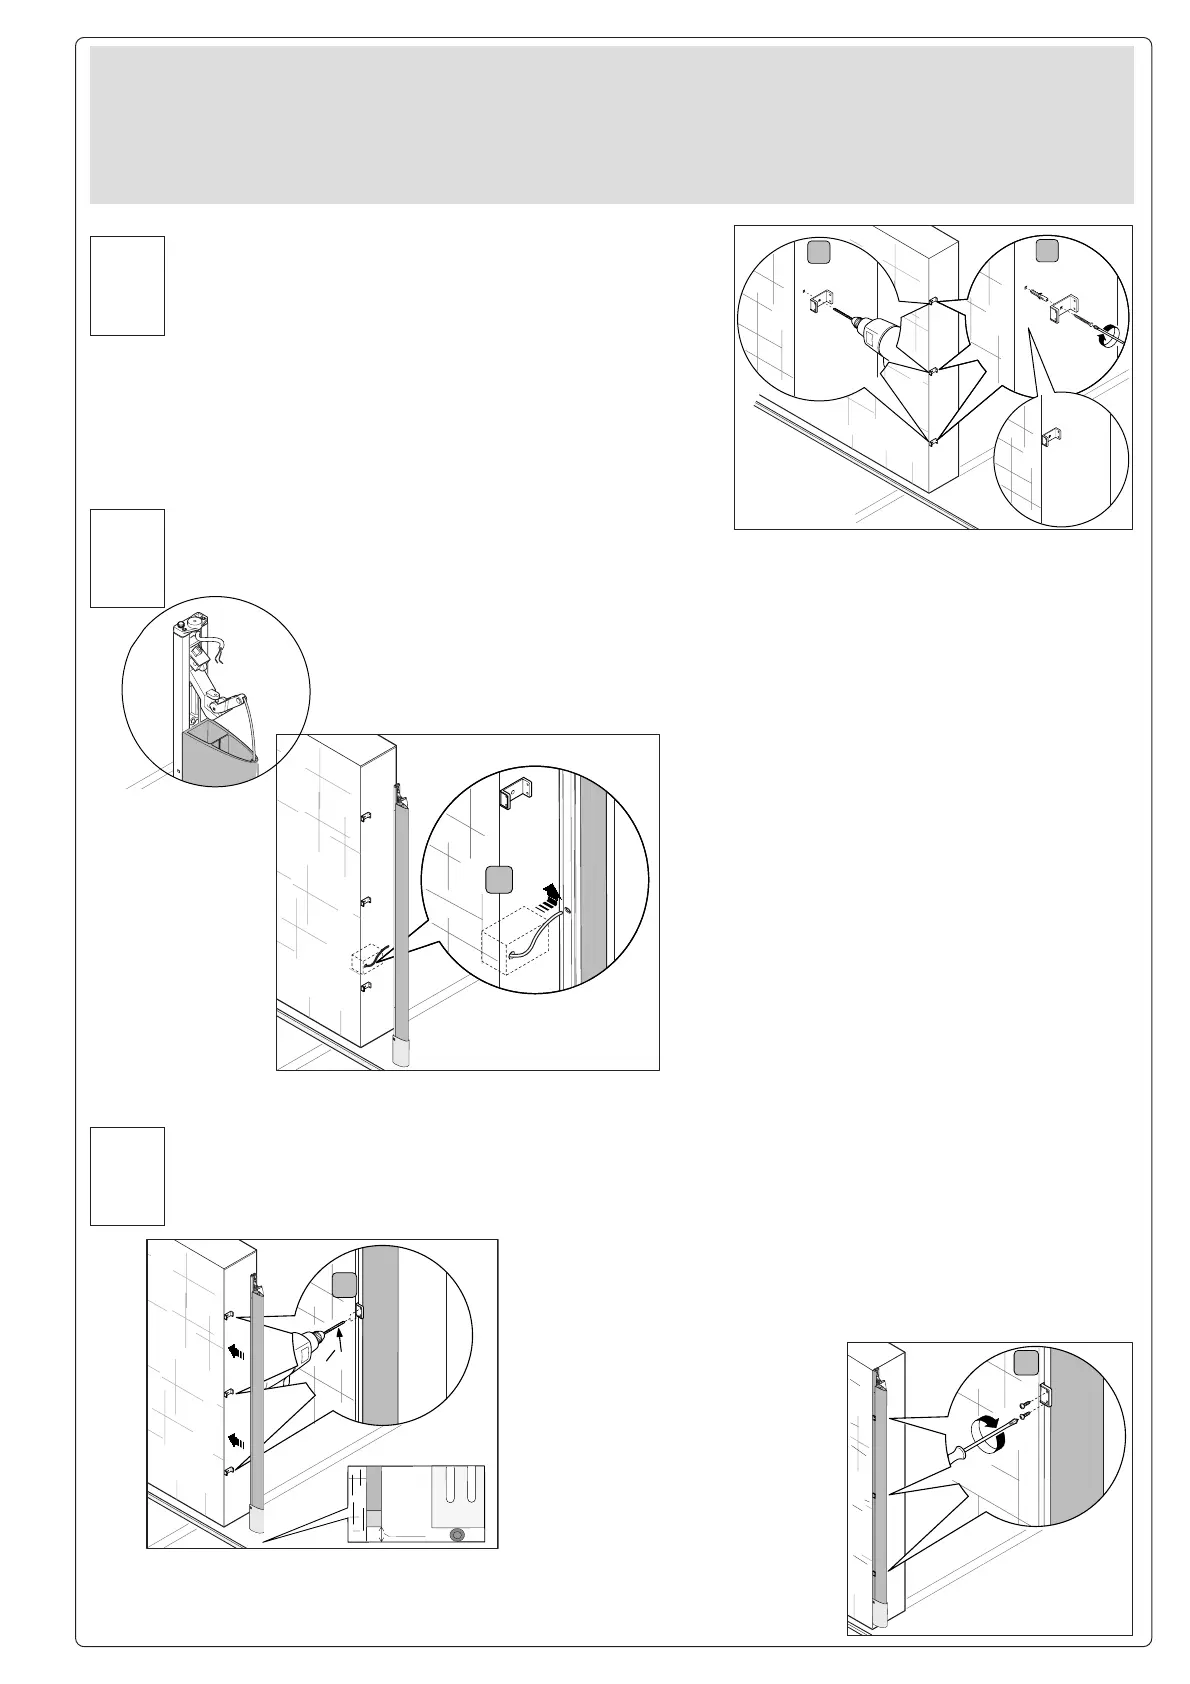
Posizionare le tre staffe di fissaggio equidistanti, forare e fissare
con gli elementi adatti a seconda della superfice.
Position the three fixing brackets at equal distances, drill and then
secure with the suitable elements depending on the superfive.
Placer les trois brides de fixation à la même distance, percer et
fixer avec les éléments appropriés en fonction de la surface.
Die drei Befestigungsbügel abstandsgleich positionieren, lochen
und mit den für die Oberfläche geeigneten Elementen befestigen.
Coloque los tres estribos de fijación equidistantes, taladre y fíjelos
con los elementos adecuados para el tipo de superficie.
Plaats de drie bevestigingsbeugels op gelijke afstand, boor gaten
en bevestig met geschikte hulpmiddelen afhankelijk van het
oppervlak.
ESEMPIO DI POSA DELLA COSTA VERTICALE SU PILASTRO
EXAMPLE OF LAYING THE VERTICAL RIB ON THE PILLAR
EXEMPLE DE POSE DU BORD VERTICAL SUR LE PILIERBEISPIEL
FÜR DIE ANBRINGUNG DES VERTIKALEN STEGES AUF EINEM PFEILER
EJEMPLO DE COLOCACIÓN DE LA GOMA VERTICAL EN UNA COLUMNA
VOORBEELD VAN PLAATSING VAN DE VERTICALE RIBBE OP EEN ZUIL
FASE
PHASE
PHASE
PHASE
8
ETAPA
FASE
Forare il profilo con una punta da Ø 2,5 (fase 10 fig.1) e fissarlo con viti UNI 6954 Ø 3,9 x 13 (fase 10 fig.2).
Drill the section with a 2.5 Diam. bit (phase 10, fig.1) and secure it with UNI 6954 screws DIA 3.9 x 13 (phase 10, fig.2).
Percer le profilé avec une mèche de Ø 2,5 (phase 10 fig. 1) et le fixer avec les vis UNI 6954 Ø 3,9 x 13 (phase 10 fig.2).
Das Profil mit einer Spitze von Ø 2,5 (Phase 10 Abb.1) durchlochen und mit
Schrauben UNI 6954 Ø 3,9 x 13 (Phase 10 Abb.2) befestigen.
Taladre el perfil con una punta de Ø 2,5 (etapa 10 fig.1) y fíjelo con los
tornillos UNI 6954 Ø 3,9 x 13 (etapa 10 fig.2).
Boor een gat in het profiel met een boorpunt met Ø 2,5 (fase 10 fig.1) en bevestig
met behulp van schroeven UNI 6954 Ø
3,9 x 13 (fase 10 fig.2).
FASE
PHASE
PHASE
PHASE
10
ETAPA
FASE
1
O 2,5
Prevedere foratura passaggio cavo sul profilo in alluminio (fase 9, fig.1) e far scorrere il cavo (2x1)
per i collegamenti elettrici. Per facilitare lo scorrimento del cavo attraverso il profilo, è consigliato
l'uso di una sonda. Negli articoli: DF 15 / 17 / 20 il foro è già predisposto.
Make a hole in the aluminium section to pass the cable (phase 9, fig.1) and slide through the cable (2x1)
for the electrical connections. To make it easier to slide the cable through the section, we recommend
using a probe. In the articles: DF 15 / 17 / 20 the hole is already made.
Percer un trou sur le profilé en aluminium (phase 9, fig. 1) et faire passer le câble (2x1) pour les
branchements électriques. Il est conseillé d’utiliser une
sonde pour que le câble passe plus facilement dans le
profilé. Le trou est déjà prévu pour les modèles: DF 15 /
17 / 20.
Ein Loch für den Kabeldurchgang auf dem Aluminiumprofil
(Phase 9, Abb. 1) anbringen und das Kabel (2x1) für die
elektrischen Anschlüsse hindurchziehen. Für diesen Vor-
gang sollte eine Sonde benutzt werden. Bei den Artikeln:
DF 15 / 17 / 20 wurde das Loch bereits vorgesehen.
Perfore el perfil de aluminio para pasar el cable (etapa 9,
fig.1) y haga pasar el cable (2x1) para las conexiones
eléctricas. Para facilitar el deslizamiento del cable a
través del perfil, se aconseja utilizar una sonda Los
artículos: DF 15 / 17 / 20 ya están perforados.
Boor een gat in het aluminiumprofiel voor de doorgang van
de draad (fase 9, fig.1) en breng de draad (2x1) er doorheen
voor de verwezenlijking van de elektrische aansluitingen. Om
de draad beter door het profiel te brengen kan best een sonde
gebruikt worden. Voor de artikels DF 15 / 17 / 20 werd dit gat
reeds voorzien
FASE
PHASE
PHASE
PHASE
9
ETAPA
FASE
 Loading...