6−22T-364
6.22.7 Sensor, CPDS Re-Installation
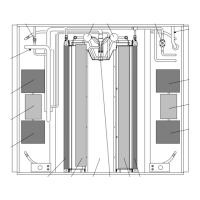
To replace the Compressor Discharge Temperature
Sensor, see Figure 6−19:
1. Ensure the unit is disconnected from the power
source and that ST is in OFF position.
2. Remove the existing sensor. Clean all silicone sealer
and dielectric compound from the sensor well. En-
sure well is clean and dry. The top of the compressor,
where the sensor seals, must also be clean and dry.
SENSOR WELL
SENSOR
SILICONE BEAD
Figure 6−19 Compressor Discharge Temperature
Sensor
3. Using the syringe supplied with the replacement
sensor, squeeze all of the dielectric compound into
the sensor well.
4. Place a bead of the silicone sealer supplied with the
replacement sensor around the sensor sealing ring.
Insert sensor into the well with the leads parallel to
the suction fitting.
5. Reconnect the sensor (see Figure 6−15) and run
Pre−trip P5.
6.23 VENT POSITION SENSOR (VPS)
The vent position sensor (VPS) determines the position
of the fresh air vent in near real-time via the Cd55.
The fresh air vent position sensor alarm (AL50) will oc-
cur if the sensor reading is not stable for four minutes or
if the sensor is outside of its valid range (shorted or
open). This can occur if the vent is loose or the panel is
defective. To confirm a defective panel, assure that the
wing nut is secure and then power cycle the unit. If the
alarm immediately reappears as active, the panel
should be replaced.
The alarm should immediately go inactive, check the
4-minute stability requirement. If the alarm reoccurs af-
ter the four minutes and the panel was known to have
been stable, then the sensor should be replaced.
Upper VPS:
In order to replace the Upper VPS, the panel must be re-
moved and replaced with another upper fresh air panel
equipped with VPS.
Upon installation, a new VPS assembly requires calibra-
tion as follows:
1. Rotate the vent to the 0 CMH/ CFM position.
2. Cd45 will automatically display. Press the Enter key
and hold for five seconds.
3. After the enter key has been pressed the display will
read CAL (for calibration).
4. Press the ALT MODE key and hold for five seconds.
5. After the calibration has been completed, Cd45 will
display 0 CMH / CFM.
 Loading...