6−12T-364
6.17 ECONOMIZER SOLENOID VALVE
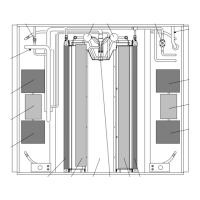
1
3
2
4
5
1. Slotted Screw
2. Top Coil (small) O−ring
3. Solenoid Coil, Enclosing Tube and Body
4. Bottom Coil (large) O−ring
5. Brass Spacer
Figure 6−10 Coil View of Economizer Solenoid
Valve (ESV)
a. Removing a Solenoid Valve Coil:
WARNING
Always turn OFF the unit circuit breaker
(CB-1) and disconnect main power supply
before working on moving parts.
1. Turn unit power off and remove power from the unit.
Disconnect leads.
2. Remove top screw and o−ring. Remove coil and
save mounting hardware, seals and spacer for re-
use. (See Figure 6−10). Refer to step d. for valve coil
replacement.
b. Removing the Solenoid Valve:
1. Pump down the compressor (refer to paragraph
6.4) and frontseat both suction and discharge
valves.
2. VALVE REMOVAL: The preferred method of re-
moving the solenoid valve is to cut the connection
between the brazed section and the valve, using a
small tube cutter. Remove valve.
Alternately, heat inlet and outlet connections to
valve body and remove valve.
3. Clean the valve stem with mild cleaner, if necessary.
c. Installing the Solenoid Valve:
1. Fit the new solenoid valve into position and braze.
Use a wet rag to keep valve cool whenever brazing.
d. Installing the Solenoid Valve Coil:
1. Install the brass spacer on the valve stem.
2. Lubricate both o−rings with silicone provided in the
kit.
3. Install bottom coil o−ring on the valve stem.
4. Install the solenoid coil on the valve stem.
5. Place the top coil o−ring on the coil mounting screw
and secure the coil to the valve using a torque−
wrench. Torque the screw to 25 in−lbs.
6. Connect coil wires using butt−splices and heat−
shrink tubing.
6.18 ECONOMIZER EXPANSION VALVE
The economizer expansion valve is an automatic device
that maintains constant superheat of the refrigerant gas
leaving at the point of bulb attachment, regardless of
suction pressure.
Unless the valve is defective, it seldom requires main-
tenance other than periodic inspection to ensure that the
thermal bulb is tightly secured to the suction line and
wrapped with insulating compound.
6.18.1 Economizer Expansion Replacement
Inlet
Outlet
Figure 6−11 Economizer Expansion Valve
a. Removing the Economizer Expansion Valve:
NOTE
The economizer expansion valve is a hermetic
valve, it does not have adjustable superheat
(See Figure 6−11).
1. Pump down the compressor (refer to paragraph 6.4)
and frontseat both suction and discharge valves.
Evacuate if unit is not equipped with service valves.
Refer to paragraph 6.6.1.
2. Turn unit power off and remove power from the unit.
3. Remove cushion clamps located on the inlet and out-
let lines.
4. Remove insulation (Presstite) from expansion valve
bulb.
5. Unstrap the bulb, located on the economizer line.
 Loading...