6−5
T-364
6.8 COMPRESSOR
WARNING
Make sure power to the unit is OFF and power plug
disconnected before replacing the compressor.
WARNING
CAUTION
6.8.1 Removal and Replacement of Compressor
a. Turn the unit ON and run it in full cool mode for 10
minutes.
NOTE
If the compressor is not operational, front-seat
the suction and discharge service valves and
go to step e. below.
b. Frontseat the manual liquid li ne valve and allow the
unit to pull−down to 0.1 kg/cm
2
(1 psig).
c. Turn the unit start −stop switch (ST) and unit circuit
breaker (CB −1) OFF, and disconnect power to the
unit.
d. Frontseat the discharge and suction service valves.
e. Remove all remaining refrigerant from the com-
pressor using a refrigerant recovery system.
f. Remove the compressor terminal cover, disconnect
the ground wire and pull the cable plug from the com-
pressor terminals. Install the terminal cover back
after removing the power cable.
NOTE
Inspect the power cable (plug) terminals to en-
sure they are not deformed or have any signs of
heat or arcing. If any damage is noted, replace
the power cable.
g. Remove the Rotalock ttings from the suction and
discharge service connections, and uncouple the
unloader and economizer lines from the com-
pressor.
h. Cut the dome temperature sensor (CPDS) wires.
The replacement compressor comes with a CPDS
already assembled.
i. Remove and save the compressor base mounting
bolts. Discard the 4 top resilient mounts and wash-
ers.
j. Remove (slide out) the old compressor from the unit.
k. Inspect compressor base plate for wear. Replace, if
necessary.
l. Wire tie the compressor base
plate to the com-
pressor, and slide the new compressor into the unit.
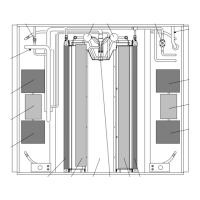
Refer to Figure 6 −5.
1
3
4
2
10
9
8
7
11
12
7
6
2
5
1. Compressor
2. Teon Seal for Valve
Connection (2)
3. O −Ring (Unloader
Connection)
4. Compressor Dis −
charge Temperature
Sensor
5. O −Ring (Economizer
Connection)
6. Base Mounting Bolts
7. SST Washers
8. Resilient Mount
9. Mylar Washers
10. Wire Ties
11. Power Cable Gasket
12. Ground Connection
Screw
13. Power Cable
Lubricant − Krytox
(Not Shown)
Figure 6 −5 Compressor Kit
NOTE
DO NOT add any oil to the replacement com-
pressor. Replacement compressor is shipped
with full oil charge of 60 oz.
m. Cut and discard the wire ties used to hold the base
plate to the compressor.
n. Place the new SST washers on each side of the resi-
lient mounts, and the new Mylar washer on the bot-
tom of it as shown in Figure 6 −5. Install the four base
mounting bolts loosely.
CAUTION
The PrimeLINE unit has a hermetically sealed
compressor that should not be opened and/or
repaired. Doing so can cause a loss in performance
and premature system failure due to the precision
machinery and assembly required within the
compresor. To repair the unit, remove the faulty
compressor and replace with an approved Carrier
compressor. If the return of the compressor is not
required, follow local waste collection and recycling
regulations in discarding the compressor.
The scroll compressor achieves low suction pressure
very quickly. Do not use the compressor to evacuate
the system below 0 psig. Never operate the compr-
essor with the suction or discharge service valves
closed (frontseated). Internal damage will result
from operating the compressor in a deep vacuum.
Before disassembly of the compressor, be sure to
relieve the internal pressure very carefully by
slightly loosening the couplings to break the seal.
 Loading...