
G
George RamirezJul 29, 2025
Why won't my Celestron Microscope turn on?
- RRobert ReyesJul 29, 2025
If your Celestron Microscope doesn't turn on, check the battery power. If the battery is low, recharge it by plugging the microscope into AC power.
Why won't my Celestron Microscope turn on?
If your Celestron Microscope doesn't turn on, check the battery power. If the battery is low, recharge it by plugging the microscope into AC power.
What to do if my Celestron FlipView 44314 screen is blank?
If the screen on your Celestron Microscope is blank, there are several things you can check: First, ensure that the power is turned on. Then, check the battery power and recharge it if needed. Also, verify that the object you are trying to view is correctly positioned under the lens, and make sure the illuminator is turned ON.
What to do if my Celestron FlipView 44314 is connected to a TV, but there is no image?
If you've connected your Celestron Microscope to a television but don't see an image, first ensure that the television is on. Next, switch to the correct video input channel on your TV. Finally, check that the video cable is securely connected to both the microscope’s Video Out port and the correct video input on your television.
How to clean smudges or blemishes on the screen of my Celestron Microscope?
To clean smudges or blemishes on the screen of your Celestron Microscope, carefully clean the screen and lens with the included microfiber cloth.
What to do if the battery indicator LED is not illuminating or the battery is not charging on my Celestron Microscope?
If the battery indicator LED on your Celestron Microscope isn't lighting up or the battery isn't charging, verify that the cable is plugged into the proper port. Also, check that the outlet has power and isn't malfunctioning. If the outlet is connected to a wall switch, ensure that the switch is turned on.
Describes how to open the compartment and insert the battery correctly.
Explains how to connect the power adapter and what the LED indicator means.
Instructions for inserting a Micro SD card for image capture.
How to power on, aim, adjust illumination, and focus on a specimen.
Instructions on how to take a still image using the shutter trigger.
How to zoom and start/stop video recording.
Lists available resolution options for still image capture.
How to capture still images and record video using the software interface.
Steps to calibrate the software using a calibration ruler for accurate measurements.
Lists and explains the various measurement tools like lines, circles, and angles.
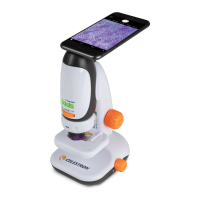
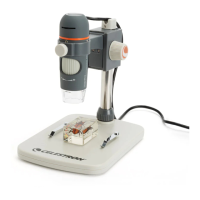
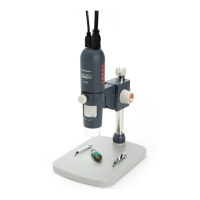
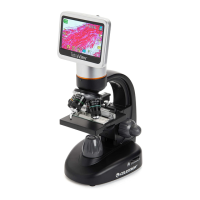
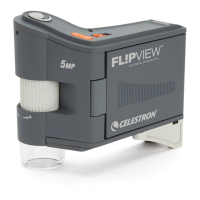
The Celestron FlipView™ Handheld LCD Digital Microscope is a precision optical instrument designed for easy and enjoyable observation and capture of images and videos. It features a 5 MP sensor and a flip-out 3.0-inch full-color TFT LCD screen, making it suitable for a wide range of users, from hobbyists to professionals.
The FlipView microscope provides low-power viewing, offering magnification up to 120x directly on its built-in LCD screen. For higher magnification, up to 300x, the microscope can be connected to a PC. Unlike traditional microscopes, the FlipView uses a built-in camera sensor to capture images, which are then displayed on its high-resolution color LCD screen. This design enhances the viewing experience by reducing neck and eyestrain and facilitates easy sharing of observations with others. The device also supports output to external monitors, projectors, and TV screens via the included AV out cable.
The microscope is primarily designed for examining 3D objects such as coins, stamps, rocks, electronics, and insects. While it can view specimens on slides using top illumination, it is not optimized for high-power viewing of slide specimens.
To begin, users need to install the included lithium battery into the battery compartment, ensuring correct alignment. The battery ships with a partial charge, but a full charge is recommended before initial use without an external power source. Charging is done by plugging the AC adapter into the 5V AC in port on the microscope and a standard AC wall outlet. A red LED indicator signals charging, and it turns off when the battery is fully charged, providing up to 2 hours of use. The battery power level can be monitored via an icon on the LCD screen.
For capturing images and videos without a computer connection, a Micro SD card (not included) must be inserted into the card slot. It's recommended to format the Micro SD card before its first use with the FlipView. The device displays various icons on the LCD screen to indicate current mode (still image capture, video capture, time lapse capture), MicroSD card recognition, current resolution setting, number of images taken/remaining, video capture time remaining, and battery power.
To view a specimen, power on the FlipView and aim it at the object. The illuminator adjustment wheel (7) controls the lighting, and the focus wheel (18) adjusts the focus. Still images are captured by pressing the shutter trigger (1).
The playback button (6) toggles between still image, video, and preview modes. Pressing it once from still image mode enters playback, and pressing it twice enters video mode. The current mode is indicated by icons on the LCD screen. The color mode button (5) allows users to switch between color, negative, and black & white streaming preview modes.
The zoom control button (9) enables users to zoom in and out while observing a specimen.
In video mode, pressing the shutter trigger (1) starts recording, and pressing it again stops it.
Images and videos can be reviewed by pressing the playback button (6) once (from still image mode) or twice (from video mode). The up (5) and down (16) buttons scroll through the captured files. To preview a video file, select it and press the OK button (15).
To delete a still image or video, access the menu via the setup button (4), scroll to "Delete," and press OK. Users can choose to delete "This Image" or "All" and confirm the action. Images and videos can also be protected from accidental deletion using the "Protect" option in the setup menu.
The "Slide Show" feature allows users to preview all images on the SD card with customizable intervals between images.
The setup button (4) provides access to the main menu, which offers various settings depending on whether the device is in still image or video mode. Navigation is done using the up (5), down (16), and OK (15) buttons.
Accessible by pressing the playback button (6) from the main menu.
Connect the FlipView to a computer using the supplied USB cable. Select "Upload Images" on the LCD screen. The computer will recognize the Micro SD card as a digital camera, allowing image download. Files can then be viewed using preferred software on the PC.
Insert the 1/8-inch plug of the video out cable into the FlipView's video out port (12) and the yellow RCA plug into the TV or projector's yellow video input. Turn on the TV/projector and tune to the appropriate input channel to view the specimen.
The software includes a measurement feature that requires calibration.
The measuring dropdown menu offers various tools:
The software allows users to mark, draw, and add notes to saved images.
For models purchased outside North America (model 44315), a multi-plug AC adapter is included with interchangeable plug heads for Europe, the United Kingdom/Hong Kong, and China. To change the plug head, grasp the main housing and the desired head, press the small release button, interlock the tabs, and rotate clockwise until it clicks. To remove, press the button and rotate counterclockwise.
The microscope is a precision optical instrument and should be handled with care. Store it in a dry, clean place, and avoid using it in restricted areas or in rain/snow to prevent damage from moisture, fire, or electric shock.
To clean dust or smudges from the LCD screen or other optical components, first blow off dust with a camel's hair brush or air blower. Then, use the included dry, microfiber cloth to wipe the surface gently. For exterior surfaces, wipe with a moist cloth.
Do not attempt to access internal components or modify the microscope. Only authorized technicians should perform maintenance or repairs.
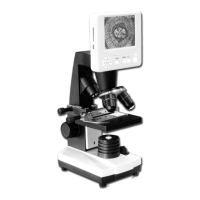
| Type | Digital Microscope |
|---|---|
| Illumination | LED |
| Connectivity | USB |
| Image Capture | Yes |
| Video Recording | Yes |
| Focusing | Manual |
| Power Source | AC adapter / rechargeable battery |
| Eyepiece | Not applicable (Digital Display) |
| Stage | Fixed |
| Weight | 0.5 lbs |