Page 11For technical questions, please call 1-800-444-3353.SKU 97586
USER-MAINTENANCE
INSTRUCTIONS
Procedures not specically
explained in this manual must
be performed only by a qualied
technician.
TO PREVENT
SERIOUS INJURY
FROM ACCIDENTAL OPERATION,
BEFORE ANY MAINTENANCE OR
REPAIRS ARE DONE (including
clearing jams):
• Wear ANSI-approved safety
goggles with side shields. Other
people in the work area must also
wear ANSI-approved impact safety
goggles with side shields.
• Detach the air supply.
• Attempt to re the Tool into a
piece of scrap wood to ensure
that it is disconnected and is
incapable of ring any fasteners.
• Empty the magazine and leave
it open during service. The
Magazine is spring-loaded and
may cause parts or a fastener to
y out of the Tool.
TO PREVENT SERIOUS INJURY
FROM TOOL FAILURE:
Do not use damaged equipment.
If abnormal noise, vibration, or
leaking air is detected, have the
problem corrected before further
use.
TO PREVENT EXPLOSION:
Lubricate only with specied
lubricants. Lubricate the air inlet
using only pneumatic tool oil.
Lubricate the internal mechanism
using only white lithium grease.
Other lubricants may damage the
mechanism and may be highly
ammable, causing an explosion.
Note: These procedures are in addition to
the regular checks and maintenance
explained as part of the regular operation
of the air-operated tool.
Daily - Air Supply Maintenance:
Every day, perform maintenance on the
air supply according to the component
manufacturers’ instructions. The
lubricator’s oil level needs to be
maintained and the moisture lter must
be regularly drained. Performing routine
maintenance on the air supply will allow
the tool to operate more safely and will
also reduce wear on the tool.
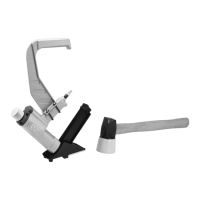
Clearing Jams
1. To remove a jammed cleat nail/staple,
disconnect the tool from its air supply, lift
the Latch (44) and slide the Moveable
Magazine (50) back until it locks in place.
Then, lean the Floor Nailer back.
2. Remove all cleat nails/staples from the
Moveable Magazine (50). Then press
the Latch (44) and slide the Moveable
Magazine forward all the way, making
sure it locks in place.
3. Attempt to re the Floor Nailer into
a piece of scrap wood to ensure it is
disconnected and is incapable of ring
any nails/staples.
4. With the Blade Guide (26) facing away
from you, remove the four Screws (24).
Then remove the Blade Guide to expose
the jammed cleat nail/staple.
5. Pull out the jammed fastener and the
remainder of the fastener strip that is
still in the magazine. Dispose of the
remaining fastener strip; it may be bent
or damaged in some other way.