13
CM73522UMC.0112
4. Functional Descriptions
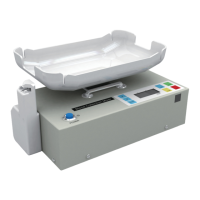
[The figure in Section 3-1. Top View]
(1) Control Panel - has seven control switches and an LCD display panel.
(2) LCD Display Panel - is a custom-designed display panel on which all information
is shown.
(3) Power Switch - turns the power on and off.
(4) Tube Clamp Module - is detachable, it can be mounted at either the left or right
side of the tray. A screwdriver is necessary to move the module.
(5) Tray - is plastic molded on which blood collection bags are loaded. Tray should
be detached when mixer is stored in the carrying/transportation case.
(6) Handle - is retractable.
(7) Weight Calibration Hole - In this hole is an adjustment screw to calibrate weight
and volume as necessary.
(8) Tray Leveling Screw - makes the tray rotate.
(9) Clamp Module Connection Hole - is used when user wants to install the tube
clamp module at the right side.
(10) LED Lamp - is illuminated when the power switch is on. The LED lamp starts
flashing when collection volume reaches the preset volume at the end of normal
collection process.
[The figure in Section 3-2. Rear View]
(1) Battery Pack - is rechargeable and replaceable Nickel-Cadmium 12 VDC/2 AH.
(2) Battery Compartment Door - is opened by placing a finger in the hole and
pushing the door plate down.
(3) Power Adaptor Inlet - takes power directly from the AC power adaptor. When the
adaptor is plugged in, it supplies power to the equipment and the battery pack
will be recharged.
(4) Tray - is detachable. At the bottom of the tray attached is a magnetic pad, which
sticks to the metal Tray Mount (5).
[The figure in Section 3-3. Control Panel]
(1) [START] Switch - starts collection process. Tray starts rocking, clamp is opened,
main display shows collected blood volume in [ML].
(2) [END] Switch - completes collection process and returns machine to initial state.
Tray stops rocking, main display shows total weight on the tray in [GRAM].
(3) [TIME] Switch - When depressed, it displays elapsed time of the collection.
Time memory is cleared by pressing [START] switch to begin next collection.
(4) [CLAMP] Switch - opens and closes tube clamp. This switch does not work at the
end of a normal collection until [END] switch is pressed.
(5) LCD Display Panel - shows all figures and symbols. Refer to the Section 3-4 for
details.