EasyManua.ls Logo

Challenger Lifts 24012 E User Manual

Challenger Lifts 24012 E
18 pages
To Next Page IconTo Next Page
Page #1 background imageLoading...
Page #1 background image
Challenger Lifts, Inc.
Model’s 24012*
*( E, W, EW, XL, LR, AR)
FOUR POST SURFACE
MOUNTED LIFT OPERATION, INSTALLATION &
MAINTENANCE MANUAL
IMPORTANT!!!
READ THIS MANUAL COMPLETELY BEFORE INSTALLING OR OPERATING THE LIFT
200 Cabel Street, P.O. Box3944
Louisville, Kentucky 40201-3944
Email - sales@challengerlifts.com
Web Site -www.challengerlifts.com
Office (502) 625-0700 Fax (502) 587-1933
Question and Answer IconNeed help?

Do you have a question about the Challenger Lifts 24012 E and is the answer not in the manual?

Challenger Lifts 24012 E Specifications

General IconGeneral
BrandChallenger Lifts
Model24012 E
CategoryLifting Systems
LanguageEnglish

Summary

Four Post Surface Mounted Lift Operation, Installation & Maintenance Manual

Installation Procedure

Site Selection and Layout

Determine location, check clearance, prepare floor, and mark site layout.

Initial Post Assembly

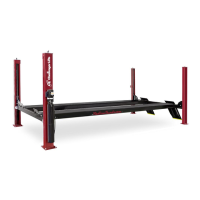
Bolt cylinder beam to main posts and lift upright.

Installation Procedure (continued)

Post Alignment and Anchoring

Plumb and anchor front post, align, and tighten beam bolts.

Cross Rail and Chain Installation

Install cross rails, pull chains, and attach to main posts.

Safety Rod and Lifting Chain Setup

Install safety rod and attach lifting chains to cross rail connectors.

Installation Procedure (continued)

Power Unit and Electrical Connection

Attach power unit, hose, wire to circuit, fill reservoir.

Leveling and Runway Placement

Level cross rails and position runways.

Final Post Positioning and Alignment

Position off side posts, plumb, and check alignment.

Installation Procedure (continued)

Lift Travel and Safety Latch Test

Test lift travel, safety latch operation.

Final Anchoring and Component Installation

Anchor off side posts, install chocks and ramps.

System Bleeding and Anti-Sway Installation

Cycle lift to bleed air and install anti-sway devices.

Operation Demonstration and Documentation

Demonstrate operation, review safety, complete warranty.

Alignment Rack Installation (24012AR)

Slip Plate Activation and Pinning

Activate slip plates, install ball bearings, attach L-pins.

Alignment Rack Specifics

Pin and Leveling Leg Installation

Attach L-pins and leveling leg assemblies.

Jack Rail Stop Bolt

Install stop bolt on jack rail.

Lube Rack Installation (24012LR)

Walk Platform and Gate Assembly

Install walk platform, gate lock, post, and gates.

Ladder and Railing Installation

Assemble ladder, attach to rack, install railing.

Drive-Through Ramp Installation

Install drive-through ramps.

Anchor Bolt Installation

Concrete Curing and Safety

Ensure concrete cure time and wear safety glasses.

Anchor Bolt Drilling and Installation

Drill holes, clean, install anchors, and tighten nuts.

Lift Operation Instructions

Operator and Owner Responsibilities

Ensure operator training and availability of manufacturer's literature.

Lift Operation Procedures

Display Requirements and Maintenance Procedures

Display operating instructions and establish regular maintenance schedules.

Safety Protocols: Lockout/Tagout and Modifications

Implement lockout/tagout for repairs and prohibit unauthorized modifications.

Vehicle Raising Procedure

Steps for driving onto lift, raising, and engaging safety latch.

Vehicle Lowering Procedure

Steps for lifting off safety latch, releasing, and lowering the lift.

Maintenance

Daily Inspection Checklist

Inspect anchor bolts, fluid leaks, and connections. Check torque.

Weekly Reservoir Fluid Check

Check the fluid level in the power unit reservoir.

Monthly Chain Inspection and Lubrication

Check cross rail and lift chains for wear, tension, and lubricate.

Troubleshooting Guide

Lift Fails to Rise

Common causes include blown fuse, hydraulic issues, or low oil.

Lift Fails to Lower

Issues related to obstructions or safety latch not releasing.

Lift Drifts Downward

Potential causes are debris in the lowering valve or travel stop issues.

Lift Cannot Reach Top Position

Primarily caused by insufficient hydraulic oil level.

Related product manuals