Do you have a question about the Chamberlain CAPXS and is the answer not in the manual?
Explains safety symbols and signal words used in the manual.
Provides crucial warnings to reduce the risk of severe injury or death and protect against fire/electrocution.
Warns about potential interference with panic hardware when installing in fail secure mode.
Notifies about exposure to chemicals, including lead, known to cause cancer or reproductive harm.
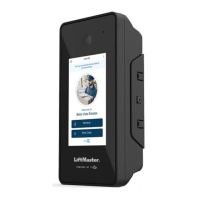
Provides an overview of the CAPXS Smart Video Intercom S, a cloud-based access control solution with video features.
Explains the access control inputs and outputs of the CAPXS for controlling a single access point.
Lists the items included in the CAPXS carton, such as the device, power supply, and screws.
Details the essential tools required for installing the CAPXS, including screwdrivers.
Suggests optional tools that can aid in the installation and configuration of the CAPXS.
Guides users to prepare for installation by completing a readiness survey for site assessment.
Provides detailed front, side, back, and bottom views with measurements of the CAPXS unit.
Details the technical specifications of the CAPXS, including capacity, voltage, temperature, and Wi-Fi compatibility.
Outlines the required wire specifications and maximum run distances for various connections to the CAPXS.
Details the internet connection requirements, including compatible Wi-Fi protocols and security settings for the CAPXS.
Provides two methods for setting up a myQ® Community account, essential for CAPXS functionality.
Guides users through the process of signing up for required myQ® Community services for the CAPXS.
Instructions for securely mounting the CAPXS mounting bracket to a surface or gang box, including sealing recommendations.
Details how to connect the CAPXS to a dedicated 120 Vac outlet, including wire specifications and safety precautions.
Guides users on connecting the CAPXS to the internet via wired Ethernet or Wi-Fi®, including compatibility considerations.
Instructions to validate CAPXS setup in Admin Mode, covering network, inputs, and outputs.
Explains how to insert and secure the CAPXS unit into its mounting bracket using provided screws.
Provides an example wiring setup for door access control, including Wiegand, readers, and lock types.
Illustrates a wiring setup for wired gate access control, covering gate operators, readers, and locks.
Explains how to manually reset the CAPXS to factory defaults using the reset button, and notes about data loss.
Lists part numbers for available repair items such as mounting brackets and power supply kits.
Details compatible accessories for the CAPXS, including readers, keypads, and trim kits.
Provides a template to record device information and configuration settings for the CAPXS.
States that the CAPXS must be installed according to the Canadian Electrical Code.
Outlines that information is subject to change and is considered proprietary LiftMaster property.
Warns that unauthorized changes or modifications to the equipment may void the user's authority to operate it.
Explains FCC compliance regarding data transmission and RF transmitter operation for the CAPXS.
Details the limited two-year warranty for the CAPXS, including coverage, exclusions, and liability limitations.
| Brand | Chamberlain |
|---|---|
| Model | CAPXS |
| Category | Intercom System |
| Language | English |