Do you have a question about the Chamberlain MyQ Smart Garage Hub and is the answer not in the manual?
Lists the essential items needed before commencing the installation process.
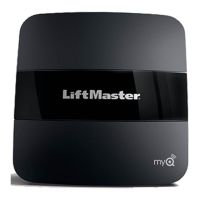
Details the components included within the MyQ Smart Garage Hub packaging.
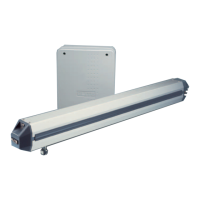
Instructions for mounting the MyQ Door Sensor onto the garage door.
Details methods for installing the door sensor using strips or screws.
Instructions for physically installing the MyQ Smart Garage Hub unit.
Connects the hub to Wi-Fi using a device like a laptop or smartphone.
Connects the hub to Wi-Fi using the Wi-Fi Protected Setup (WPS) button.
Connects the hub to Wi-Fi using Bluetooth on an iPhone.
Explains the meaning of different LED colors and states on the hub.
Instructions on how to find the MyQ Smart Garage Hub's serial number.
Registering the hub through the Alarm.com MobileTech application.
Registering the hub via the Alarm.com Partner Portal.
Registering the hub through the Alarm.com Customer Website.
Steps to add sensors and openers to the system via the wizard.
Validating added devices and testing functionality via Alarm.com.
Lists compatible garage door opener brands and their radio frequencies.
Details compatibility with brands like Chamberlain, Genie, LiftMaster, and others.
Procedure to erase the hub's Wi-Fi configuration settings.
Procedure to remove paired door sensors from the MyQ Smart Garage Hub.
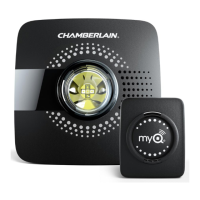
The LiftMaster MyQ Smart Garage Hub is a kit designed to integrate a wide range of garage door openers with an Alarm.com account, providing remote functionality for garage doors. This solution allows nearly any garage door to connect with Alarm.com through the LiftMaster Integration/Garage Door & Gate Control add-on.
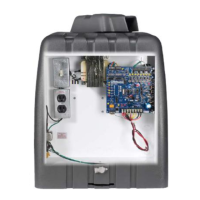
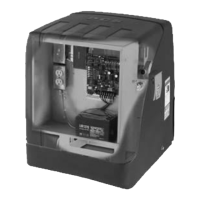
The MyQ Smart Garage Hub supports two non-MyQ garage doors when paired with a tilt sensor, and up to 16 MyQ devices, such as a MyQ Control Panel (888LM/889LM) or a MyQ-enabled motor. Its primary function is to enable remote control and monitoring of garage doors via the Alarm.com platform. The hub features a single wired connection for AC power and connects wirelessly to the customer's home network, with configuration managed via a smartphone or PC.
A key safety feature of the hub is its integrated speaker and strobe light/flasher. These components provide audible and visual alerts when the garage door is closing, a requirement under modern building codes. These alerts cannot be disabled, ensuring consistent safety notifications during door operation.
The system relies on a MyQ Door Sensor, a small tilt sensor installed on the top panel of the garage door. This sensor communicates the door's state (open or closed) to the MyQ Smart Garage Hub. When the sensor is in a vertical position, it registers as "Closed," and when horizontal, it registers as "Open." The door sensor communicates with the hub via Bluetooth, offering an operating range of approximately 30 feet.
Installation of the MyQ Smart Garage Hub begins with mounting the door sensor. The door sensor must be installed before connecting the hub to Alarm.com. There are two methods for installing the door sensor: using fastening strips or screws. For fastening strips, the sensor is positioned vertically on a clean, dry location on the top panel of the garage door. When using screws, the front cover of the sensor is removed, the sensor is positioned vertically on the top panel, and then secured with screws before replacing the cover. In both methods, the "TOP" indicator on the sensor must always face upwards, and it must be installed on the top panel of the garage door.
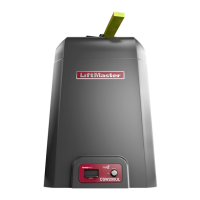
Once the door sensor is in place, the MyQ Smart Garage Hub is mounted. The bracket for the hub should be installed on the ceiling near the garage door opener, but not so close as to cause interference. It's crucial that the hub is not covered by the overhead door when open, as this can disrupt its Wi-Fi signal. The hub should also be visible from the garage doorway so users can see the flashing light when the door is closing. After the bracket is installed, the hub slides onto it and is connected to AC power. The LEDs on the hub will blink momentarily, indicating a successful power-up. The MyQ technology has an open-field range of 1,500 feet.
Setting up Wi-Fi on the MyQ Smart Garage Hub can be done using an internet-connected device, WPS, or Bluetooth (for iPhone users only).
Using an Internet-Connected Device: Users need the home's 2.4 GHz Wi-Fi network name and password. After plugging in the hub, the blue LED will blink. Wi-Fi must be enabled on the laptop, tablet, or mobile device. Users then select the "MyQ-nnn" network (where "nnn" are the last three digits of the hub's serial number) from the list of available Wi-Fi networks. Android devices may show "internet not available," which is expected; users should click "Ignore" if prompted. Once connected to the MyQ-nnn network, the hub's blue light will turn solid. Users then launch a web browser and enter setup.myqdevice.com (or setup.myqhome.com or 192.168.0.1) to complete the setup, entering the Wi-Fi name and password for the home network. The MyQ Garage app should not be installed at this stage. A solid green LED indicates a successful Wi-Fi connection. Android and Apple devices' "Smart Network Switch" or "Wi-Fi Assist" features should be disabled to prevent the device from disconnecting from the MyQ-nnn network. If the phone repeatedly connects to another Wi-Fi network, users should "Forget" that network to maintain connection with MyQ-nnn.
Using WPS: With the hub powered and the blue LED blinking, users press and release the hub's button. The blue LED will turn solid. Within one minute, the WPS button on the router is pressed and released. The hub should connect to the network within a few minutes, indicated by a solid green LED.
Using Bluetooth (iPhone users only): After plugging in the hub and observing the blinking blue LED, the Apple mobile device is connected to the Wi-Fi network. In the device's Bluetooth settings, Bluetooth is turned on. Users then find and select the "MyQ-nnn" Bluetooth device to pair. If the phone indicates the hub is not connected to the internet, forgetting the device before re-pairing may resolve the issue. When prompted, the phone is allowed to share Wi-Fi network settings with the hub. A green LED indicates a successful Wi-Fi connection. The LiftMaster iPhone application should not be installed.
LED indicators provide status updates:
Connecting the hub to Alarm.com can be done via the Partner Portal, MobileTech app, or the Customer Website. The serial number, located on the back of the hub below the barcode, is required for registration.
Using MobileTech app: The hub's LED must be solid green. Users log into the MobileTech app, find the customer account, tap "Package" to verify "Garage Door & Gate Control" and "LiftMaster Integration" add-ons are included, then navigate to "Equipment" > "LiftMaster Devices" > "Add Gateway" and enter the serial number. After the gateway appears in the equipment list, users tap its name, then "Add Device," and select the type of garage door opener (MyQ Wall Control, MyQ-Enabled, or non-MyQ-Enabled). The wizard then guides users through adding door tilt sensors and garage door openers. For wall controls, the internet gateway enters learn mode, and users press the learn button twice on the wall control. For MyQ-enabled openers, users press and hold the learn button on the opener for two seconds. For non-MyQ-enabled openers, users select the brand and program button color. The 821LM may attempt multiple frequencies, so all attempts should be allowed to complete.
Using Partner Portal: Similar to the MobileTech app, the hub's LED must be solid green. Users log into the Partner Portal, find the customer account, click "Service Package" to verify add-ons, then navigate to "Equipment" > "LiftMaster" > "Add Gateway" and enter the serial number. After the gateway appears, users click "Add Device" and follow the wizard to add door sensors and openers.
Using Customer Website: The hub's LED must be solid green, and the account must have the appropriate add-ons. Users log into the Customer Website, click "Settings" > "Devices" > "Liftmaster Installation," select the motor's brand and model, and click "Continue." The wizard then guides them through adding door sensors and openers.
The system is compatible with most garage door openers from Chamberlain, Craftsman, Genie (1996-2016), LiftMaster, Linear, Overhead Door (after 1996, before 2016), Raynor, Stanley, Wayne Dalton, and other brands manufactured after 1993 (Access Master, AssureLink, BuildMark, Do-It, Garage Access, Master Mechanic, True Value). Compatibility is determined by program button colors (yellow, purple, orange, green, red) or manufacturing dates. The hub is not compatible with garage door openers requiring DIP switch programming for remotes. All compatible garage door openers must have safety reversing sensors at the bottom of the track.
The MyQ Smart Garage Hub offers features to erase stored information for troubleshooting or re-configuration.
Erase Wi-Fi Settings: To clear Wi-Fi settings from the hub, users press and hold the button until only the blue LED blinks. This allows for re-configuration of the Wi-Fi connection if needed.
Erase Door Sensors: To remove a door sensor's information from the hub, users press and hold the corresponding BUTTON 1 or 2 (connected to that specific door sensor) until the Yellow LED turns off. This is useful for re-pairing sensors or removing old ones.
The MyQ Door Sensor uses a 3-volt CR2450 Lithium battery. The battery level is tracked by the MyQ Smart Garage Hub based on the number of cycles (up and down) the sensor has transmitted since it was first learned. The sensor reports a low battery at 7,000 cycles and typically ceases functioning due to battery depletion after approximately 10,000 cycles, indicating a need for battery replacement.
For specific troubleshooting with the MyQ Smart Garage Hub, users are directed to a dedicated troubleshooting guide.
| Compatibility | Most garage door openers manufactured after 1993 |
|---|---|
| Connectivity | Wi-Fi |
| Control | Smartphone app |
| Brand | Chamberlain |
| Model | MYQ-G0301 |
| Remote Control | No |
| Requires Hub | No |
| Voice Control | Google Assistant |
| Power Source | Plug-in |
| Notifications | Real-time alerts |