EasyManua.ls Logo

Check Point 4800 - User Manual

Check Point 4800
6 pages
Print Icon
To Next Page IconTo Next Page
Loading...
.
Classification [Protected] P/N: 704818 | P. 1
© 2011 Check Point Software Technologies Ltd. All rights reserved.
For a list of our trademarks, please refer to: http://www.checkpoint.com/copyright.html.
For a list of our Third Party Copyright notices, please refer to: http://www.checkpoint.com/3rd_party_copyright.html.
Check Point 4800 Installing and
Removing Memory
Important - Only qualified personnel can open an appliance and install or remove memory
DIMMs. Doing the installation incorrectly can permanently damage the appliance. Only install
or remove memory DIMMs if you have explicit permission from Check Point Technical Support.
Preparing the Appliance
Before you start to install or remove memory DIMMs, make sure that:
The appliance is in a clean environment and on a level surface.
You can physically access and open the cover of the appliance.
You can connect to the WebUI or CLI to shut down the appliance.
You have the Check Point memory DIMM upgrade kit.
Important - To protect the appliance and the memory modules from electrostatic discharge
damage, make sure that you are properly grounded before you touch these components. Use
a grounding wrist strap and follow the instructions provided with the wrist strap before you
handle the components or open the appliance.
The grounding plug on the rear of the appliance provides a chassis grounding point. If you do
not have a grounding wrist strap, make sure you are properly grounded before you touch any
electronic component.
To prepare the appliance:
1. From the WebUI or the CLI, shut down the appliance.
2. Use the power switch to turn off power to the appliance.
3. Remove the power cords from the appliance.
4. Remove the warranty sticker from the appliance cover screw.
5. Remove the top cover from the appliance.
6. Only use the screwdriver that is included in the upgrade kit to open and replace the
appliance cover.

Other manuals for Check Point 4800

Question and Answer IconNeed help?

Do you have a question about the Check Point 4800 and is the answer not in the manual?

Summary

Preparing the Appliance

Installing Memory DIMMs

Find DIMM Slots

Locate the DIMM memory slots on the system board of the appliance.

Prepare DIMM Socket

Press the two white retaining clips outward to open the memory socket.

Align and Insert DIMM

Align the new DIMM above the socket and press it in until it clicks.

Verify Installation and Power Cycle

Check DIMM installation, reconnect power, and verify appliance model on LCD.

Replace Appliance Cover

Re-attach the appliance cover after the memory DIMM installation is complete.

Removing Memory DIMMs

Release DIMM Retaining Clips

Press the two retaining clips outward to release the memory DIMM.

Remove DIMM

Carefully pull the memory DIMM straight up from the socket.

Verify Socket After Removal

Ensure the memory DIMM is removed and no parts are left inside.

Finalize Removal Steps

Connect power, turn on, verify model on LCD, then turn off and remove power cords.

Attaching the New Warranty Sticker

Confirm Appliance Operation

Ensure the appliance is operating correctly after the upgrade.

Apply Warranty Sticker

Attach the new warranty sticker from the upgrade kit to the appliance cover.

Record Upgrade Details

Write the date of upgrade and current RAM/LOM configuration on the sticker.
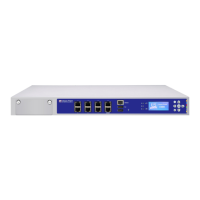
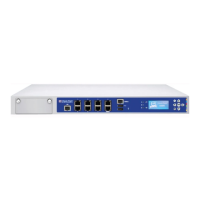
Check Point 4800 Specifications

General IconGeneral
Form Factor1U
IPS Throughput5 Gbps
Maximum VPN Tunnels10, 000
Interfaces8 x 1 GbE, 4 x 10 GbE SFP+
Power SupplyDual

Related product manuals