3-17
Cisco UCS C200 Server Installation and Service Guide
OL-20732-02
Chapter 3 Maintaining the Server
Installing or Replacing Components
Installing Hard Drives or Solid State Drives
The qualified and supported part numbers for this component are subject to change over time. For the most
up-to-date list of replaceable components, see the following URL and then scroll to Technical Specifications:
http://www.cisco.com/en/US/products/ps10493/products_data_sheets_list.html
Tip You do not have to shut down or power off the server to replace hard drives because they are hot
pluggable.
Note You can mix hard drives and solid state drives (SSDs) in the same server. However, You cannot configure
a logical volume (virtual drive) that contains a mix of hard drives and SSDs. That is, when you create a
logical volume, it must contain all hard drives or all SSDs.
Note If you need to make changes to your RAID configuration after installing a hard drive, use the LSI
configuration utility for your mass storage device. See
RAID Controller Considerations, page C-1 for
more information.
Note Cisco recommends following the industry-standard practice of using drives of the same capacity when
configuring RAID volumes. If you use drives of different capacities, the usable portion of the smallest
drive will be used on all drives of the RAID volume.
Note The 500 GB SATA drive (A03-D500GC3) and the 1 TB SATA drive (A03-D1TBSATA) that are sold with
the UCS C200 M2 SFF server are supported at full 6G speeds.
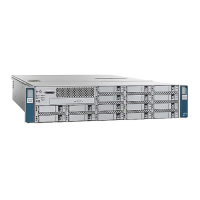
To replace or install a hot-pluggable hard drive, follow these steps:
Step 1 Remove the hard drive that you are replacing or remove a blank panel from an empty bay (see
Figure 3-11 or Figure 3-13):
a. Press the release button to expose the ejector lever.
b. Pull the ejector lever toward you, and then pull the hard drive sled from the drive bay.
c. If you are replacing an existing hard drive, remove the hard drive from the sled by removing the four
securing screws:
–
If you have the LFF version of the server with 3.5-in drives, the four screws are on the bottom
of the sled.
–
If you have the SFF version of the server with 2.5-in drives, there are two screws on each side
of the sled.
Step 2 Install a new hard drive (see Figure 3-11 or Figure 3-13):
a. Place the hard drive in the sled with the connectors facing the rear.
b. Install the four securing screws on the sled.