__
i_
-4.
CAUTIONS
ON
WIRING
IPRECAUTIONSAU
SUJETOES
CONNEXIONS
I
PRECAUCIONES
PARA
LA
CONEXION
DE
CABLES
11l~~~
••
I»!
1
Be
sure to turn the power off before wiring
2 Be particularly careful where you route the wires
Keep them well away from the engine and exhaust
pipe, etc Heat may damage the wires
3 If the fuse should blow, check to see if the wiring is
correct
If it is, replace the fuse with a new one with the
same amperage rating as the original
4
To
replace the fuse, release the catch on the source
unit side, remove the old fuse and insert the new
one (Figure 6)
Note:
There are various types of fuse holder Do
not let the battery side touch other metal
parts
Veillez a arn9ter Ie moteur avant de faire les
connexions
2 Faites tres attention ou vous acheminez les fils
Ne les faites pas passer pres du moteur, du tuyau
d'echappement, etc La chaleur pourrait les
endommager
3 Si
Ie
fusible saute, verifiez sl
Ie
cablage est correct
Si ce n'est pas
Ie
cas, remplacez
Ie
fusible par un
neuf, de meme ampere que
Ie
fusible d'origine
4 Pour remplacer
Ie
fusible, ouvrez
Ie
verrou
sur)e
cote de I'appareil pilote, enlevez ie vieux
fusibleel
inserez-en un neuf (Figure 6)
Remarque:
II
y a different type de porte-fusible La
borne du cote batterie ne dolt pas
toucher d'autres pieces metalliques
Fuse holder
Porte-fusible
Portafusible
~~#:Bi
Antes
de
conectar los cables, cerciorese
de
desconectar la alimentacion
2 Tenga especial cuidado cuando enrute los cables
Mantengalos alejados del motor, el tubo
de
escape,
etc
EI
calor podria dafiar los cables
3 Si se quema un fusible, compruebe si la conexion
de
los cables es correcta,
Si
10
es, reemplace el fusible por otro nuevo con el
mismo amperaje que el del original
4 Para reemplazar el fusible, abra el seguro
de
la
parte lateral de la unidad fuente, extraiga el fusible
quemado e inserte el nuevo (Figura 6)
Nota:
Existen varios tipos
de
portafusibles No
permita que el terminal
dellado
de la bateria
toque otras partes metalicas
Fuse (15
A)
Fusible (15
A)
Fusible (15
A)
jJlH~tt
(15
A)
I
t1ij~BH~
lifIi
i:A.
EI!
jJ.ijU3
If]
Wi'
0
2
:ftJr~B1::it:tt:~:'J\'L'0
';f.r~Mill;I*l~?9JtJL,
.J1pEi/t~:~o
,\'IJrfil:f1j'·
t6HF';f.rJt
3
!m*1JH\t~Hfj.Wi',
TJH&j!tt~~£~
J.I..Jifflo
j(O*~~,
~lifIi,.m.k~.*~~~.~~~~&~~o
4
m.&~i~H1,
5ttJJf±tJLii!uj]jf~l!!1Jt,
Jt\I.f±lIBB9
fi!:~~,
JJ!OdM9{JiUl.&~0
(
00
6)
~~:&~~~~~$#o
~EI!~k~~~ttmm
t11D!!t]z~*-,1*0
Figure
6/
Figure 6 /
Figura
6/
00
6
• CeNET input
• Orient the
CeNET
cable
in
the direction shown
in
Figure 7 and insert it until it is locked in position
• Wire the CeNET cable so that there is minimal
tension
in
the cable, and the connection part will
not come off
•
To
remove the
CeNET
cable, pull it by lightly
grasping the slide cap in your fingers
•
To
extend the CeNET cable, use either the CeNET
extension cable
25m,
CeNET extension cable °6
m,
or
V-adapter
15m
(they are separately
sold)
For
more information, consult your store of purchase
II
Entree CeNET
• Dirlgez
Ie
cable CeNET dans
Ie
sens Indique a
la
Fig 7 et inserez.-Ie jusqu'a ce qu'il soit verrouille
en
position
• Acheminer
Ie
ci'lble CeNET de fayon
qu'i1
y ait une
tension minimale sur
Ie
cable et que la piece de
raccordement ne se detache pas
• Pour retirer
Ie
cable CeNET, tirez dessus
en
saisissant delicatement
Ie
capuchon coulissant entre
vos doigts
• Pour rallonger
Ie
cable CeNET, utilisez soit
Ie
cable de rallonge
CeNET
de
2,5 m, soit
Ie
cable
de rallonge
CeNET
de
0,6 m, soit I'adaptateur Y
de 1,5 m (tous vendus separement) Pour de plus
amples informations, consultez votre magasin
• Entrada CeNET
• Oriente el cable CeNET en el sentido mostrado en
la figura 7, e insertelo hasta que quede bloqueado
en su posicion
• Conecte el cable CeNET de forma que reciba la
minima tension y no se desprenda la parte
de
conexion
• Para desconectar el cable CeNET, tire ligeramente
de el sujetando Iigeramente la tapa deslizable con
sus dedos
• Para prolongar el cable CeNET, utilice un cable
prolongador CeNET de 2,5 m, un cable prolongador
CeNET de 0,6 m,
0 un adaptador en V de 1,5 m
(vendidos aparte) Para mas informacion, consulte a
su proveedor
IICeNET~A
fii:OO
7
lYr]f,¥f
CeNET
El!g'J\lJit~tEm~1.1lJt1t19!L
~
JEo
mI'@
CeNET
El!fA!~tH!I!EI!g'A!m
JJ:llr(lj\,
!Vi
l1:JitU~
5J-!BI,;'*io
fW"F
CeNET
EI!~B1,
ffl'f
:J1J1'li:1±?lHw¥f:ttt&:f±lo
1&M.-KCeNET
El!g'A!B~,
1iJ~ffl25
*CeNETttJl€Et!
fA!,
0.6
*Cel'<'ET
ttJl€1tJl€~
15 * Y
~m~c:im
(itg
1&11~J)
,
i:f1fiJ1f(ol~J*Ii5i&j.ijJ.
pl..esDE
SYSTEMES
I EJEMPLOS
DE
SISTEMAS I
fFf§ll~!1f
----
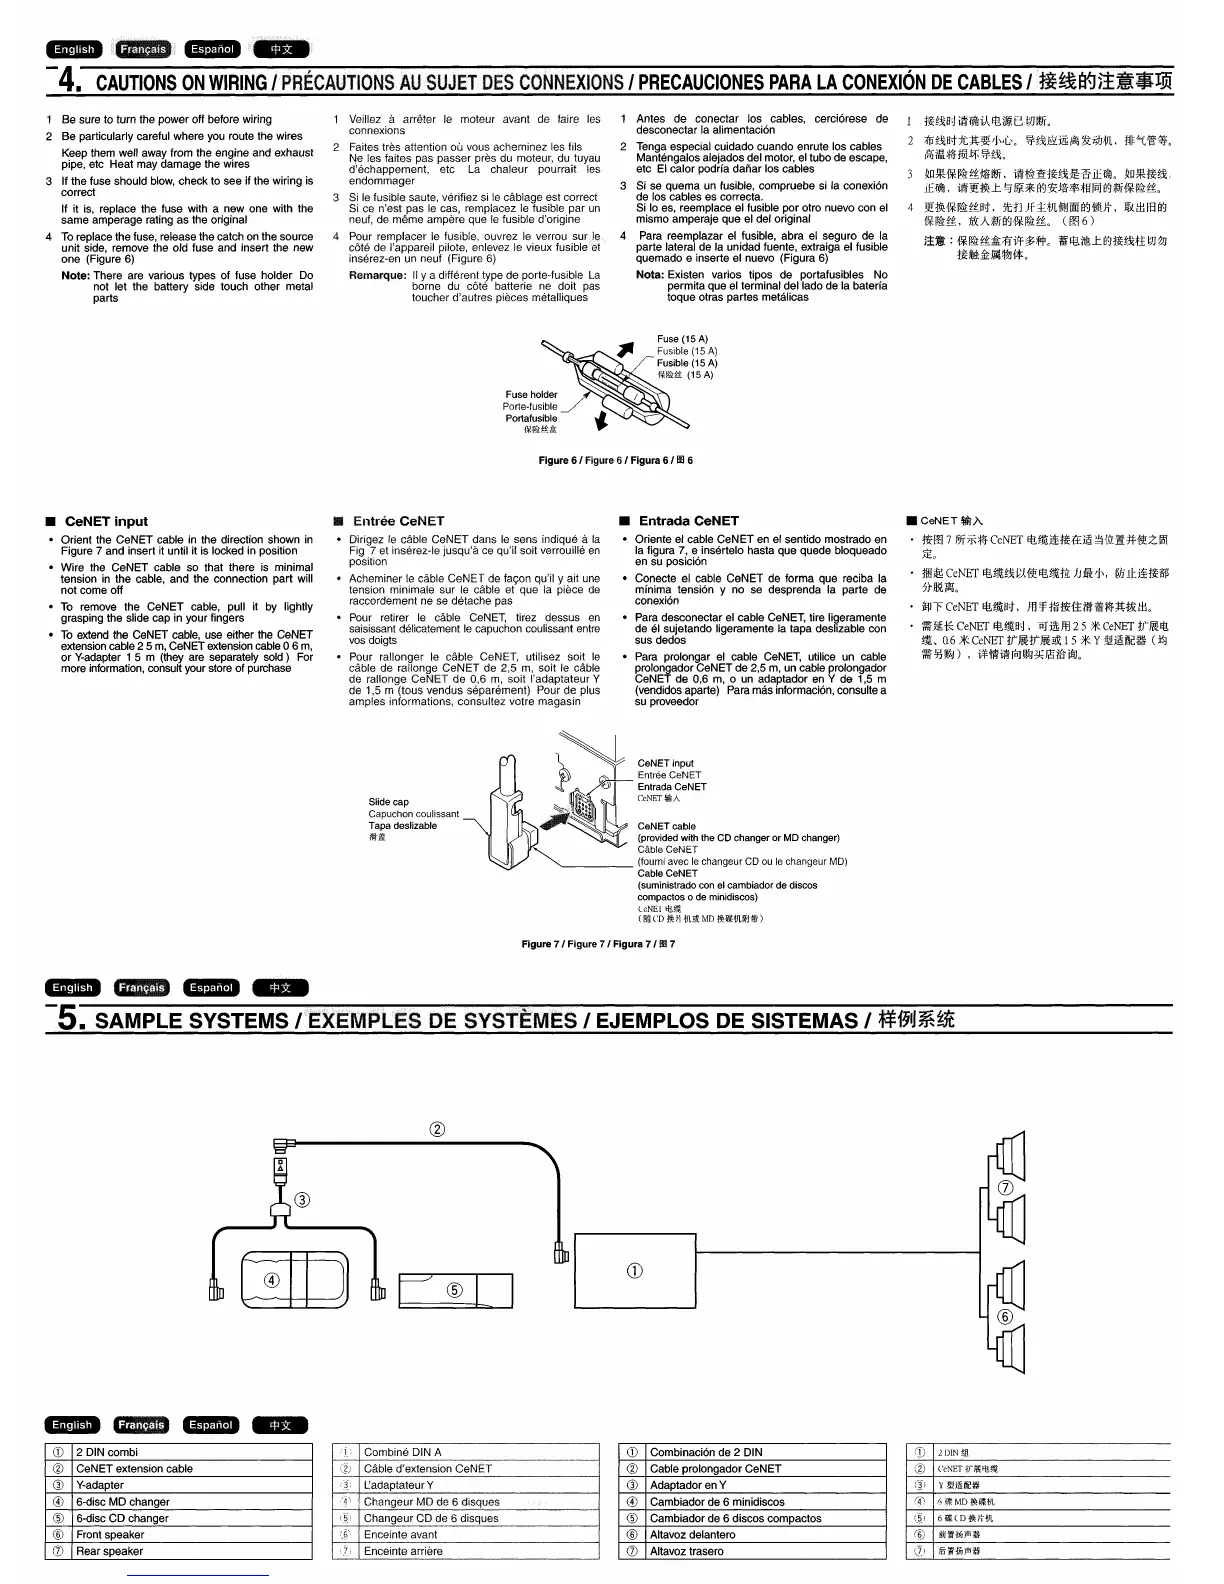
-5. SAMPLE SYSTEMS I
Slide cap
Capuchon coulissant
Tapa deslizable
Ill1\\!
GeNET input
Entree CeNET
Entrada CeNET
CeNETIiliA
GeNET cable
(provided with the
GO
changer
or
MD changer)
Cable CeNET
~
(lourni avec
Ie
changeur CD ou
Ie
changeur MD)
CableCeNET
(suministrado con el cambiador
de
discos
compactos
0 de minidiscos)
leNEl
""r~
(Ili!l
CD
J*JilJljjl(
MD
J*ill\1JlmH1r)
Figure
7/
Figure 7 /
Figura
7/
00
7
®
----
CD
2 DIN combi
0
CeNET
extension cable
G)
V-adapter
@
6-disc MD changer
®
6-disc
CD
changer
®
Front speaker
(j)
Rear speaker
1.'
Combine DIN A
(g;
Cable d'extension CeNET
3:
L:adaptateur V
T
Changeur MD de 6 disques
:5:
Changeur CD de 6 disques
(§'
Enceinte avant
);
Enceinte arriere
CD
Combinacion de 2 DIN
0
Cable prolongador
CeNET
G)
Adaptador en V
@
Cambiador de 6 minidiscos
®
Cambiador de 6 discos compactos
®
Altavoz delantero
(j)
Altavoz trasero
(D
2DIN!.ll
@
CeNET
irRllf1!!!\i
 Loading...