1
2
2
4
5
3
You can change the media sources.
Vous pouvez modifier les supports sources.
Es posible cambiar las fuentes de medios.
NX700
QUICK START GUIDE /
GUIDE DE DÉMARRAGE
RAPIDE /
GUÍA DE INICIO RÁPIDO
English Françals Español
PACKAGE CONTENTS / CONTENU DE L’EMBALLAGE / CONTENIDO DEL PAQUETE
1
Main unit / Unité principale / Unidad principal
2
Quick Start Guide (This Guide) / Guide de démarrage rapide (Ce Guide) / Guía de inicio rápido (Esta Guía)
3
Installation Manual / Manuel d’installation / Manual de instalación
4
CD-ROM / CD-ROM / CD-ROM
s/WNERSMANUAL)NSTALLATION-ANUALMode d’emploi et manuel d’installation / Manual de instrucciones y de instalación
s5SER-ANUAL#LARION-OBILE-APManuel de l’utilisateur - Clarion Mobile Map / Manual de usuario - Clarion Mobile Map
s
User Manual - Bluetooth Connectivity / Manuel de l’utilisateur - Connectivité Bluetooth / Manual de usuario - Conectividad Bluetooth
5
0OWERSUPPLYCORDCordon d’alimentation / Cable de la fuente de alimentación
6
RCA pin cord / Cordon RCA à broche / Cable de terminales RCA
7
Bag for accessories / Sac d’accessoires / Bolsa de accesorios
&LATHEADSCREWVis à tête plate / Tornillo de cabeza plana (M5 X 8 mm)................................................................................... 8
Hexagonal bolt / Vis hexagonales / Perno hexagonal (M5 X 8 mm) ............................................................................................. 8
Rubber cap (for RCA pin cord) / Capuchon en caoutchouc (pour le cordon RCA à broche) /
Cubierta de caucho (para cables de terminales RCA).................................................................................................................. 14
Lead holder / Support de câble / Sujetacables .............................................................................................................................. 3
Double-sided tape for fastening GPS antenna / Ruban adhésif double face pour fixer l’antenne GPS /
Cinta de doble cara para fijar la antena GPS ................................................................................................................................ 1
8
Remote control unit / Télécommande / Unidad de mando a distancia
9
Battery / Pile / Pilas
0
Finisher / Cadre extérieur / Acabado
!
Warranty card / Carte de garantie/ Tarjeta de garantía
@
GPS antenna / Antenne GPS / Antena GPS
#
Microphone / Microphone / Micrófono
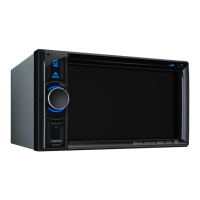
Note:
sBe sure to read this section while referring to the front diagram.
1
Sensor
s2ECEIVERFORTHEREMOTECONTROLUNITOPERATINGRANGEINALL
directions).
2
[VOL –], [VOL +] buttons
s5SETHESEBUTTONSTOINCREASEDECREASETHEVOLUME
3
[SRC] button
s0RESSTHISBUTTONTODISPLAYHIDETHE3OURCESCREENTOSWITCH
the source mode.
4
Blink LED/Reset button
s7HENTHE"LINK,%$FUNCTIONISSETTOhOn” from the System tab
MENUONTHE'ENERALSCREENBLINKSWHENTHE!##POWERIS
turned off.
5
SD memory card slot
s3$MEMORYCARDFUNCTIONISAVAILABLEINTHE.AVIMODE&OR
more information about the SD memory card function, see your
5SERMANUALFORTHE.AVIMODE
Note:
sWhen you insert the SD memory card stored music files, they cannot
be read in this unit.
Remarque :
s
Lisez attentivement ce chapitre en vous référant aux schémas de la façade.
1
Capteur
s2ÏCEPTEURDELATÏLÏCOMMANDERAYONDEFONCTIONNEMENT
dans toutes les directions).
2
Touches [VOL –], [VOL +]
s5TILISEZCESTOUCHESPOURAUGMENTERDIMINUERLEVOLUME
3
Touche [SRC]
s!PPUYEZSURCETTETOUCHEPOURAFFICHERMASQUER3OURCE
l’écran et changer le mode source.
4
DEL clignotante/bouton de réinitialisation
s3ILAFONCTION"LINK,%$ESTRÏGLÏESURiOn » à partir de
LONGLET3YSTEMDELÏCRAN'ENERALELLECLIGNOTELORSQUEVOUS
coupez le contact du véhicule.
5
Logement de la carte mémoire SD
s
,AFONCTIONDECARTEMÏMOIRE3$ESTDISPONIBLEENMODE.AVI0OUR
plus d’informations sur la fonction de carte mémoire SD, consultez
LE-ANUELDELUTILISATEURSECTIONDÏDIÏEAUMODE.AVI
Remarque :
sSi vous insérez une carte mémoire SD contenant des fichiers
musicaux, il est impossible de lire ces fichiers sur cet appareil.
Nota:
s
Asegúrese de leer esta sección a la vez que consulta el diagrama delantero.
1
Sensor
s2ECEPTORPARALAUNIDADDEMANDOADISTANCIARANGODE
OPERACIØNENTODASLASDIRECCIONES
2
Botones [VOL –], [VOL +]
s5TILÓCELOSPARAAUMENTAROREDUCIRELVOLUMEN
3
Botón [SRC]
s0ULSEESTEBOTØNPARAVISUALIZAROCULTARLAPANTALLA3OURCEY
cambiar al modo de fuente.
4
LED parpadeante/botón de reinicio
s#UANDOLAFUNCIØN"LINK,%$SEESTABLECEENhOn” en el menú
de la ficha System de la pantalla General, parpadea al
desactivar la alimentación de ACC.
5
Ranura para tarjeta de memoria SD
s,AFUNCIØNDETARJETASDEMEMORIA3$ESTÈDISPONIBLEENEL
MODO.AVI0ARAOBTENERMÈSINFORMACIØNSOBRELAFUNCIØNDE
tarjetas de memoria SD, consulte el Manual de usuario
SECCIØNDELMODO.AVI
Nota:
sSi inserta una tarjeta de memoria SD con archivos de música, no
podrán leerse en esta unidad.be read in this unit.
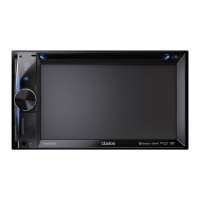
Functions of Buttons / Fonctions des touches / Funciones de los botones
z
Operation Panel / Panneau de commande / Panel de operaciones
z
DVD Video mode / DVD Video mode / Modo DVD vídeo
z
With the operation panel open /
Lorsque le panneau de commande est ouvert
/
Con el panel de operaciones abierto
Selecting a Media Source / Sélection d’une source multimédia / Selección de una fuente de soporte
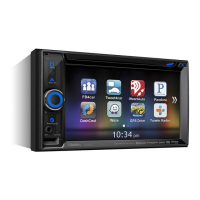
Connecting a Bluetooth Mobile Phone / Connexion d’un téléphone portable Bluetooth / Conectar a un Teléfono Móvil Bluetooth
Source Media Modes / Mode Source Multimédia / Modo De Soporte De Fuente
Opening/closing the Operation Panel / Ouverture/fermeture du panneau de commande / Apertura o cierre del panel de operaciones
Appuyez sur le bouton [
o
(Ejection)] pour afficher l’écran Eject.
4OQUELATECLA;
o
(Eject)] para visualizar la pantalla Eject.
1. Touch the [
o
(Eject)] key to display the Eject screen.
2. Touch the [Open/Close] key.
4HEOPERATIONPANELWILLBEOPENED
Appuyez sur la touche [Open/Close].
Le panneau de commande s’ouvre.
4OQUELATECLA;Open/Close].
Se abrirá el panel de operaciones.
3. Touch the [Open/Close=KEYWHENTHEOPERATIONPANELISOPEN
4HEOPERATIONPANELWILLBECLOSED
s4HEOPERATIONPANELWILLCLOSEAUTOMATICALLYWHENLEAVINGITOPENFORAWHILE
Appuyez sur la touche [Open/Close=LORSQUELEPANNEAUDECOMMANDEESTOUVERT
Le panneau de commande se ferme.
s,EPANNEAUDECOMMANDESEFERMEAUTOMATIQUEMENTSIVOUSLELAISSEZOUVERT
pendant un moment.
4OQUELATECLA;Open/Close] cuando el panel de operaciones esté abierto.
Se cerrará el panel de operaciones.
s%LPANELDEOPERACIONESSECERRARÈAUTOMÈTICAMENTESILODEJAABIERTODURANTEUNRATO
Turning the Power On / Mise sous tension /
Encender la alimentación
1. Press the [SRC] button to display the Source screen.
Appuyez sur la touche [SRC] pour afficher l’écran Source.
Pulse el botón [SRC] para ver la pantalla Source.
4OUCHTHEDESIRED3OURCEKEYYOUWISHTOCHANGETO
4HESYSTEMISSWITCHEDTOTHECORRESPONDINGSOURCE
media mode.
!PPUYEZSURLEBOUTON3OURCEQUEVOUSSOUHAITEZACTIVER
Le système active le mode source multimédia
correspondant.
4OQUELATECLADELAFUENTEALAQUEDESEECAMBIAR
El sistema se cambia al modo de soporte de fuente
correspondiente.
1
Control keys for current source /
Boutons de commande de la source actuelle /
Teclas de control para la fuente actual
2
Source keys / Boutons de la source / Teclas de fuente
3
Control 2-Zone / Commande 2-Zone / Control de 2-Zone
1
Displays status of Repeat play.
Affiche l’état de la lecture répétée.
Muestra el estado de la reproducción repetida.
2
Hides the control keys.
-ASQUELESBOUTONSDECOMMANDE
Oculta las teclas de control.
3
Changes the screen size to suit to the playback film.
Modifie la taille de l’écran selon le type de film lu.
#AMBIAELTAMA×ODELAPANTALLAPARAQUESEADAPTEALAPELÓCULAQUESEESTÈREPRODUCIENDO
4
3WITCHESAMONGTHEANGLESWHENTHEVIDEOIMAGESARERECORDEDINTWOORMOREANGLES
#OMMUTELESANGLESLORSQUELESIMAGESVIDÏOSONTENREGISTRÏESSOUSDEUXOUPLUSIEURSANGLES
Cambia entre los ángulos si las imágenes de vídeo se han grabado en dos o más ángulos.
5
Displays the DVD menu.
Affiche le menu DVD.
Muestra el menú DVD.
6
Displays the Cursor-Key Pad panel to operate the DVD menu.
Affiche le curseur pour pouvoir utiliser le menu DVD.
Muestra el panel de teclado-cursor para utilizar las funciones del menú DVD.
7
$ISPLAYSTHE.UMERIC+EY0ADPANELTOOPERATETHE$6$MENU
!FFICHELEPAVÏNUMÏRIQUEPOURPOUVOIRUTILISERLEMENU$6$
Muestra el panel de teclado numérico para utilizar las funciones del menú DVD.
8
Displays the Options screen to specify other settings.
Affiche l’écran Options pour spécifier d’autres réglages.
Muestra la pantalla Options para especificar otros ajustes.
4
Enter Settings screen / Pour afficher l’écran Settings /
Pantalla de introducción de ajustes (Settings)
5
Set DIMMER mode / Pour régler le mode DIMMER /
Establecer modo DIMMER
6
3WITCHTO.AVIMODE0OURACTIVERLEMODE.AVI /
#AMBIARAMODO.AVI
3TARTTHEENGINE4HEPOWERISSUPPLIEDTOTHISUNIT
Démarrez le moteur. L’appareil est alimenté.
Encienda el motor. Esta unidad recibe la alimentación.
7HENYOUSELECTTHEDESIREDSOURCEMODEFOREXAMPLETHE$6$6IDEOORI0ODMODETHEFOLLOWINGSCREENWILLAPPEAR
,ORSQUEVOUSSÏLECTIONNEZLEMODESOURCEDEVOTRECHOIXPAREXEMPLELEMODE$6$VIDÏOOUI0ODLÏCRANSUIVANTSAFFICHE
Cuando selecciona el modo de fuente deseado (por ejemplo, DVD Vídeo o iPod), aparece la siguiente pantalla.
Press the [SRC] button to display the Source screen.
Appuyez sur la touche [SRC] pour afficher l’écran Source.
Pulse el botón [SRC] para ver la pantalla Source.
Touch the [DVD] key to select the DVD Video screen.
Appuyez sur le bouton [DVD] pour sélectionner le mode
DVD vidéo.
4OQUELATECLA;DVD] para seleccionar el modo DVD
vídeo.
Fr
Es
Fr
Es
Fr
Es
En
En
Fr
Es
En
En
4. Touch the [Back] key to return to the previous screen.
Appuyez sur la touche [Back] pour revenir à l’écran précédent.
4OQUELATECLA;Back] para regresar a la pantalla anterior.
Fr
Es
En
1. Tap TEL on the Source screen.
Pressez sur le bouton TEL sur l’écran Source.
Presione el botón TEL en la pantalla Source
(Fuente).
Fr
Es
En
4. 4APTHEMOBILEPHONEYOUWANTTOCONNECT
Les résultats s’afficheront sur l’écran.
,APANTALLAMOSTRARÈLOSRESULTADOSDELABÞSQUEDA
Fr
Es
En
5. 4APTOCONNECTTHISSYSTEMWITHTHEMOBILEPHONE
Pressez sur pour connecter votre appareil au téléphone portable.
Presione para conectar su dispositivo con el teléfono móvil.
Fr
Es
Fr
Es
En
2. Tap Setup
➜
Search Phone.
Pressez sur Paramètres
➜
Rech. téléph.
Presione Configuración
➜
Buscar teléfono.
Fr
Es
En
Fr
Es
En
3. Make sure that your Bluetooth mobile
phone is in discoverable mode.
Tap for the program to search for
nearby Bluetooth mobile phone.
6ÏRIFIEZQUEVOTRETÏLÏPHONEPORTABLEESTEN
mode de découverte. Pressez sur le
programme commence à chercher tous les
téléphones portables Bluetooth à proximité.
!SEGÞRESEDEQUESUTELÏFONOMØVIL"LUETOOTHESTÈENMODOVISIBLE
Presione para buscar teléfonos móviles Bluetooth cercanos.
Fr
Es
En
7HENYOUPAIRYOUR"LUETOOTHMOBILEPHONEWITHTHISSYSTEMFOR
THEFIRSTTIMEYOUNEEDTODOTHEFOLLOWING
➜
6. When prompted, enter the passkey 1234 on your mobile phone to establish a connection.
Depending on the mobile phone model, you may need to select the hands-free service to complete the connection.
En
,ORSQUEDEMANDÏENTREZLEMOTDEPASSESURVOTRETÏLÏPHONEPORTABLEPOURÏTABLIRLACONNEXION
Vous devrez peut-être choisir, en fonction du type de téléphone portable utilisé, le service mains-libres avant de
pouvoir établir la connexion.
#UANDOSELEINDIQUEINTRODUZCALACONTRASE×AENSUTELÏFONOMØVILPARAESTABLECERUNACONEXIØN
$EPENDIENDODELMODELODETELÏFONOMØVILPUEDEQUENECESITESELECCIONARELSERVICIOMANOSLIBRESPARA
completar la conexión.
7. Tap . The Phone Menu screen appears.
Pressez sur . L’écran Menu du téléphone apparaît.
Presione . Aparecerá la pantalla del Menú del Teléfono.
Fr
Es
En
,ORSQUEVOUSAPPAIREZVOTRETÏLÏPHONEPORTABLE"LUETOOTHËCE
SYSTÒMEPOURLAPREMIÒREFOISPROCÏDEZCOMMESUIT
Cuando empareje su teléfono móvil Bluetooth con este sistema
PORPRIMERAVEZDEBEHACERLOSIGUIENTE
NX700
8
4
3
2
5
1
7
6
[Options] key / Bouton [Options] / Tecla [Options]
z
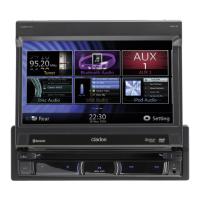
iPod mode / iPod mode / Modo iPod
1
Displays status of Repeat and Shuffle play.
Affiche l’état de la lecture répétée et de la lecture aléatoire.
Muestra el estado de la reproducción repetida o aleatoria.
2
Displays the corresponding list screen to select track to be played.
Affiche l’écran de liste correspondant en vue de sélectionner la plage à lire.
Muestra la pantalla de la lista correspondiente para seleccionar una pista y reproducirla
3
3WITCHESTHEOPERATIONMODETOTHE6IDEOMODEOR-USICMODE
s%NABLEDINTHE3IMPLE#ONTROLMODE
"ASCULELEMODEDEFONCTIONNEMENTSURVIDÏOOUSURMUSIQUE
s$ISPONIBLEENMODEDECOMMANDESIMPLE
Cambia el modo de funcionamiento del modo de vídeo al modo de música y viceversa.
s3EACTIVAENELMODODECONTROLSIMPLE
1 2
3
Printed in China / Imprimé en Chine / Impreso en China
280-8884-00
1111
42 23 43
6
5
6 5