7
ENGLISH
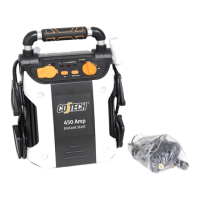
4.3 Using the jump starter
1. Switch off all unnecessary electrical features on your vehicle such as radio, A/C, mobile phone charger, etc.
before connecting thebattery clamps. Readthesection on “jump starting” in your vehicle instruction manual.
2. Check that thejump starter’s on/off switch (7) is set toOFF.
3. Check which of thebattery terminals is thepositive and which is thenegative. Somebatteries have
aninsulating cover over theterminals which will need to be lifted so that you have access to theterminals.
Warning! Nowadays, most vehicles are negatively earthed, i.e. thenegative terminal of thebattery is
connected to thechassis. However, certain vehicles may be positively earthed. Itis important that you find
out which type of earthing your vehicle’s battery has. Consult atradesman if you are uncertain.
4. Connect thepositive (red) battery clamp to thepositive terminal (+) of thebattery. Connect thenegative
(black) battery clamp to thenegative terminal (-) of thebattery or to ametal part of thevehicle chassis.
N.B. Certain makes of car have special jump start connections in theengine compartment if thebattery is
difficult to access. Checkyour vehicle’s owner manual if you are unsure.
Warning! Ifthebattery battery clamps are connected incorrectly, i.e. red to negative and black to positive,
thereverse polarity indicator will light and abuzzer will sound until theincorrect lead has been removed.
5. Turn theon-off switch (7) toON.
6. Turn theignition key and try to start thevehicle for 3 to 6 seconds.
N.B. Ifthevehicle does not start, let thejump starter battery cool down for three minutes before thenext
attempt to start thevehicle ismade.
7. When thevehicle’s engine has started, turn thejump starter on/off switch (7) toOFF.
8. First disconnect theblack, negative clamp (16) from thenegative terminal (-) of thebattery or from ametal
part of thevehicle chassis. Windup thelead and place it back into theholder.
9. Then remove thered positive (+) battery clamp (13) from thepositive terminal (+) of thebattery. Windup
thelead and return thebattery clamp securely into its holder.
10. Charge thejump starter’s battery again as soon as possible.
5. USB port
1. Press thepower switch (1) to activate theUSB port. TheUSB indicator light should comeon.
2. Lift thecover and connect theUSB connector of theproduct you wish to power to theUSB port (2).
3. The USB port is only intended for charging MP3 players, digital cameras, etc. Theoutlet is not intended for
any form of data communication (i.e. computers). TheUSB-port outputs 5VDC, max 500mA.
N.B. Notall USB products work with thisport.
N.B. TheUSB port must not be activated during charging of thejump starter’s battery or when thestarter is put
away for storage.
6. Using the jump starter as a 12 V power supply via
the 12 V socket (cigarette lighter socket)
The jump starter can be used for apower supply for 12 V products with 12 V plugs. Thesocket produces 5 Amax.
1. Lift thecover.
2. Connect theplug from your 12 V device to thesocket (3). N.B. Themax output for thedevice should be 5 A(60 W).
3. Switch on theconnected device.
4. Press the“Test-button” (10) to check thebattery’s charge every now andthen.
7. Integrated LED work light
The jump starter is equipped with anadjustable LED worklight (9). Pressthelight’s power switch to turn
theworklight on/off. Makesure thelight is turned off when charging or when thestarter is put away for storage.