EasyManua.ls Logo

Coleman ELITE 17'X9' User Manual

Coleman ELITE 17'X9'
2 pages
To Next Page IconTo Next Page
Page #1 background imageLoading...
Page #1 background image
SCREENED WEATHERMASTER
®
ELITE 17'X9'
1
Layout & Positioning of Tent
– Layout and position tent with screen room
facing desired direction. (illus. 1)
– Stake down tent, starting with the corners.
Do not stretch too tight. Angle the stakes
slightly toward the tent. (illus. 2)
Keep the floor taut.
– Stake down the remainder
of the stake loops.
– Unzip the door.
2
Assemble & Place Roof Poles
– Assemble all shock-corded
roof poles. When assembled will
form a continuous arch with both
ends pointing down. (illus. 3)
– Select center curved roof poles,
and insert through the two center
roof sleeves and the front screen
room roof sleeve all with grey
webbing on sleeve ends. (illus. 4)
– Select rear roof pole, (orange
sticker), and insert through the roof
sleeve with orange webbing sleeve
end at rear of the tent. (illus. 4)
When You Are Ready
To Set Up Your Tent
– Select a level campsite
clear of rocks, branches
and other hard or sharp
objects.
– Do not set up your tent
under trees.
– For best results in windy
conditions, position the
end of tent into the wind.
(3) Center Curved Roof Poles
Part No.
5010000474
(1) Rear Pole
(Orange Sticker) Part No.
5010000475
(6) Center Upright Poles
Part No.
5010000477
(1) Vertical Hinge Door Pole (short with
plastic tips) Part No.
5010000479
(1) Hinge Door Pole (long with
plastic tips) Part No.
5010000480
(2) Rear Brace Poles
(Orange Sticker) Part No.
5010000476
Rainfly Part No.
5010000478
Instructions apply to Part Number 2000000146
illus. 3 Curved roof pole assembly.
illus. 4 Curved roof pole system shown
inserted through pole sleeve.
illus. 2
Stake loops
properly staked
Front of
screen
door
Roof sleeve
illus. 1
Roof pole sleeve
Shock-corded poles
Forms an arch
POLE ASSEMBLY PARTS
Color coded
webbing
Color coded
webbing
Question and Answer IconNeed help?

Do you have a question about the Coleman ELITE 17'X9' and is the answer not in the manual?

Coleman ELITE 17'X9' Specifications

General IconGeneral
BrandColeman
ModelELITE 17'X9'
CategoryTent
TypeCabin Tent
Capacity8-person
Number of Rooms2
Water ResistanceWeatherTec System
MaterialPolyester
Floor MaterialPolyethylene
Setup Time15 minutes
Dimensions17 ft x 9 ft
Poles MaterialSteel and Fiberglass

Summary

When You Are Ready To Set Up Your Tent

Select a level campsite

Choose a flat, clear area free from hazards for optimal tent placement.

Avoid setting up tent under trees

Avoid setting up the tent beneath trees to prevent damage from falling debris.

Position tent for windy conditions

Position the tent's end into the wind for better stability in windy conditions.

Layout and Positioning of Tent

Orient screen room

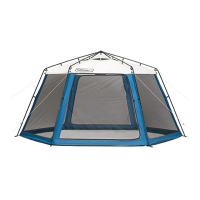
Position the tent with the screen room oriented towards the desired direction.

Stake down corners first

Secure the tent by staking down the corners first, angling stakes slightly.

Ensure floor tautness

Ensure the tent floor is kept taut and properly staked for stability.

Stake all loops

Secure all remaining stake loops to ensure the tent is firmly anchored.

Unzip door for access

Unzip the tent door to allow access and ventilation.

Assemble and Place Roof Poles

Assemble shock-corded roof poles

Assemble all shock-corded roof poles to form continuous arches.

Insert center roof poles

Insert center poles through the two center roof sleeves and front screen room sleeve.

Insert rear roof pole

Insert the rear pole with orange webbing into the rear roof sleeve.

Raise Center of Tent

Assemble center brace poles

Assemble the longer, shock-corded brace poles for the tent's center structure.

Adjust poles to inner hole 'A'

Adjust poles to the innermost hole 'A' for initial tent frame setup.

Insert brace poles into roof poles

Insert brace poles into roof poles and raise the tent structure upright.

Attach brace poles to squeeze pins

Connect brace poles to the tent's bottom squeeze pins for stability.

Repeat for front screen area brace poles

Repeat the brace pole attachment process for the front screen area.

Raise Ends of Tent and Add Hinged Door

Assemble end brace poles

Assemble the end brace poles, noting the orange sticker and round ends.

Insert end brace poles into roof assemblies

Insert end brace poles into roof assemblies, ensuring they angle towards the tent's center.

Attach end brace poles to squeeze pins

Ensure end brace poles connect to the tent's bottom squeeze pins.

Adjust poles for terrain

Adjust pole positions to adapt to uneven ground terrain.

Attach rainfly

Drape the rainfly over the tent, securing it to brace poles with 'S' hooks.

Install vertical hinged door pole

Insert the short vertical door pole into its sleeve and pole stop, then zip closed.

Install long hinged door pole

Insert the long door pole into its sleeve and pole stops, then zip closed.

Important Tent Information and Warnings

Condensation management

Manage condensation caused by moisture through ventilation and removing wet items.

Tent storage and drying

Dry tent thoroughly before storage; do not pack stakes or poles inside.

Proper stake removal

Remove stakes by pulling on the stake itself, not the tent fabric or loop.

Pole storage

Do not leave tent poles telescoped together during storage.

UV damage prevention

Avoid leaving tent set up for extended periods to prevent UV damage.

Flame and heat warning

Keep all flame and heat sources away from tent fabric; it meets flammability requirements.

Mercury warning for fluorescent tubes

Fluorescent tubes contain mercury and must be recycled or disposed of properly.
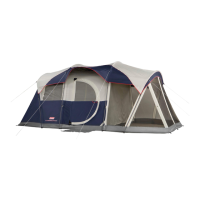
Related product manuals