MainsPro G99TT 1.0.0 Global Guide
20
Number Description
TRIPLED
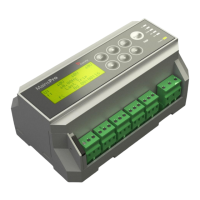
Singalization LEDs
Mechanical seal
4.1.1 Pushbuttons
In the measurement screens, use the ↑ and ↓ arrow buttons to browse through the measured values as
displayed on the 4x20 alphanumerical display. See the chapter Measurement screens (page 24) to get
the basic orientation.
To enter the setpoints menu, push the → button. For setpoints change, see Setpoints change on page
20.
To enter the init screen, to reset operation time, perform factory default reset, reset statistics or enter the
Test mode, push the ENTER and ESC at the same time. Together with the init screen display, the unit
performs lamp test by simultaneous cycling of all LEDs through all indication colors.
For confirmation of any value change or query, use the ENTERbutton.
For leaving any value change or query screen without change, use ESC button.
From any screen, press and hold the ESC button for 2 seconds to return back to the main measurement
screen (homepage).
4.1.2 Setpoints change
1. Push the → button to open the setpoints menu.
2. Use buttons ↑ and ↓ to browse through the menu. The setpoint groups are displayed in a cyclical order, i.e.
from the last setpoint group by button ↓, the cursor moves to the first group and vice versa.
3. Use button → to enter the setpoint group, by button ←, move one level up in the setpoint tree. The
setpoints are displayed in a cyclical order, i.e. from the last setpoint by button ↓, the cursor moves to the
first one and vice versa.
4. Press → to access the setpoint screen. Here you can change the setpoint value. The setpoint range is
shown at the bottom row.
5. The change is done by orders, starting from the least important digit. Use the buttons ← and → to move
between the digits. Use the buttons ↑ and ↓ to edit the digit. Please note, that the value is not limited by the
parameters limits during editing, but if an out-of-limits value is set-up, it will not be allowed to be stored in
the unit memory (the change may not be confirmed).
6. After the setpoint change is done, press ENTER to confirm the set value, or ESC to leave the setpoint
change screen without saving the changes.
Note: The unit allows mechanical sealing of selected setpoints by the black switch in left-bottom corner of the
unit (for information what setpoints are sealing protected see Factory default setting of MainsPro G99TT
unit (page 47)). If locked, the icon of closed padlock will appear on the position of setpoint change and the
setpoints may not be changed. Also, the padlock icon will be seen on the "homepage" measurement screen.
Once the setpoint change screen is entered and afterwards the sealing position is changed, the padlock
indication is not changed, but the internal lock is applied immediately.