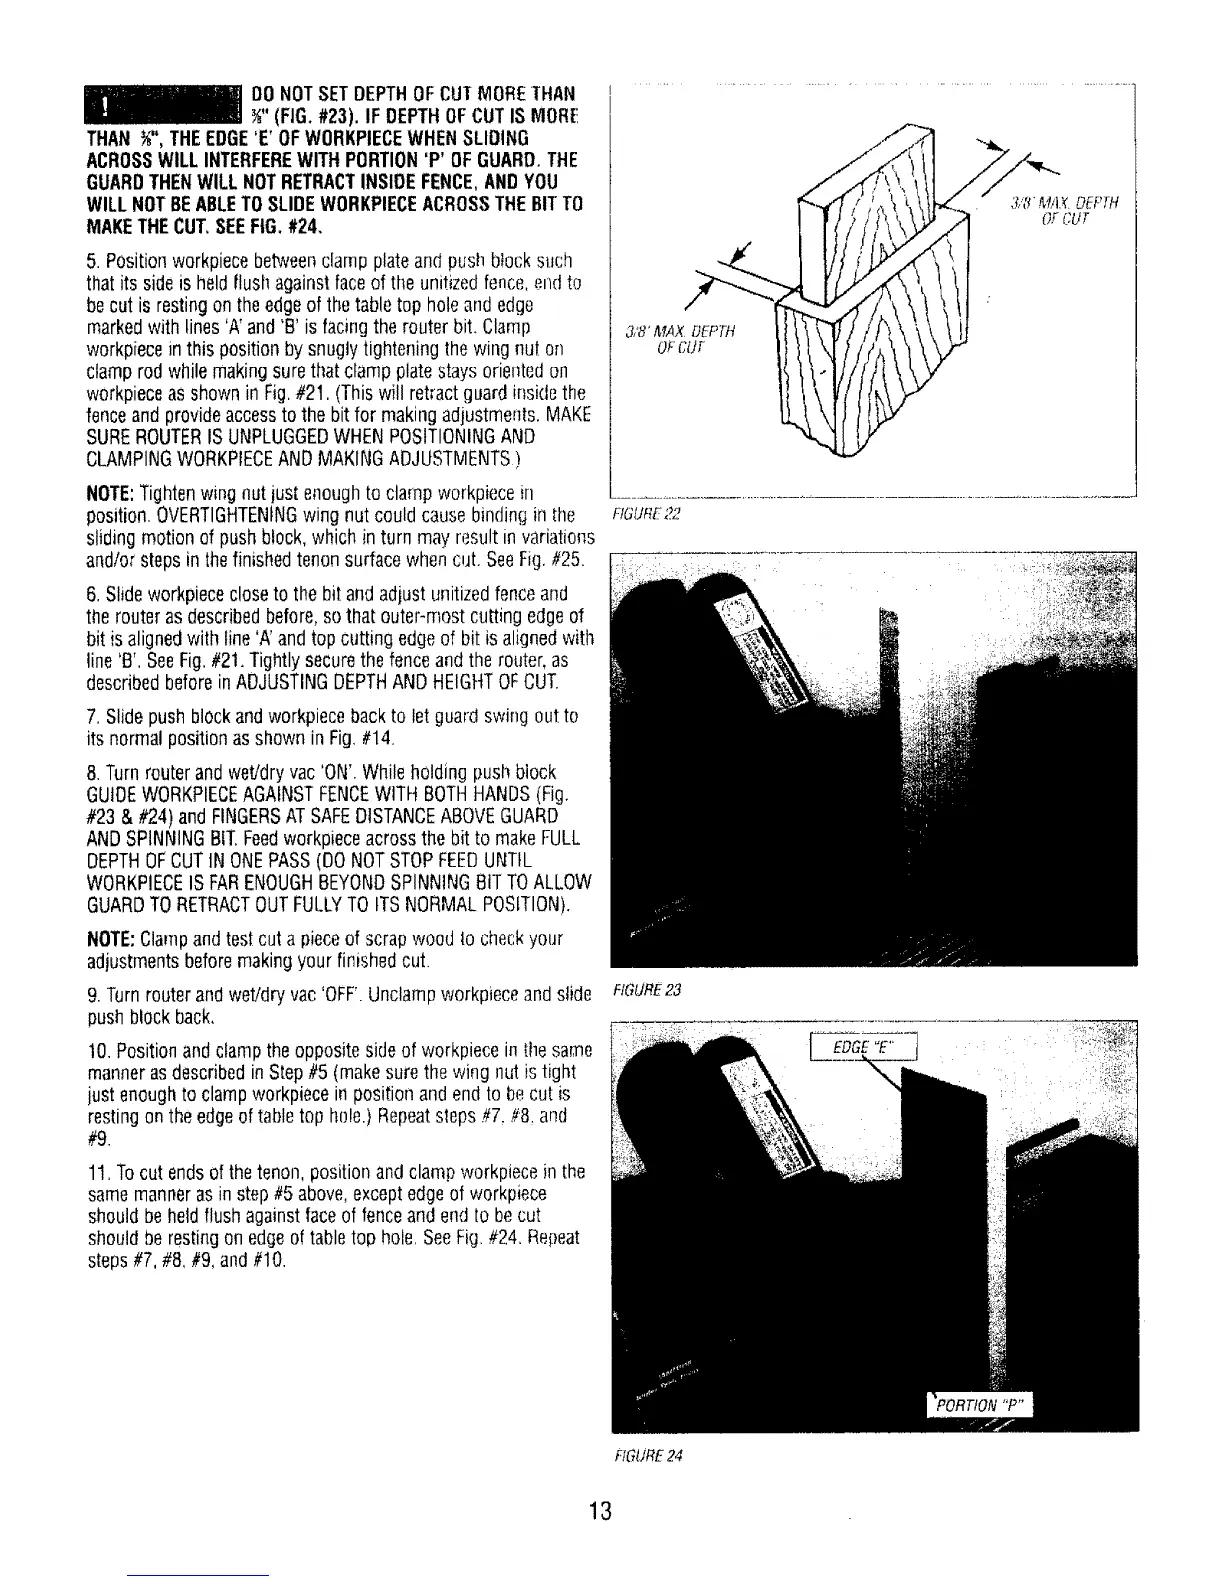
DONOTSETDEPTHOF CUTMORETHAN
_" (FIG.#23). IF DEPTHOFCUTIS MORE
THAN %",THEEDGE'E' OFWORKPIECEWHENSLIOtNG
ACROSSWILL INTERFEREWITHPORTION'P' OFGUARD.THE
GUARDTHENWILLNOTRETRACTINSIDEFENCE,ANDYOU
WILLNOTBEABLETOSLIDEWORKPIECEACROSSTHEBITTO
MAKETHECUT,SEEFIG.#24.
5. POsitionworkpiecebetweenclampplate andpush block such
that its sideis held flushagainstfaceof the unitizedfence,el_(ito
becut is restingon the edgeof thetabletop hole andedge
markedwith lines'A'and 'B' is facingthe routerbit. Clamp
workpiecein this position by snuglytightening thewing nut on
clamp rod whilemakingsurethat clamp platestays orientedon
workpieceas shownin Fig.#21. (This will retract guard inside the
fenceandprovideaccessto the bit for making adjustments.MAKE
SUREROUTERISUNPLUGGEDWHENPOSITIONINGAND
CLAMPINGWORKPIECEAND MAKINGADJUSTMENTS)
NOTE:Tightenwingnut just enoughto clamp workpiece in
position.OVERTIGHTENINGwing nut could causebinding in tim
slidingmotion of pushblock,which in turn may resultin variations
andlor stepsin thefinishedtenon surface whencut. SeeFig, #25.
6. Slideworkpiececloseto the bit andadjust unitizedfenceand
therouterasdescribedbefore,so that outer-most cutting edgeof
bit is alignedwith line'A'and top cutting edgeof bit is alignedwith
line 'B'. SeeFig,#21.Tightlysecurethe fenceand therouter, as
describedbeforein ADJUSTINGDEPTHANDHEIGHTOFCUT.
7. Slidepushblockandworkpiecebackto let guard swing out to
its normal positionasshown in Fig. #14.
8.Turnrouterand wet/dryvac 'ON'. Whileholding push biock
GUIDEWORKPIECEAGAINSTFENCEWITH BOTHHANDS(Fig.
#23 & #24) and FINGERSATSAFEDISTANCEABOVEGUARD
ANDSPINNINGBIT.Feedworkpieceacross the bit to makeFULL
DEPTHOFCUTtN ONEPASS(DONOTSTOPFEEDUNTIL
WORKPIECEIS FARENOUGHBEYONDSPINNINGBITTOALLOW
GUARDTO RETRACTOUTFULLYTOITSNORMALPOSITION).
NOTE:Clampand testcut a pieceof scrapwood Io ci:leckyour
adjustmentsbeforemakingyour finishedcut.
9. Turnrouter and wet/dry vac 'OFF'.Unclampworkpieceand slide
pushblockback,
10.Positionand clampthe oppositeskJeof workpiece in tile same
manneras describedin Step #5 (makesure the wing nut istight
just enoughto clamp workpiecein position and end to becut is
restingon theedgeof table top hole.} Repeatslops #7. #8,and
#9.
11,Tocut endsof thetenon, positionand clamp workpiecein the
samemanrmrasin step#5 above,exceptedgeof workpiece
shouldbe hetdflush againstfaceof fenceand end tobecut
shouldbe restingon edgeof table top hole, SeeFig.#24, Repeat
steps#7, #8, #9, and#10.
• " ' " , 3,"8' MAX.DEPTH
f
3,'8"&'lAX.DEPTH
o_-CUr
FIGURE22
HGURE23
EDGE"E"
_ i ¸ i :' ¸¸ ?
#IGURE24
13