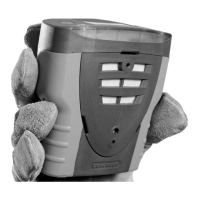
Installing or replacing an i-module
1. Unwrap the i-module from any packaging.
If you are installing a new i-module into a currently unused slot, you
will first need to remove the dummy i-module. Follow the i-module
removal instructions to do so.
2. Ensure the gasket is in place in the sensor. Place the new sensor in the
vacant space and push down gently.
3. Attach the ribbon connector by squeezing the two retaining lugs , on the
module board, toward each other and pulling out slightly. Slide the ribbon
into the slot. Push the retaining lugs back toward the sensor, this will grip
the ribbon firmly.
4. If using a dual sensor, always place this in the slot nearest to the display.
Re-assembling the Tetra 3 unit
1. Ensure that all i-modules are seated in their correct positions and all
ribbon cables are folded neatly between the i-modules and the main
unit. Put the battery and plastic holder back into their original
positions.
2. Switch on your Tetra 3 unit. The new sensor will be automatically
identified.
Check the filters and gaskets are all in good condition.
Replace if any items are faulty.
Refer to the troubleshooting guide if necessary.
Warning
Do not twist the connection ribbons.
Do not pull the i-modules too far from the PCB board, to prevent dam-
age to the cabling or electrical connections
If replacing an i-module with one of the same type, instrument specific
configuration will be retained. If replacing with a different i-module its default
configuration will be loaded.
23
Tetra 3 i-module replacement
 Loading...