Do you have a question about the curt SWAY CONTROL and is the answer not in the manual?
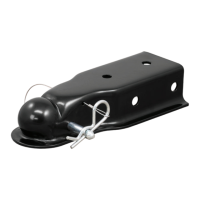
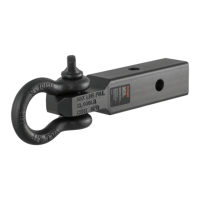
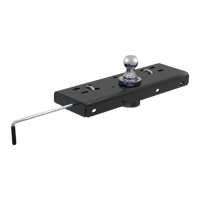
Attaching the sway control ball to the ball mount and preparing the trailer frame with a spacer plate.
Crucial safety advice regarding trailer loading, tongue weight, and conditions to avoid sway.
Instructions for connecting the sway control, setting initial tension, and road testing adjustments.
Details the initial break-in period and recommended cleaning procedures for the slide bar.
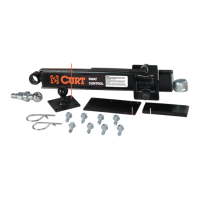
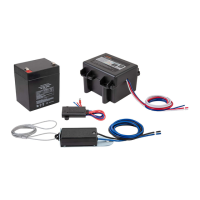
Visual identification and listing of all parts provided in the sway control kit for assembly.
The CURT Sway Control device is designed to enhance the handling characteristics of a tow vehicle when pulling a trailer, particularly to mitigate trailer sway. It is an essential accessory for trailers, especially those with heavy loads or in challenging towing conditions.
The primary function of the CURT Sway Control is to provide resistance against trailer sway, which can be caused by various factors such as wind, uneven road surfaces, or sudden maneuvers. By creating a controlled friction between the tow vehicle and the trailer, the device helps to stabilize the trailer and maintain a straighter towing path. This friction is generated by a slide bar mechanism that attaches to both the tow vehicle's ball mount and the trailer frame. The device features an On/Off handle that allows the user to adjust the tension, thereby controlling the amount of sway resistance. When engaged, it limits the relative movement between the tow vehicle and the trailer, making the towing experience safer and more predictable.
The manual provides several key components and their part numbers, which are integral to the device's functionality:
The installation process involves specific measurements:
The CURT Sway Control is designed for ease of use with several practical features:
Proper maintenance is crucial for the longevity and effective operation of the CURT Sway Control:
The manual includes several critical warnings to ensure safe operation:
By adhering to these instructions and warnings, users can effectively utilize the CURT Sway Control to enhance towing safety and stability.
| Brand | curt |
|---|---|
| Model | SWAY CONTROL |
| Category | Automobile Accessories |
| Language | English |