EasyManua.ls Logo

curt 56420 - User Manual

curt 56420
2 pages
Print Icon
To Next Page IconTo Next Page
Loading...
56420-INS-RB
July 29, 2020 9:25 AM
ECN7320
PAGE 1 OF 2
Wiring Location Guide*
for SUVs and Vans (S)
S1 Behind driver side taillight housing
S2 Behind passenger side taillight housing
S3 Behind driver side rear access panel
S4
Behind passenger side rear access panel
S5 Behind driver side rear bumper
S6 Behind center of rear bumper
S7 Behind passenger side rear bumper
S8 Under rear floor panel
S9 Behind driver side rear access panel
S10
Behind passenger side rear access panel
S5 S6 S7
S1
S3
S8
S4
S2
* Representative vehicle shown
S9
S10
INSTALLATION MANUAL
Tools Required
Ratchet Panel trim
removal tool
Socket, 14mm Cutting tool
Socket extension --
Wiring Location(s)
S5
Level of Difficulty
Easy
WARNING
Do not exceed product rating or tow vehicle lamp load rating, whichever is lower.
The battery connection must be fuse-protected, 15-amp max. Exceeding
the product rating can cause loss of warranty, overheating and potential fire.
Do not lay tools across the positive terminal (typically labeled with red covers or a red “+
symbol). This can cause a ground to short causing sparks, and / or electrical shocks.
Product Registration and Warranty
CURT Group stands behind our products with industry-leading warranties.
Provide feedback and help us to improve our products by registering your purchase at:
warranty.curtgroup.com/surveys
Maintenance
Periodic inspection of all wires and connections should be performed
to ensure there is no visible damage or loose connections.
Electrical Ratings
Signal circuits 5.0-amps per side
Tail / Running Circuits 7.5-amps total
Check vehicle owner's manual or contact
the vehicle manufacturer for more information.
NOTICE
Before you begin installation, read all instructions thoroughly.
Proper tools will improve the quality of installation and reduce the time required.
All steps must be followed to ensure the product will function properly. Once installed,
test for proper function by using a test light or connecting a properly wired trailer.
Product Photo
Question and Answer IconNeed help?

Do you have a question about the curt 56420 and is the answer not in the manual?

Summary

Electrical Ratings

Wiring Location Guide

Tools Required

Safety Warnings

General WARNING

Advises against exceeding product ratings, using fused battery connections, and laying tools across positive terminals.

Installation NOTICE

Emphasizes reading instructions, using proper tools, and testing functionality after installation.

Maintenance

Product Registration and Warranty

Installation Steps

Step 1: Battery Disconnection

Locate vehicle battery, disconnect negative terminal, and secure the wire away from the battery.

Step 2: Shroud Removal and Fuse Installation

Remove shroud below driver-side rear bumper, install fuse into the wiring harness fuse holder.

Step 3: Harness Connection

Remove dust cover, insert custom harness into OEM harness, ensuring connectors are fully inserted.

Step 4: Converter Box and Wiring Route

Adhere converter box, route 4-flat along vehicle back, secure loose wires with cable ties.

Step 5: Reassembly and Final Check

Reinstall removed items, reconnect battery terminal, install dust cover on 4-flat connector.

Overview

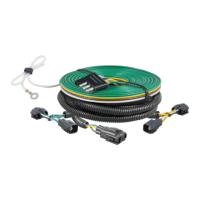
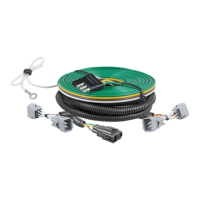
This document outlines the installation and features of a custom wiring harness for vehicle towing applications, designed for SUVs and Vans.

Function Description

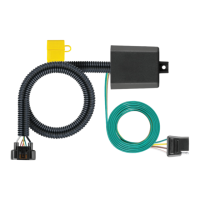
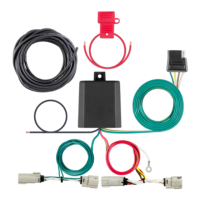
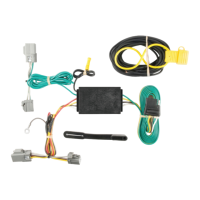
The device is a custom wiring harness that provides electrical connections for trailer lighting. It taps into the vehicle's existing wiring system to supply power for signal circuits (turn signals, brake lights) and tail/running lights on a connected trailer. The harness includes a converter box and a 4-flat connector, which is a standard interface for trailer lighting. A key safety feature is the inclusion of a fuse, which must be installed into the fuse holder in the custom wiring harness, to protect the circuit from overcurrent. The installation process involves connecting the harness to the vehicle's OEM harness, securing the converter box, and routing the 4-flat connector to the hitch area.

Important Technical Specifications

Electrical Ratings:

  • Signal circuits: 5.0 amps per side. This rating applies to the turn signals and brake lights.
  • Tail / Running Circuits: 7.5 amps total. This rating applies to the continuous power for tail lights and running lights.
  • Fuse Protection: The battery connection must be fuse-protected with a 15-amp maximum fuse. Exceeding this limit can lead to loss of warranty, overheating, and potential fire.
  • Product Rating: The device's product rating or the tow vehicle's lamp load rating, whichever is lower, should not be exceeded.

Tools Required for Installation:

  • Ratchet
  • Socket, 14mm
  • Socket extension
  • Panel trim removal tool
  • Cutting tool

Wiring Location Guide (for SUVs and Vans - S series): The manual provides a detailed guide for connecting the harness based on specific vehicle locations, designated S1 through S10. These locations include:

  • S1: Behind driver side taillight housing
  • S2: Behind passenger side taillight housing
  • S3: Behind driver side rear access panel
  • S4: Behind passenger side rear access panel
  • S5: Behind driver side rear bumper
  • S6: Behind center of rear bumper
  • S7: Behind passenger side rear bumper
  • S8: Under rear floor panel
  • S9: Behind driver side rear access panel
  • S10: Behind passenger side rear access panel The product photo illustrates a representative vehicle with these wiring locations marked, showing the harness components and their typical placement.

Usage Features

Ease of Installation: The product is rated as "Easy" in terms of installation difficulty. The manual provides step-by-step instructions with accompanying images to guide the user through the process. Safety Warnings:

  • Users are warned not to exceed the product's electrical ratings or the vehicle's lamp load rating.
  • The importance of fuse protection (15-amp max) is emphasized to prevent overheating and fire.
  • A critical safety warning advises against laying tools across the positive battery terminal to avoid short circuits, sparks, and electrical shocks. Pre-Installation Notice: Users are instructed to read all instructions thoroughly before beginning installation and to use proper tools to ensure quality and reduce installation time. Post-Installation Testing: After installation, it is crucial to test the product for proper function using a test light or by connecting a properly wired trailer. Corrosion Prevention: A provided 4-flat dust cover should be installed to help prevent corrosion on the connector.

Maintenance Features

Periodic Inspection: The manual recommends periodic inspection of all wires and connections to ensure there is no visible damage or loose connections. This helps maintain the reliability and safety of the wiring harness over time. Warranty and Registration: CURT Group offers industry-leading warranties. Users are encouraged to register their purchase at warranty.curtgroup.com/surveys to provide feedback and help improve products.

curt 56420 Specifications

General IconGeneral
Brandcurt
Model56420
CategoryAutomobile Accessories
LanguageEnglish

Related product manuals