68
69
r
r
y
a
u
i
i
A
B
C
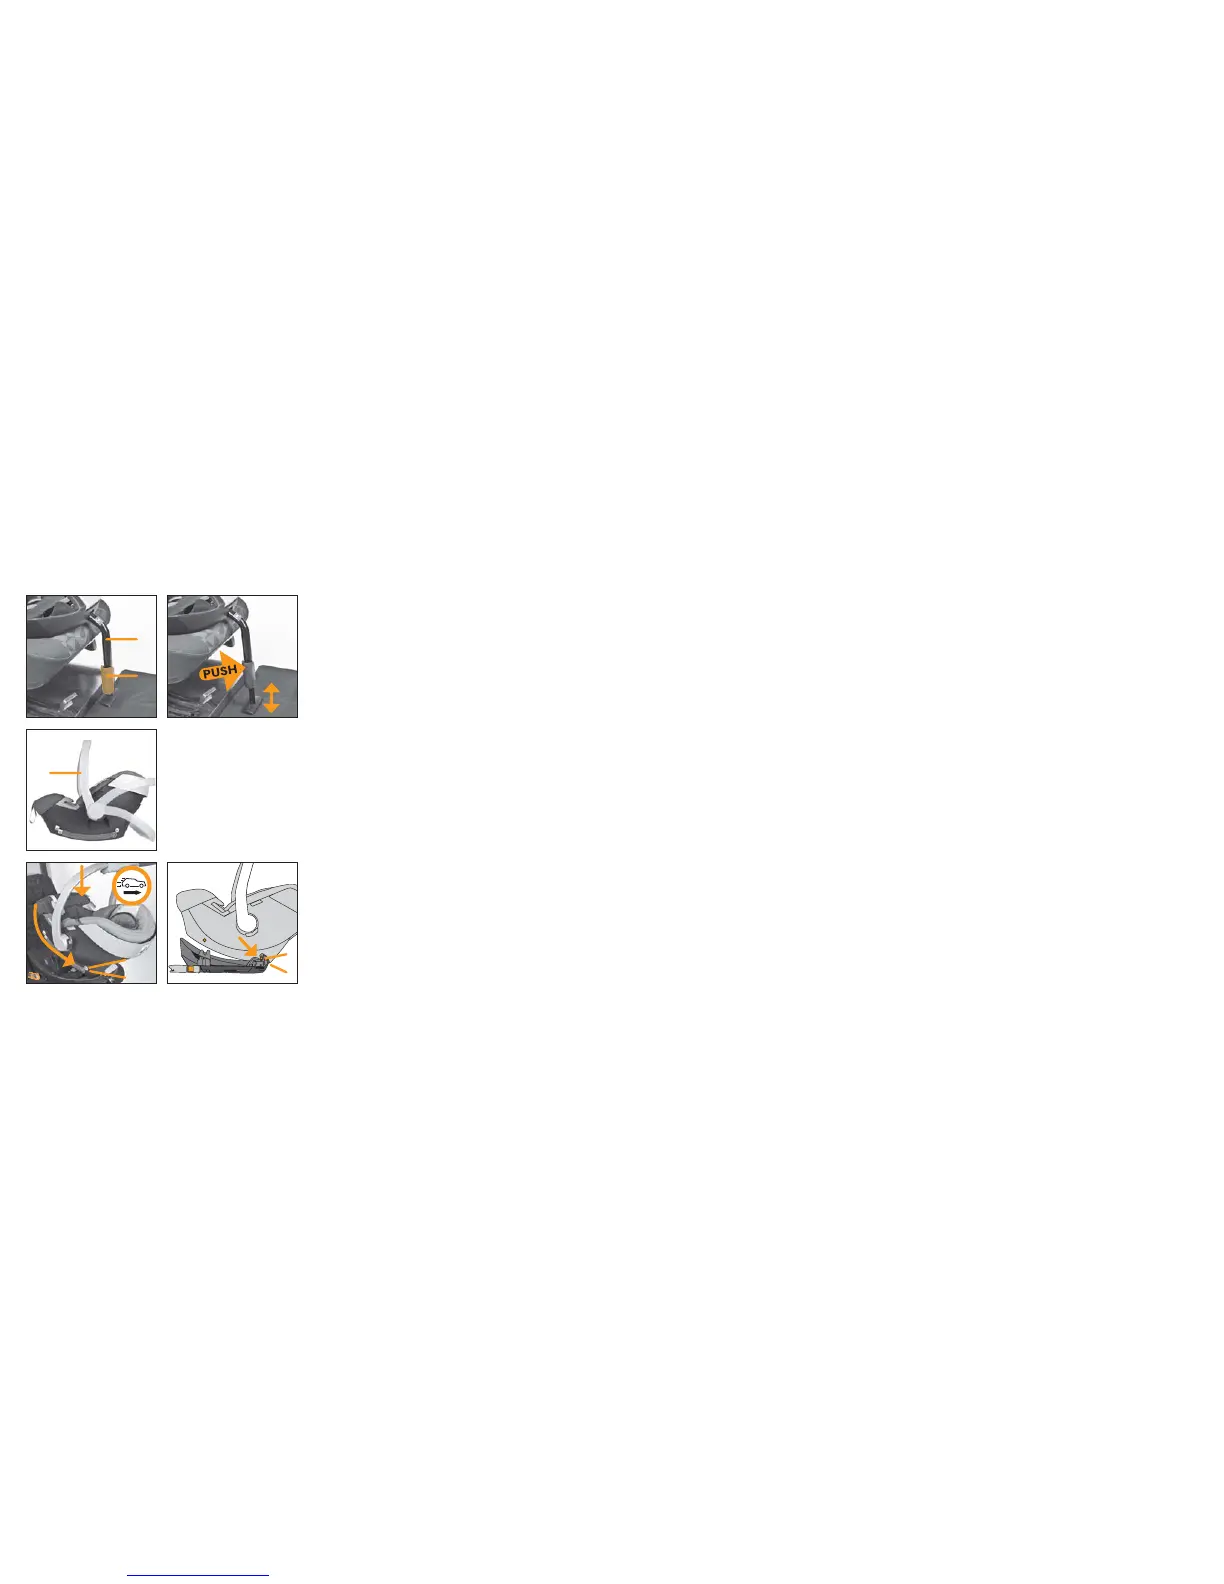
Ayar düğmesine (y) basarak destek ayağını (u) yere sağlamca
sabitlenene kadar uzatın.
Not! Destek ayağının ATON BASE-fi x i araç koltuğundan
yükseltmediğine emin olunuz.
Uyarı: Destek ayarı yere sürekli olarak direkt temas etmelidir.
Detsek ayağının altına hiçbir şey yerleştirmeyiniz.
Uyarı: Eğer aracın tabanında bir saklama gözü varsa kurulum
için aracın kullanım kılavuzundan faydalanın.
DESTEK AYAGININ AYARLANMASI
Not! ATON BASE-fi x in üzerinde yabancı bir malzeme
bulunmadığına emin olun.
ATON ana kucağının taşıma kolunun (a) üstte olduğuna
(pozisyon A) ve bebeğinizin ana kucağının emniyet kemeri ile
sabitlendiğine emin olun.
ATONUN ANA KUCAĞININ YERLEŞTİRİLMESİ
– ATON ana kucağını aracın arkasına bakacak şekilde ATON
BASE-fi x e yerleştirin.
– Baş kısımında altında bulunan kilitleme barını (r) yuvaya (i)
yerleştirin
Push the adjustment button (y) and pull out the support leg (u)
until it rests fi rmly on the fl oor of the vehicle.
Note! Ensure that the support leg does not raise the ATON BASE-
fi x from the surface of the vehicle seat.
Warning! The support leg must always have direct contact to the
fl oor. No objects may be placed under the support leg.
Warning! In case your car features a storage tray in the leg
room, please contact the vehicle manufacturer.
AJUSTING THE SUPPORT LEG
Referring to the user guide please ensure that the carrying
handle (a) is in the upper position A and the child is secured with
the integrated harness system. Please refer to the user guide of
the ATON for adjusting the carrying handle.
Note! Ensure that the top of the ATON BASE-fi x is free of foreign
objects.
ENGAGING OF THE ATON
– Place the ATON infant carrier reverse to the driving position
above the ATON BASE-fi x.
– Move the ATON down along the backrest and connect the
locking bar (r) at the head end with the locking bar retainer
(i).
Poussez le bouton de règlage (y) et tirez la jambe de force
(u) jusqu‘à ce qu‘elle repose fermement sur le plancher du
véhicule.
Note! Assurez vous que la jambe de force ne soulève pas la
BASE-fi x ATON du siège.
Avertissement! La jambe de force doit toujours être en contact
direct avec le plancher. Il ne doit pas y avoir d‘objets sous la
jambe de force.
Avertissement! Si vous avez un tiroir de rangement dans le
plancher de votre voiture, veuillez contacter le fabricant du
véhicule.
REGLAGE DE LA JAMBE DE FORCE
Consultez le manuel ATON pour vérifi er que la poignée (a) est
dans la position haute A et que l‘enfant est bien attaché avec
le harnais intégré. Se référer au manuel de la coque ATON pour
ajuster la poignée (a).
Note! Assurez vous qu‘il n‘y a pas d‘objets étrangers sur la
surface de la BASE-fi x ATON.
FIXER L‘ATON
– Positionnez la coque Aton, position dos à la route, au dessus
de la BASE-fi x ATON.
– Abaissez la coque ATON le long du dossier du siège passager
et connectez la barre de verrouillage (r) côté tête avec le
loquet de barre (i).