BRI
EF
OPERATING
INSTRUCTIONS
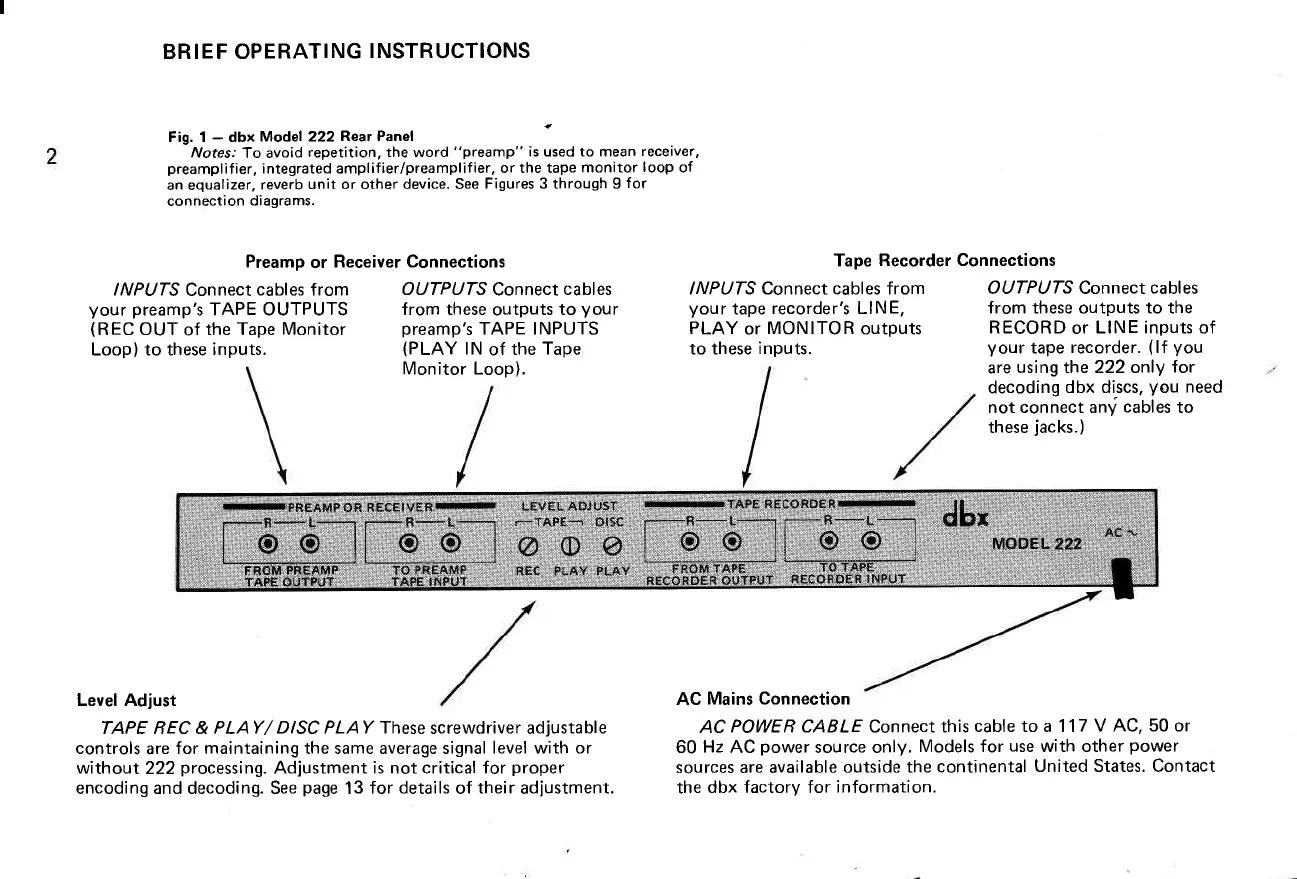
Fig. 1
-
dbx
Model 222Rear
Panel
Notes:
To avoid
repetition, the word
"preamp"
is used to mean
receiver,
preamplifier,
integrated amplif
ierlpreamplifier, or the tape
monitor
loop
of
an equalizer,
reverb
unit or other device. See
Figures 3 through I
for
connection
diagrams.
Preamp
or
Receiver Connections
Tape
Recorder Connections
INPUTS
Connect
cables from
your preamp's
TAPE OUTPUTS
(REC
OUT
of
the Tape
Monitor
Loop) to these
inputs.
OUTPUTS
Connect
cables
from these
outputs
to
Vour
preamp's
TAPE INPUTS
(PLAY
lN
of
the
Tape
Monitor Loop).
INPUTS Connect cables from
your
tape
recorder's LINE,
PLAY
or
MONITOR
outputs
to these
inputs.
OUTPUTS Connect
cables
from these outputs to the
RECORD
or
LINE inputs of
your
tape
recorder.
(lf
you
are
using the 222 only
for
decoding
dbx discs.
you
need
not connect any
cables
to
these
jacks.)
Level Adjust
TAPE REC &
PLAY/ DISC PLAY fhese
screwdriver adjustable
controls
are
for maintaining the same average signal
level with or
without
222
processing.
Adjustment is not critical for
proper
encoding and decoding. See
page
13 for
details
of
their
adjustment.
AC
Mains Connection
AC
POWE R CABLE Connect this
cable to a 1 17
V AC, 50 or
60
Hz
AC
power
source only.
Models for
use
with other
power
sources are available
outside the
continental
United States. Contact
the
dbx factory for
information.