274 Installing Enclosure Components
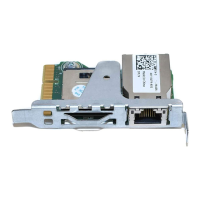
iKVM Module
Removing an iKVM Module
1
Disconnect the cables attached to the iKVM module.
2
Press in the release latch on the handle and rotate the handle away from
the module front panel. See Figure 4-4.
3
Slide the module out of the enclosure.
Installing an iKVM Module
1
Ensure that the module handle is fully open. See Figure 4-4.
2
Slide the module into the enclosure until the handle contacts the
enclosure.
3
To fully seat the module, close the handle until the release latch snaps into
place.
4
If applicable, connect the keyboard, monitor, and mouse to the module.
I/O Modules
CAUTION: If you remove an I/O module, you must either replace it with another
I/O module or with a filler blank to maintain cooling airflow through the system
enclosure.
Removing an I/O Module
1
If you have not already installed the cable enumerators to make removal
and replacement of the I/O modules easier and faster, install them now.
See the
Rack Installation Guide
for details.
2
Disconnect the cables attached to the I/O module.
3
Lift the latch on the end of the module’s handle and rotate the handle
away from the module. See Figure 4-6.
4
Slide the I/O module out of the enclosure.
5
Install the I/O connector cover.