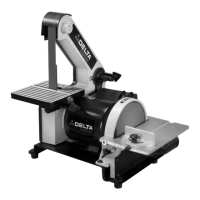
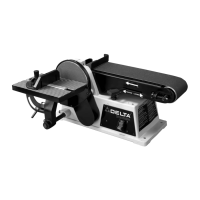
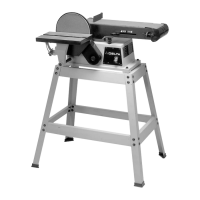
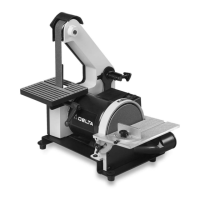
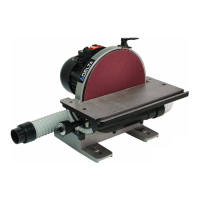
The Delta ShopMaster Model SA150 Belt/Disc Sander is a versatile woodworking machine designed for sanding wood, metal, plastic, or ceramic workpieces. It combines a 1-inch belt sander and a 5-inch disc sander, powered by an induction motor for long-lasting performance.
Function Description:
The primary function of the SA150 is to provide efficient and precise sanding for a variety of materials. The belt sander is ideal for shaping, smoothing, and removing material from larger surfaces, while the disc sander offers precision for smaller workpieces, edges, and curves. The machine is designed for both general woodworking tasks and more specialized applications, especially when paired with accessories like a flexible shaft.
Important Technical Specifications:
- Model: SA150
- Belt Sander Size: 1 inch
- Disc Sander Size: 5 inches
- Motor Type: Induction motor
- Electrical Requirements: 120 volt, 60 Hz alternating current. A separate electrical circuit is recommended, not less than #12 wire, protected with a 20 Amp time lag fuse.
- Grounding: The machine must be grounded while in use to protect the operator from electric shock. It is equipped with a 3-prong grounding type plug.
- Extension Cords: Only 3-wire extension cords with 3-prong grounding type plugs and matching receptacles should be used. The recommended gauge depends on the ampere rating and cord length (e.g., 18 AWG for 0-6 Ampere rating up to 25 feet, 12 AWG for 10-12 Ampere rating up to 150 feet).
- Dust Chutes: Two dust chutes are supplied, one for the belt unit and one for the disc unit, both with 1-1/2 inch I.D. openings for connection to a dust bag.
Usage Features:
- Automatic Belt Tensioning: Simplifies belt changes and ensures consistent performance.
- Removable Belt Platen: Allows for specialized sanding operations, such as stropping or polishing, by removing the platen.
- Built-in Dust Port: Facilitates connection to dust collection systems for a cleaner work environment.
- Power Take-Off: A unique feature that allows for mounting an accessory flexible shaft (Model 31-055) for grinding, polishing, and sanding operations in hard-to-reach areas. The flexible shaft can be attached to the power take-off shaft, and a small hole can be cut in the abrasive disc to accommodate it.
- Belt Sander Table Adjustments:
- The table can be set at a 90-degree angle to the sanding belt using a positive stop, adjustable with a combination square and an adjusting screw.
- It can be tilted to the front by loosening a table locking handle.
- The table can be adjusted in or out by loosening the locking handle.
- A maximum clearance of 1/16 inch or less between the work table and the sanding belt is crucial to prevent trapping workpieces or fingers.
- Disc Sander Table Adjustments:
- The table surface angle can be checked and adjusted to 90 degrees to the sanding disc by loosening two wing nuts.
- The disc table can be tilted down 45 degrees by loosening the two wing nuts.
- The table can be adjusted in or out by loosening two set screws.
- Similar to the belt table, a maximum clearance of 1/16 inch or less between the work table and the sanding disc is recommended for safety.
- Miter Gage: A miter gage is supplied for use on the disc table, allowing angle adjustments up to 45 degrees right or left by loosening a lock knob.
- Switch: Located on top of the switch box, it has "ON" and "OFF" positions.
- Locking Switch: The switch can be locked in the "OFF" position using a padlock with a 3/16 inch diameter shackle to prevent unauthorized use.
Maintenance Features:
- Cleaning: The machine should be unpacked carefully, and protective coating removed from unpainted surfaces with a soft cloth moistened with kerosene. After cleaning, unpainted surfaces should be covered with a good quality household floor paste wax.
- Changing Abrasive Belt:
- Disconnect from power source.
- Remove the lock knob and side cover.
- Depress the tracking knob to release belt tension.
- Remove the old belt from the three wheels.
- Install the new belt and replace the side cover.
- Check and adjust belt tracking.
- Changing Sanding Disc:
- Disconnect from power source.
- Remove the two screws fastening the sanding disc guard and table.
- Remove the used sanding disc from the disc plate.
- Ensure the disc plate is clean.
- Peel half of the backing from the new sanding disc, press firmly in place, then remove the other half and press in place.
- Replace the sanding disc guard and table.
- Belt Tracking Adjustment: If the abrasive belt leads to either side of the pulleys, adjust it by turning the tracking knob. Clockwise movement shifts the belt to the right, counterclockwise to the left.
- Platen Adjustment: The platen, made of heavy steel, supports the work. It can be adjusted by loosening two screws that fasten its bottom to the frame, positioning it almost touching the back of the sanding belt, and then tightening the screws. For stropping, polishing, or other special operations, the platen can be completely removed by unscrewing these two screws.
- Always read the instruction manual before operating.
- Keep guards in place and in working order.
- Wear eye protection (safety glasses conforming to ANSI Z87.1) and a face or dust mask if operations are dusty.
- Remove adjusting keys and wrenches before turning on the tool.
- Keep the work area clean and well-lighted.
- Keep children and visitors away.
- Childproof the workshop.
- Do not force the tool; let it work at its designed rate.
- Use the right tool for the job.
- Wear proper apparel (no loose clothing, jewelry; non-slip footwear; protective hair covering).
- Secure work with clamps or a vise.
- Maintain proper footing and balance; do not overreach.
- Keep tools sharp and clean; follow lubrication and accessory change instructions.
- Disconnect tools before servicing or changing accessories.
- Use only recommended accessories.
- Ensure the switch is in "OFF" position before plugging in; move to "OFF" during power failure.
- Never stand on the tool.
- Check for damaged parts before use.
- Feed work against the direction of rotation.
- Never leave the tool running unattended; turn power off and wait for it to stop completely.
- Stay alert, watch what you are doing, and use common sense; do not operate while tired or under the influence of drugs, alcohol, or medication.
- Ensure the tool is disconnected from the power supply when mounting, connecting, or reconnecting the motor.
- Operate in well-ventilated areas and use dust collection systems, as wood dust can be injurious to health.
- Be aware that dust from power sanding, sawing, grinding, drilling, and other construction activities can contain chemicals known to cause cancer, birth defects, or other reproductive harm. Use approved safety equipment like dust masks designed to filter microscopic particles.
- Do not operate until fully assembled and installed.
- Obtain advice from a supervisor or instructor if unfamiliar with operation.
- Follow all wiring codes.
- Securely fasten the machine to a supporting surface if it tends to tip or move.
- Ensure the sanding belt runs in the proper direction (downward at the front).
- Ensure the belt or disc is not torn or loose.
- Hold work firmly.
- Support work with the miter gage, backstop, or work table (except for curved workpieces on the top wheel of the belt).
- Avoid kickback by sanding on the downward side of the disc.
- Never wear gloves or hold work with a rag when sanding.
- Sand with the grain of the work.
- Do not sand pieces too small to be safely supported.
- Avoid awkward hand positions where a slip could cause contact with the belt or disc.
- Provide additional support for large workpieces.
- Do not force the work; it can cause motor overheating.
- When sanding metal, allow it to cool; do not use a steady stream of water, but dip the workpiece in water.
- Do not sand or polish magnesium due to fire hazard.
- Remove scrap pieces and objects from tables before turning on.
- Never perform layout, assembly, or set-up work while the sander is operating.
- Always turn off and disconnect the machine before installing/removing accessories, adjusting, or making repairs.
- Never leave the work area when the power is "ON" or before the machine stops.
- Do not expose the machine to rain or operate in damp locations.
The Delta ShopMaster Model SA150 is a robust and feature-rich sander designed for both hobbyists and professionals, emphasizing safety and versatility in its operation and maintenance.