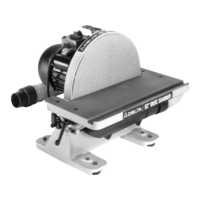
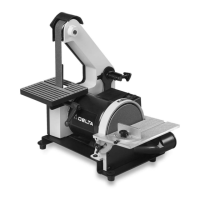
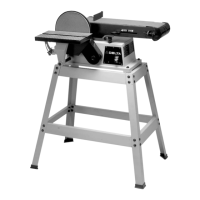
This document is a user manual for the DELTA ShopMaster 4" Belt / 6" Disc Sander, Model SA446. It provides comprehensive instructions for assembly, operation, and maintenance of the device, along with important safety guidelines and technical specifications.
Function Description:
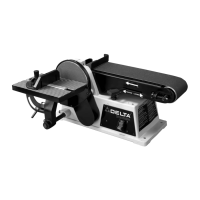
The DELTA ShopMaster SA446 is a versatile 4" Belt / 6" Disc Sander designed for various sanding applications. It combines a 4-inch wide sanding belt and a 6-inch diameter sanding disc, allowing for both broad surface sanding and detailed edge work. The device is powered by a 1/3 hp 120 Volt Single Phase Induction Motor, providing sufficient power for most common sanding tasks. The tilting table feature allows for angled sanding, enhancing its versatility for different workpiece shapes and sizes. The belt can be mounted for use on either the belt or disc unit, and the disc unit can be operated in the horizontal position or the vertical position, offering flexibility in operation. The 3100 rpm disc and 2000 sfpm belt speed facilitate efficient material removal and smooth finishes.
Important Technical Specifications:
- Model: SA446
- Motor: 1/3 hp 120 Volt Single Phase Induction Motor
- Belt Size: 4 inches wide
- Disc Diameter: 6 inches
- Disc Speed: 3100 rpm
- Belt Speed: 2000 sfpm (surface feet per minute)
- Table: Tilting table for angled sanding
- Power Connection: 120 Volt, 60 HZ alternating current. Requires a 3-prong grounding type plug and matching receptacle.
- Minimum Gauge Extension Cord: Refer to the provided chart for appropriate cord selection based on amperage rating and total length of cord. For 0-6 amps, up to 25 feet requires 18 AWG, 25-50 feet requires 16 AWG, 50-100 feet requires 16 AWG, and 100-150 feet requires 14 AWG. Higher amperage ratings require thicker gauge cords.
Usage Features:
The sander offers several features that enhance its usability and adaptability:
- Adjustable Belt Tension: The belt tension can be easily adjusted using a hex wrench, ensuring proper tracking and efficient sanding.
- Assembling Belt and Pulley Guard: The belt and pulley guard is assembled to protect moving parts, enhancing user safety.
- Assembling Sanding Disc Plate: The sanding disc plate is securely attached to the drive shaft, providing a stable surface for disc sanding.
- Assembling Lower Cover for Sanding Disc: A lower cover is installed to enclose the sanding disc mechanism.
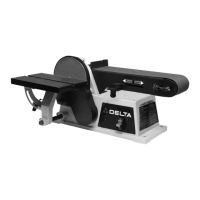
- Assembling Disc Sander Table: The disc sander table can be adjusted for height and angle, allowing for precise sanding operations. It can be tilted up to 45 degrees.
- Assembling Dust Chute: A dust chute is included to connect to a standard shop vacuum hose, aiding in dust collection and maintaining a cleaner work area. The outside diameter of the opening of the dust spout is 2-1/2 inches.
- Fastening Sander to Supporting Surface: The sander can be permanently fastened to a workbench or stand using four holes, with a recommended 3/8" diameter for the holes and a 15-1/2" x 24" minimum mounting board.
- Operating Controls and Adjustments:
- Starting and Stopping Sander: The sander is operated via a switch with "ON" and "OFF" positions. An important safety feature is the "OFF" position lock, which prevents unintended use.
- Tracking the Sanding Belt: The sanding belt's tracking can be adjusted to ensure it runs true on the drums, preventing it from running off the machine.
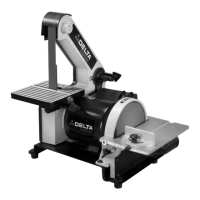
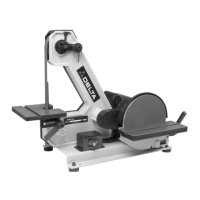
- Changing Position of Sanding Arm: The sanding arm can be adjusted to vertical or horizontal positions, and its angle can be adjusted by loosening and tightening a screw.
- Adjusting Backstop Square with Sanding Belt: The backstop square can be adjusted to be square with the sanding belt, providing a stable reference for workpieces.
- Tilting the Table: The table can be tilted up to 45 degrees for angled sanding, with a lock knob to secure the desired angle.
- Adjusting Table Square with Sanding Disc: The table can be adjusted to be square with the sanding disc, with a pointer indicating the 0-degree mark on the angle scale.
- Adjusting Miter Gage Slot Parallel with Sanding Disc: The miter gage slot can be adjusted to be parallel with the sanding disc, ensuring accurate miter cuts.
- Miter Gage: A miter gage is supplied for use with the disc table, allowing for precise angle adjustments.
- Using Table Assembly with Sanding Belt: The table assembly can be used with the sanding belt, with adjustments for vertical position and angle.
- Operation: The manual details procedures for surfacing or edge sanding with both the sanding belt and disc, as well as sanding inside and outside curves. It emphasizes maintaining a maximum of 1/16 inch away from the sanding belt to avoid trapping the work or fingers.
Maintenance Features:
The manual outlines several maintenance procedures to ensure the longevity and optimal performance of the sander:
- Replacing Sanding Belt: Instructions are provided for removing the old belt and installing a new one, including steps for releasing tension and tracking the new belt.
- Replacing Sanding Disc: Steps are detailed for replacing the sanding disc, which involves removing screws and the old disc, then installing a new one.
- Wrench Storage: Two holes are provided in the base casting for storing the two wrenches supplied with the sander, ensuring they are readily available.
- General Safety Rules: The manual includes extensive general safety rules, covering personal protective equipment, workpiece handling, electrical safety, and proper machine operation. These rules are crucial for preventing accidents and ensuring safe use.
- Additional Safety Rules for Belt/Disc Sanders: Specific safety rules for belt and disc sanders are provided, such as always wearing eye protection, ensuring the machine is securely fastened, checking for loose belts, and avoiding contact with moving parts.
- Power Connections: Detailed instructions on proper power connections, including the use of appropriate extension cords, are provided to prevent electrical hazards.
The manual also includes a warranty statement, outlining the terms of the two-year limited warranty, and contact information for parts, service, or warranty assistance. It emphasizes that only Delta recommended accessories should be used with the product.