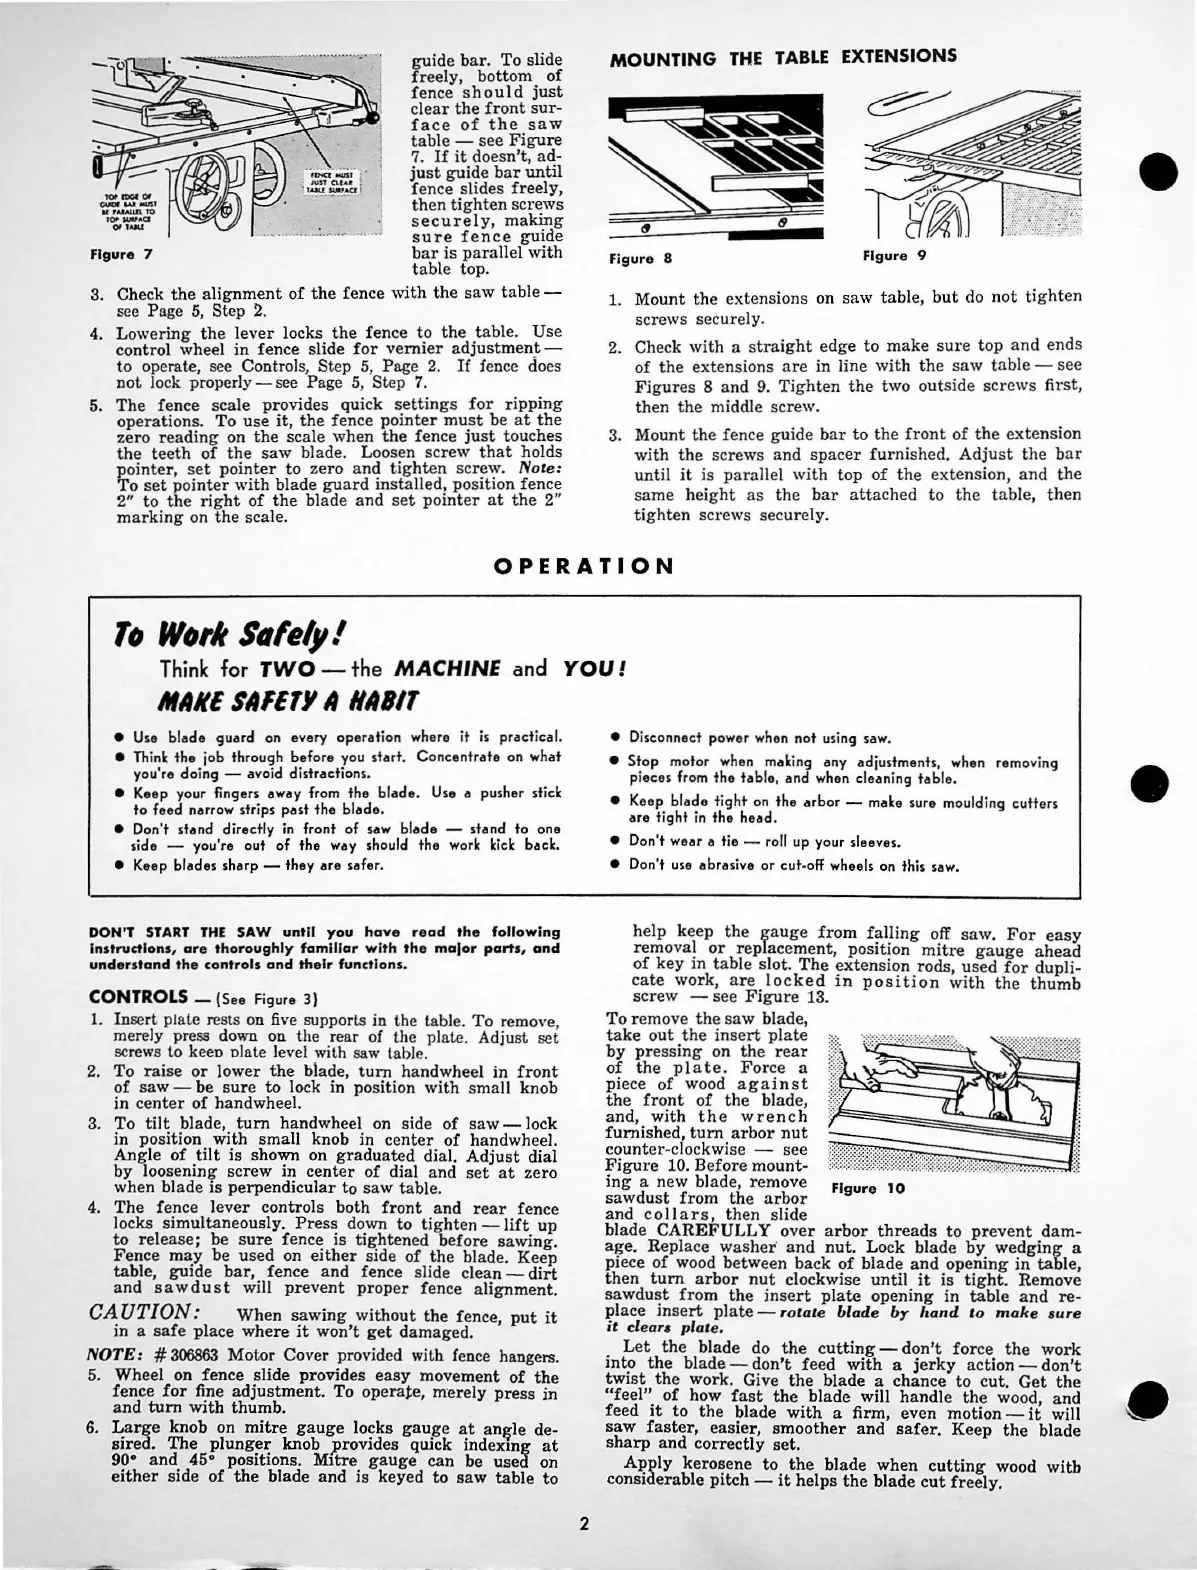
Figure 7
guide
bar.
To slide
freely, bottom
of
fence
sho
uld
just
clear
the
front
sur-
f
ace
of
the
saw
table
- see
Figure
7.
If
it
doesn't,
ad-
just
guide
bar
until
fence slides freely,
then
tighten
screws
securely,
making
sure
fence
guide
bar
is
parallel
with
table
top.
3. Check
the
alignment
of
the
fence
with
the
saw
table -
see Page
5,
Step
2.
4. Lowering
the
lever
locks_
the
fence t_o
the
_table.
Use
control wheel
in
fence
shde
for
vernier
ad1ustmen~ -
to
operate, see Controls, Step 5, Page
2.
If
fence does
not
lock properly - see Page 5,
St
ep
7.
5.
The
fence scale provides quick
settings
for
ripping
op
erations
. To
use
it,
the
fence
pointer
mu.st be
at
the
zero
reading
on
the
scale
when
the
fence Ju
st
touches
th
e
teeth
of
the
saw
blade. Loosen screw
that
holds
pointer
,
set
poll!ter
to
zero an~
tighten
scr~'Y·
Note:
To
set
pointer
with
blade gua
rd
mstalled, pos1t1on fence
2"
to
the
right
of
the
blade and
set
pointer
at
the
2"
marking
on
the
scale.
MOUNTING
THE
TABLE
EXTENSIONS
Figure 8
Figure 9
1.
Mount
the
extensions on
saw
table,
but
do not
tighten
screws securely.
2.
Check with a
straig
ht
edg
e
to
ma
ke
sure
top
and
ends
of
the
extensions
are
in
line
with
the
saw
tabl
e - see
Figures
8 and 9.
Tighten
the
two outside screws first,
then
the
middle screw.
3. Mount
the
fence guide
bar
to
the
front
of
the extension
with
the
screws and
spacer
furnished. Adju
st
the
bar
until
it
is parallel
with
top
of
the
extension,
and
th
e
sa
me
height
as
the
bar
attach
ed to
the
table,
then
tighten
scr
ews securely.
OPERATION
To
Worlt
Solely!
Think
for
TWO
- the
MACHINE
and
YOU
I
MANE
SAFETY
A
HABIT
• Use
blade
guard
on
eve
ry
operation
wh
ere
it
is practical.
• Think
the
job through
before
you
star
t.
Conc
e
ntrate
on
what
you
're
do
ing - avoid distractions.
• Keep your fingers away from
the
blade
. Use a pusher stick
to
feed narrow strips
past
the
blade
.
• Don't
stand
directly in
front
of
saw
blade
-
stand
to
one
side - you're
out
of
the
way should
the
work
kick
back.
• Keep blades sharp -
they
are
safer.
DON'T
START
THE
SAW
until
you
have
read
the
following
Instructions,
are
thoroughly
famlllar
with
the
ma)or
parts,
and
understand
the
controls
and
their
functions.
CONTROLS
- (S
ee
Figure
3)
1.
In
se
rt
plate rests on five supporl.s
in
the table.
To
remove,
merely press down on the rear of the plate. Adjust set
screws
to
keen olate level with
saw
table.
2. To
raise
or
lower
th
e blade,
turn
handwheel
in
front
of saw - be
sure
to
lock
in
position
with
sma
ll knob
in
cent
er
of
handwheel.
3. To
tilt
bl
ade,
turn
hand
wheel on side
of
saw
- lock
in position with small knob
in
center
of
handwheel.
Angle
of
tilt
is shown on
graduated
dial.
Adjust
dial
by
loose
ning
screw in ce
nt
er of dial and
set
at
zero
when blade
is
perpendicular to s
aw
table.
4.
The
fence l
ever
controls both
front
and
rear
fence
locks simultaneously.
Press
down
to
tight
en -
lift
up
to
release; be
sure
fence
is
tightened befo
re
sawing.
Fence
may
be
used on
either
side
of
the
bl
ade. Keep
tab
le, guide
bar,
fence
and
fence slide cl
ean
-
dirt
and
sawd
ust
will
prevent
proper
fence alignment.
CA
UT/ON:
When
sawing
without the fence,
put
it
in
a
safe
place
where
it
won't
get
damaged.
NOTE
: #
306863
Motor Cover provided with fence hangers.
5. Wheel on fence slide provides
easy
movement
of
the
fence
for
fine
adjustment
. To operate, m
ere
ly
press
in
an
d
turn
with thumb.
6.
Larg
e knob on
mitre
gauge
locks
gauge
at
an~le de-
sired.
The
plunger
knob
provides
quick indexing
at
90•
and
45• positions.
Mitre
gauge
can
be u
se
d on
either
side
of
the
blade and is keyed
to
sa
w table to
2
• Disconnect power when
not
using saw.
•
Stop
motor when making any adjustments, when removing
pi
eces
from
the
table,
an
d when cleaning
tabl
e.
• Keep
blade
tight
on
the
arbor
- make sure moulding
cutters
are
tight
in
the
head.
• Don't weor a tie - roll up your sleeves.
• Don't use
abras
ive
or
cut-off wheels on this saw.
help
ke
ep
the
gauge
from
falling
off saw.
For
easy
remova!
or
replacement, posit\on
mitre
gauge
ahe
ad
of
key
m
tabl
e slot.
The
extension rods, u
sed
for
dupli-
cate
work,
are
lo
cke
d
in
position
with
th
e
thumb
screw - see
Figure
13.
To remove
the
saw
blade,
take
o
ut
th
e in
sert
plate
by
pressing
on
the
rear
of
the
plate.
Force
a
piece
of
wood
against
the
front
of
the
blade,
and,
with
the
wrench
furnished,
turn
arbor
nut
---
!i_
:
counter-clockwise - see
F
igur
e 10. Before mount-
ing
a new blade, remove
Figure
10
sawdust
from
th
e
arbor
and
co
lla
rs,
then
slide
blade CAREFULLY
over
arbor
threads
to
pr
e
vent
dam-
age
. Replace
washer
· a
nd
nut.
Lo
ck blade
by
wedging
a
piece
of
wood
betw
een back
of
blade
and
opening
in
tabl
e,
then
turn
arbor
nut
clockwise
until
it
is
tight
. Remove
sawdust
from
the
insert
plate
opening
in
tab
le
and
re-
place
insert
plate
-
rotate
blade
b:r
hand
to
make
1
ure
it
clear,
plate.
Let
the
blade do
th
e
cutt
i
ng
-
don't
force
the
work
into
the
blade -
don't
feed
with
a j
erk
y action -
don't
twist
the
work. Give
the
blade a chance
to
cut.
Get
the
"feel"
of
how
fast
the
blade will handle
the
wood,
and
feed
it
to
the
blade
with
a firm, even motion -
it
will
saw
fas
ter, easier,
smoother
and
safer.
Ke
ep
the
blade
sharp
a
nd
correctly
set.
Apply kerosene
to th
e bl
ade
when
cutting
wood witb
considerable pitch -
it
helps
the
blade c
ut
freely.
 Loading...