11
ENGLISH
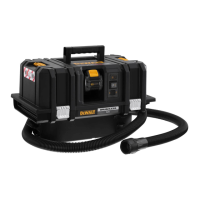
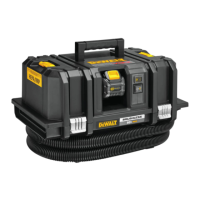
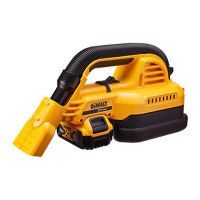
The dust extractor can be used with a DeWALT TSTAK transport
system or as a stand alone unit on thefloor.
The DCV586M is suitable for picking up dry and non‑flammable
dusts, liquids, wood chips, mineral dusts containing quartz and
hazardous dusts with exposure limit values (e.g. MAK or AGW
values) greater than or equal to 0.1 mg/m³ (dust class M as per
IEC/EN60335‑2‑69).
DO NOT pick up materials that present a risk of explosion,
glowing or burning materials, flammable materials, gases or
other hazardoussubstances.
DO NOT suck up oil, liquids with a temperature of over 32°C,
aggressive or flammableliquids.
DO NOT use the dust extractor in explosiveatmospheres.
DO NOT use the dust extractor without dustbag.
NOTE: This appliance is suited for professional and commercial
use, e.g. in hotels, schools, hospitals, factories, shops, offices,
rental companies, and on constructionsites.
DO NOT let children come into contact with the dust extractor.
Supervision is required when inexperienced operators use
thisdustextractor.
• Young children and the infirm. This appliance is not
intended for use by young children or infirmpersons.
• This product is not intended for use by persons (including
children) suffering from diminished physical, sensory or
mental abilities; lack of experience, knowledge or skills.
Children should never be left alone with thisproduct.
ASSEMBLY AND ADJUSTMENTS
WARNING: To reduce the risk of serious personal
injury, turn dust extractor off and disconnect battery
pack before making any adjustments or removing/
installing attachments or accessories and if the
dust extractor head is removed from the tank or
not latched securely. An accidental start‑up can
causeinjury.
WARNING: Use only DeWALT battery packs andchargers.
Installing and Removing the Battery Pack
(Fig. B)
NOTE: Make sure your battery pack
7
is fullycharged.
1. To install the battery pack into the vaccum, insert/slide
battery pack into battery port
1
. Make sure the battery pack
is fullyseated.
2. To remove the battery pack from the dust extractor,
press and hold the battery release
23
on the battery
pack and remove. To charge the pack, insert it into your
DeWALTcharger.
Fuel Gauge Battery Packs (Fig.B)
Some DeWALT battery packs include a fuel gauge which
consists of three green LED lights that indicate the level of
charge remaining in the batterypack.
To actuate the fuel gauge, press and hold the fuel gauge
button
16
. A combination of the three green LED lights will
illuminate designating the level of charge left. When the level
of charge in the battery is below the usable limit, the fuel gauge
will not illuminate and the battery will need to berecharged.
NOTE: The fuel gauge is only an indication of the charge left on
the battery pack. It does not indicate dust extractor functionality
and is subject to variation based on product components,
temperature and end‑userapplication.
Attaching the Hose to the Dust Extractor
(Fig. A)
To attach the hose to the dust extractor, press the hose release
latch
8
and insert the end of the hose into the hose inlet.
The hose must be inserted fully before the hose release latch
isreleased.
To remove the hose, press the hose release latch and remove
the hose. The hose must be fully removed before releasing the
hose releaselatch.
The hose inlet plug
9
may be used to cover the hose inlet if the
hose is removed for transportation, cleaning,etc.
Installing the Paper or Fleece Bag (Fig. A, C, E, F)
When vacuuming fine dust, you may also use an additional paper
bag or fleece bag
12
to make emptying the tank
21
easier.
NOTE: Always use a bag with M‑classdust.
1. Press the three position switch
3
to the Off (O) position and
remove thebattery
7
.
2. Unlatch the tank latches
4
and remove the dust extractor
head
6
from thetank
21
.
3. Attach the bag by passing the two tabs
26
on the bag
opening past the two notches
27
on the dustextractor.
4. Rotate the bag a quarter turn until the square edge
28
is
facingupward.
5. Fit the bag inside thetank.
6. Replace dust extractor head onto the tank and
latchsecurely.
Removing and Disposing the Bag (Fig.A, D, E ,F)
WARNING: Appropriate personal protective equipment
like dust mask and gloves should be used while handling
used dustbags.
1. Press the three position switch
3
to the Off (O) position and
remove thebattery
7
.
2. Close the twist‑lock hose inlet with the hose inlet plug
9
.
3. Unlatch the tank latches
4
and remove the dust extractor
head
6
from thetank
21
.
NOTE: It is normal for there to be a small amount of dust in
the tank even with the the bag properlyinstalled.
4. Rotate the bag until the two tabs align with the two
notches on the dust extractor and remove the bag from the
dustextractor.
5. Once the bag is removed it can be sealed fordisposal.
a. Peel the backing from the adhesive seal
29
.
b. Press the adhesive seal over the opening and properly
dispose of the bag. DO NOT reuse thebag.
c. Dispose of collection bag in appropriate container
according to statutory provisions.