9
Alternatively, a (3 A) in-line fuse may be
used between positive (+) 12 Vdc power
supply ( RED wire) and LED switch.
3. Route wiring (inside RV) to general location
where connections to awning hardware will be
made.
Allow enough wiring length to pass through
outside RV wall (hole will be drilled later)
for connection to awning.
Wiring hole location will be either at top or
bottom of RH back channel depending on
awning model. See (FIG. 1).
INSTALL AWNING
INSTALL ELECTRICAL KITS
4. Make appropriate wiring connections inside RV.
Wiring connections to awning (through
outside RV wall) will be made later.
See instructions included with your LED
light switch for additional wiring instruc-
tions.
Unfurl awning fabric 1 revolution before inserting
fabric (with awning roller cover, if equipped) into
awning rail.
Unfurling 1 revolution will allow enough
space between RV wall and awning hard-
ware to guide awning fabric into awning
rail.
2. LIFTING HAZARD. Use proper
lifting technique and control when lifting product.
Failure to obey this caution could result in injury.
Keep both arm assemblies paral-
lel to each other to avoid twisting.
With one person grasping each arm assembly,
carefully lift entire awning assembly upright.
Then carry awning to prepared (ared) awning
rail end. See (FIG. 12).
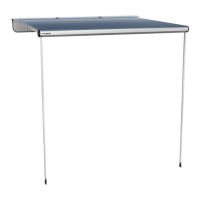
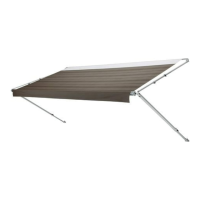
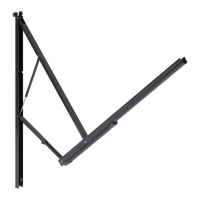
FIG. 12
Awning
Rail
Arm
Assembly
FRTA (Fabric Roller
Tube Assembly)
3. While one person guides awning fabric (with aw-
ning roller cover, if equipped) into awning rail,
carefully move (carry) awning hardware assem-
bly to desired location. See (FIG. 12).
A stepladder may be necessary to reach
awning rail.
At least two other people are required to
hold and control hardware until top mount-
ing brackets and back channels are cor-
rectly installed.
Failure to obey the following warnings could
result in death or serious injury:
● IMPACT OR CRUSH HAZARD. This product should
be installed in a controlled environment (inside). Do
NOT install product during windy conditions, or when
wind is expected. Otherwise, product could move
unpredictably, become unstable, and could detach,
bend, or collapse.
● FIRE OR ELECTRICAL SHOCK HAZARD. Make sure
there are no obstacles (wires, pipes, etc.) inside the
RV’s roof, oor or walls. Shut OFF gas supply, discon-
nect 120 Vac power from RV, and disconnect positive
(+) 12 Vdc terminal from supply battery BEFORE drill-
ing or cutting into RV. Failure to obey these warnings
could result in death or serious injury.
Failure to obey the following notices could
damage product or property:
● ALWAYS use sealant on (clean) parts and surfaces
where fasteners enter the RV’s walls, roof or oor.
Otherwise, water leakage could occur.
● Install back channels on a at surface, level, and keep
parallel with each other to ensure correct function and
appearance.
A. Insert Awning Fabric Into Awning Rail
IMPACT OR CRUSH HAZARD.
Do NOT remove LED rail from awning fabric (if
equipped). Otherwise, awning fabric could sepa-
rate from awning rail (on RV) and cause awning to
extend quickly or detach, bend, or collapse. Failure
to obey this warning could result in death or serious
injury.
If LED light strip is NOT desired, standard
fabric MUST be used. Otherwise, you may
remove LED light strip from LED rail, and
leave empty LED rail on fabric rope.
1. Do NOT unfurl more than 1 revo-
lution of fabric, as this could cause issues with
the awning closing and opening correctly.
 Loading...