English
27
INSTALLATION MANUAL
Global 40 CF
• Place back the burner mounting plate plus accessories and
fi x it with the self-tapping screws.
• Place the vermiculite tray back in the combustion chamber.
!Caution Position the vermiculite tray on the right
location by means of the stop edges (as far
as possible to the front)
• If applicable, remove the tape from the convection box
• Place back the cover under the combustion chamber and
fi x it with the self-tapping screws.
• Place the wood set; see section 6.7
• Place the glass pane; see section 6.8
6.5 Flue gas discharge system
For connection to an existing chimney – only allowed in
Great-Britain – the instructions from the separate booklet
‘Fitting into a conventional class 1 chimney’ also apply. In
addition to the installation instructions, this booklet also
contains supplementary tests.
6.5.1 General
The appliance is of the B
11AS
type.
The passage to the outside is made with a roof terminal
(see section 6.5.2).
Use a suitable Ø80 mm diameter fl ue gas
discharge system provided with the CE
mark.
The fl ue gas discharge system is constructed from (the fl ue
spigot of) the appliance.
6.5.2 Connecting the fl ue gas discharge system
A discharge pipe of at least 3 metres, should be connected
to the appliance.
Bends in the fl ue gas discharge system are not allowed.
The roof terminal can end in a sloping and a fl at roof.
The roof terminal can be supplied with an adhesive plate
for a fl at roof or with a universally adjustable tile for a
sloping roof.
- Maintain a distance of at least 50 mm
between the outside of the fl ue gas
discharge system and the walls and/or
the ceiling. If the system is built in (for
instance) a cove, it should be made with
non combustible material all around it;
- Use heat-resistant insulation material
when passing through combustible
material.
!Caution Some heat-resistant insulation materials
contain volatile components that will
spread an unpleasant smell for a prolonged
time; these are not suitable.
Place the fl ue gas discharge system as follows:
• Build the system up from (the fl ue spigot of) the
appliance.
• Connect the pipe pieces.
• Apply suffi cient clamps, so that the weight of the pipes
does not rest on the appliance.
• Determine the remaining length of the roof terminal.
• Make sure the roof terminal has the right dimensions.
!Caution Make sure that the right insertion length is
maintained.
• Connect the roof terminal to the discharge pipes.
!Caution - Make sure that the universal tile fi ts well
with the surrounding tiles;
- Make sure that the adhesive plate fi ts well
onto the fl at roof.
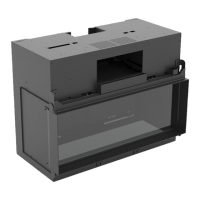
6.6 Placing the chimney breast
This paragraph describes how the appliance should be built
in a chimney breast.
In order to provide proper heat discharge, there should be
suffi cient space around the appliance.
The chimney breast should be ventilated suffi ciently by
means of ventilation holes.
- Use non combustible and heat-resistant
materials for the chimney breast, inclu-
ding the top of the chimney breast, the
material in the chimney breast and the
back wall of the chimney breast;
- Make sure that the appliance is not car-
rying the weight of the chimney breast
when using stone-like materials;
- The ventilation holes – which should be
mounted as high as possible – should have
a combined passage of at least 200 cm
2
.
!Caution - Take the minimum internal width of the
chimney breast into account: 600 mm
(see fi g. 2);
- When placing the chimney breast, you
should take the location of the ventilation
holes (V) into account (see fi g. 2).
!Tip You should preferably apply the ventilation
holes on both sides, above and below the
chimney breast. You can use DRU ventila-
tion elements.
• Check whether the fl ue gas discharge system is placed
correctly.
• Check the fi xture of the clip binding with self-tapping
screws on places that cannot be reached later on.
• Do not apply plaster on or over the fl anges (see fi g. 2),
because the heat of the appliance could cause cracks.
• If a front is used, the chimney breast is placed behind the
edge of the convection box; see the instructions supplied.
Caution
Caution
Caution
 Loading...