R
DURASTAR.COM52
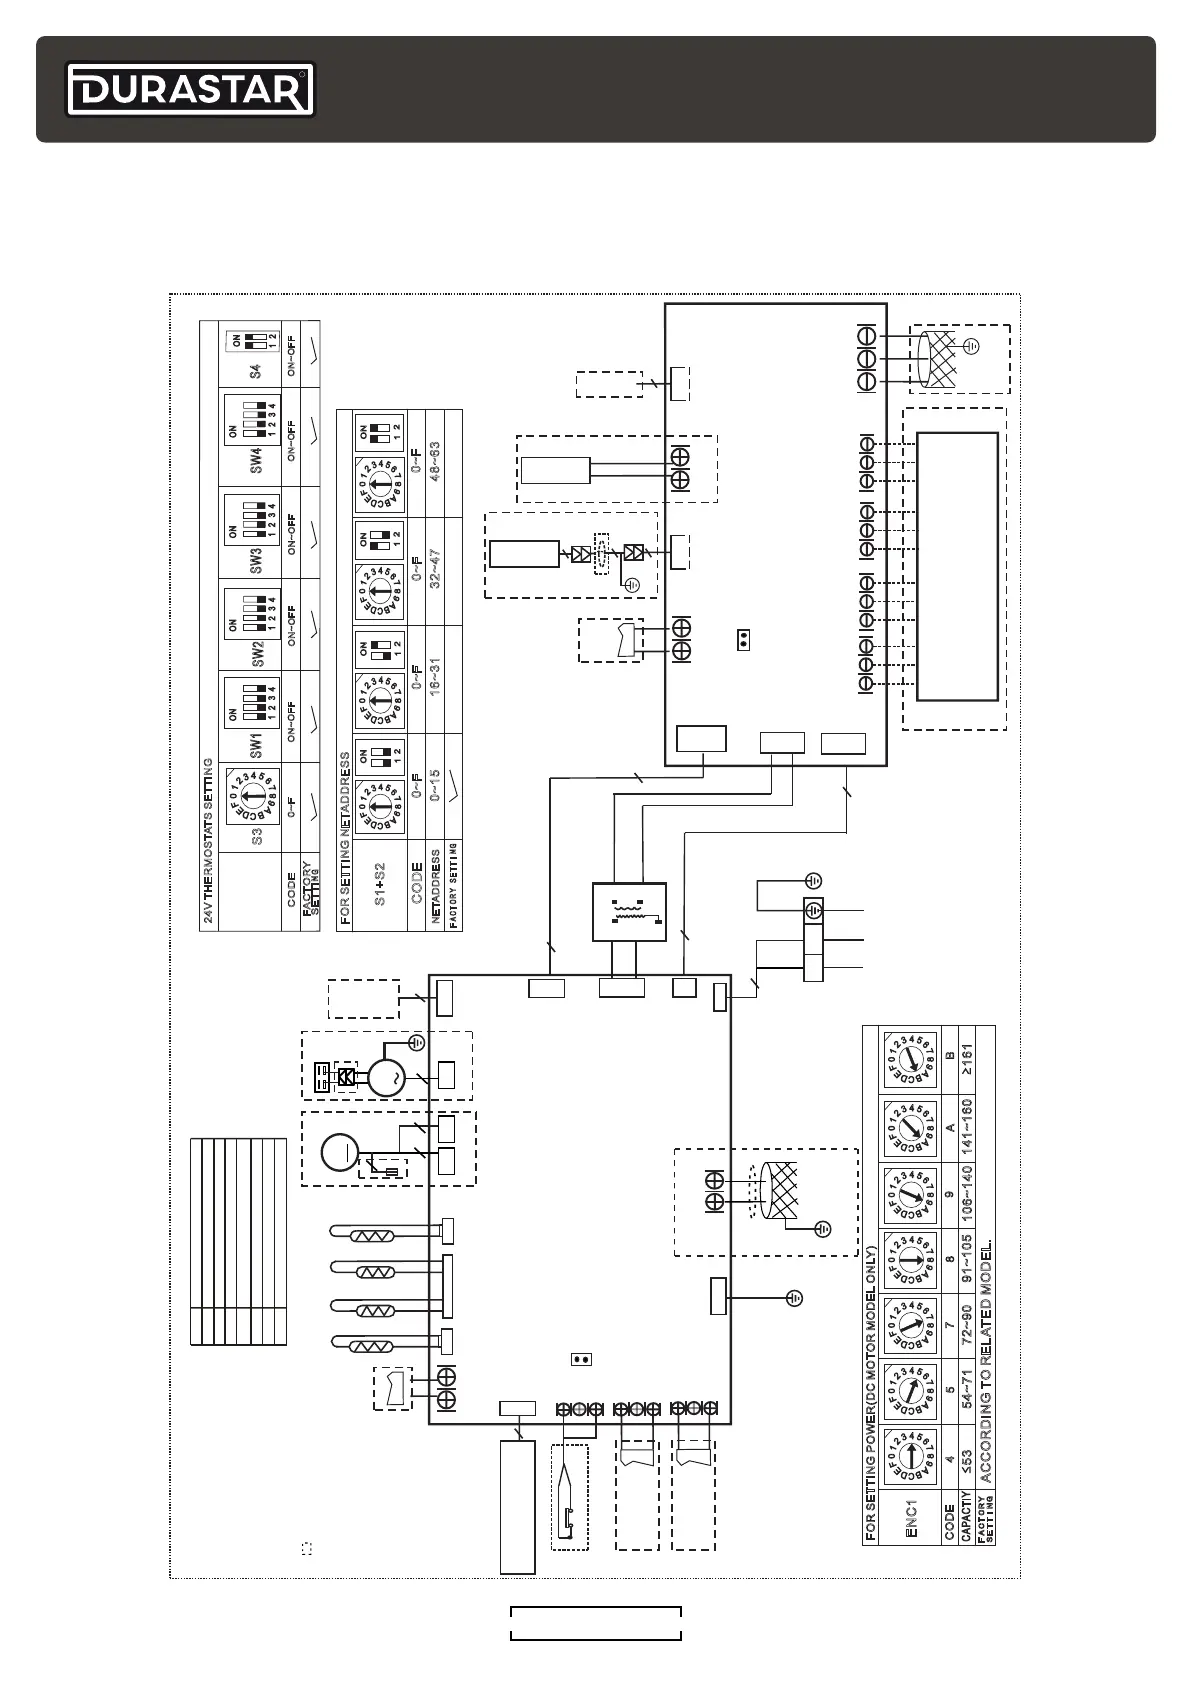
WIRING DIAGRAM
30K, 36K, 48K, 60K
INDOOR UNIT
MAINBOARD
0
8
4
1
2
3
5
6
7
C
9
A
B
D
E
F
0
8
4
1
2
3
5
6
7
C
9
A
B
D
E
F
0
8
4
1
2
3
5
6
7
C
9
A
B
D
E
F
0
8
4
1
2
3
5
6
7
C
9
A
B
D
E
F
0
8
4
1
2
3
5
6
7
C
9
A
B
D
E
F
0
8
4
1
2
3
5
6
7
C
9
A
B
D
E
F
0
8
4
1
2
3
5
6
7
C
9
A
B
D
E
F
ENC1
4
5
7
8
9
A
B
CAPACTIY
CODE
≤
53
54~71
72~90
91~105
106~140
141~160
≥
161
FACTORY
SETTING
ACCORDING TO RELATED MODEL.
FOR SETTING POWER(DC MOTOR MODEL ONLY)
RED
CN11
Y/G
CN18
S1 S2
CN20
CN23
ALARM
JR1
CN33
WORK
NOTE1:
1.The parts with dotted line indicates
optional features.
2.Remove the short connector of JR1
when you use the "on-off" function.
3.Remove the short connector of J1
when you use the "WATER LEVEL
SWITCH" function.
L1
L2
Y/G
FAN
Y/G
CN4
M
5
6
CN10
CN5
WATER LEVEL SWITCH
T2B
CN46
T2A
T1
CN6
ECM
CN15
M
4(3)
3
CN34
CN43
UVLED
OUTPUT
ELECTRONIC
EXPANSION VALVE
6
CN21
AC:24V
BLUE
RED
RED
CN5
TRANS
CN22
RED
CN4
Remote
Control
CN6
R
24V THERMOSTAT
G
B
0
8
4
1
2
3
5
6
7
C
9
A
B
D
E
F
1
2
ON
0
8
4
1
2
3
5
6
7
C
9
A
B
D
E
F
1
2
ON
0
8
4
1
2
3
5
6
7
C
9
A
B
D
E
F
1
2
ON
0
8
4
1
2
3
5
6
7
C
9
A
B
D
E
F
1
2
ON
S1+S2
0~F 0~F 0~F
0~F
NETADDRESS
CODE
0~15
16~31
32~47
48~63
FACT O RY SET TIN G
FOR SETTING NETADDRESS
CN9
WIRE
CONTROLLER
4
4
4
MAGNETIC RING
Y/G
BLACK
2
COMMUNICATION
NOTE2:
1.The other switches should be set as
"Off" state from factory.
2.The specific use of the switches please
reference to the manual of application.
J1
CN29
T2
CAP
CN12
3
HEATER
2 WIRE WIRE
CONTROLLER
4
485 PORT
2
E Y X
To CCM
Comm.Bus
TO OUTDOOR UNIT
0
8
4
1
2
3
5
6
7
C
9
A
B
D
E
F
0~F
ON~OFF
CODE
FACTORY
1 2 3
ON
4
SW1
1
2 3
ON
4
SW2
1 2 3
ON
4
SW3
S3
1
2 3
ON
4
SW4
160230000
11626
1
2
ON
S4
24V THERMOSTATS SETTING
SETTIN G
CODE
PART NAME
ECM INDOOR ECM MOTOR
CAP
INDOOR FAN CAPACITOR
INDOOR FAN MOTORFAN
T1
T2
T2A
T2B
INDOOR COIL INLET TEMP.SENSOR
WIRING DIAGRAM
ROOM TEMP.SENSOR
COIL TEMP.SENSOR
INDOOR COIL OUTLET TEMP.SENSOR
W2
2
ON~OFF ON~OFF
ON~OFF ON~OFF
2
6
4. This symbol indicates the element
is optional, the actual shape shall prevail.
E/AUX
DH
Y/Y2
Y1
W1
W
L
C
CN9
CN10
CN11
CN3
CN14
CN7
CN13
CN2
CN1
ON/OFF
3.The CN5/CN23/CN33 connect to left
and right terminals.
TO OUTDOOR UNIT
OR POWER
 Loading...