You have now configured the iScan HD+ to output 480p on DVI.
Note: Since the DVI video format is defined as RGB with
separate Hsync and Vsync signals, there is no need to modify
colorspace or sync type when using the DVI output. The format
selection is always set to RGB with separate Hsync and Vsync.
Power/Standby Control
Pushing the Power button toggles the system between two states:
active and standby. There is a tricolor LED that is next to the
Power button. In Standby mode, the LED is illuminated red.
When the system is active, the LED color indicates:
blue (the system is processing the input signal); green (the
system is passing through the signal without processing).
▲, ▼, and Enter/Exit Controls
These buttons allow you to navigate the menus and submenus.
Their functions are dependent on the specific function selected.
Output Setup
The Output Setup settings allow you to configure the output of
the iScan HD
+ to match the requirements of the specific type
and model of display device being driven.
Pushing the
Output Setup button once shows the current output
control function. You can cycle through the functions by pushing
this button repeatedly. There is an LED corresponding to each
function. This helps you to set up the output without an image
on the display. The table below shows the available functions.
The FPD (front panel display) and the OSD (on-screen display)
will turn on when the
Output Setup button is pressed. The
Output Setup indicators, FPD, and OSD will turn off automatical-
ly after 30 seconds.
8
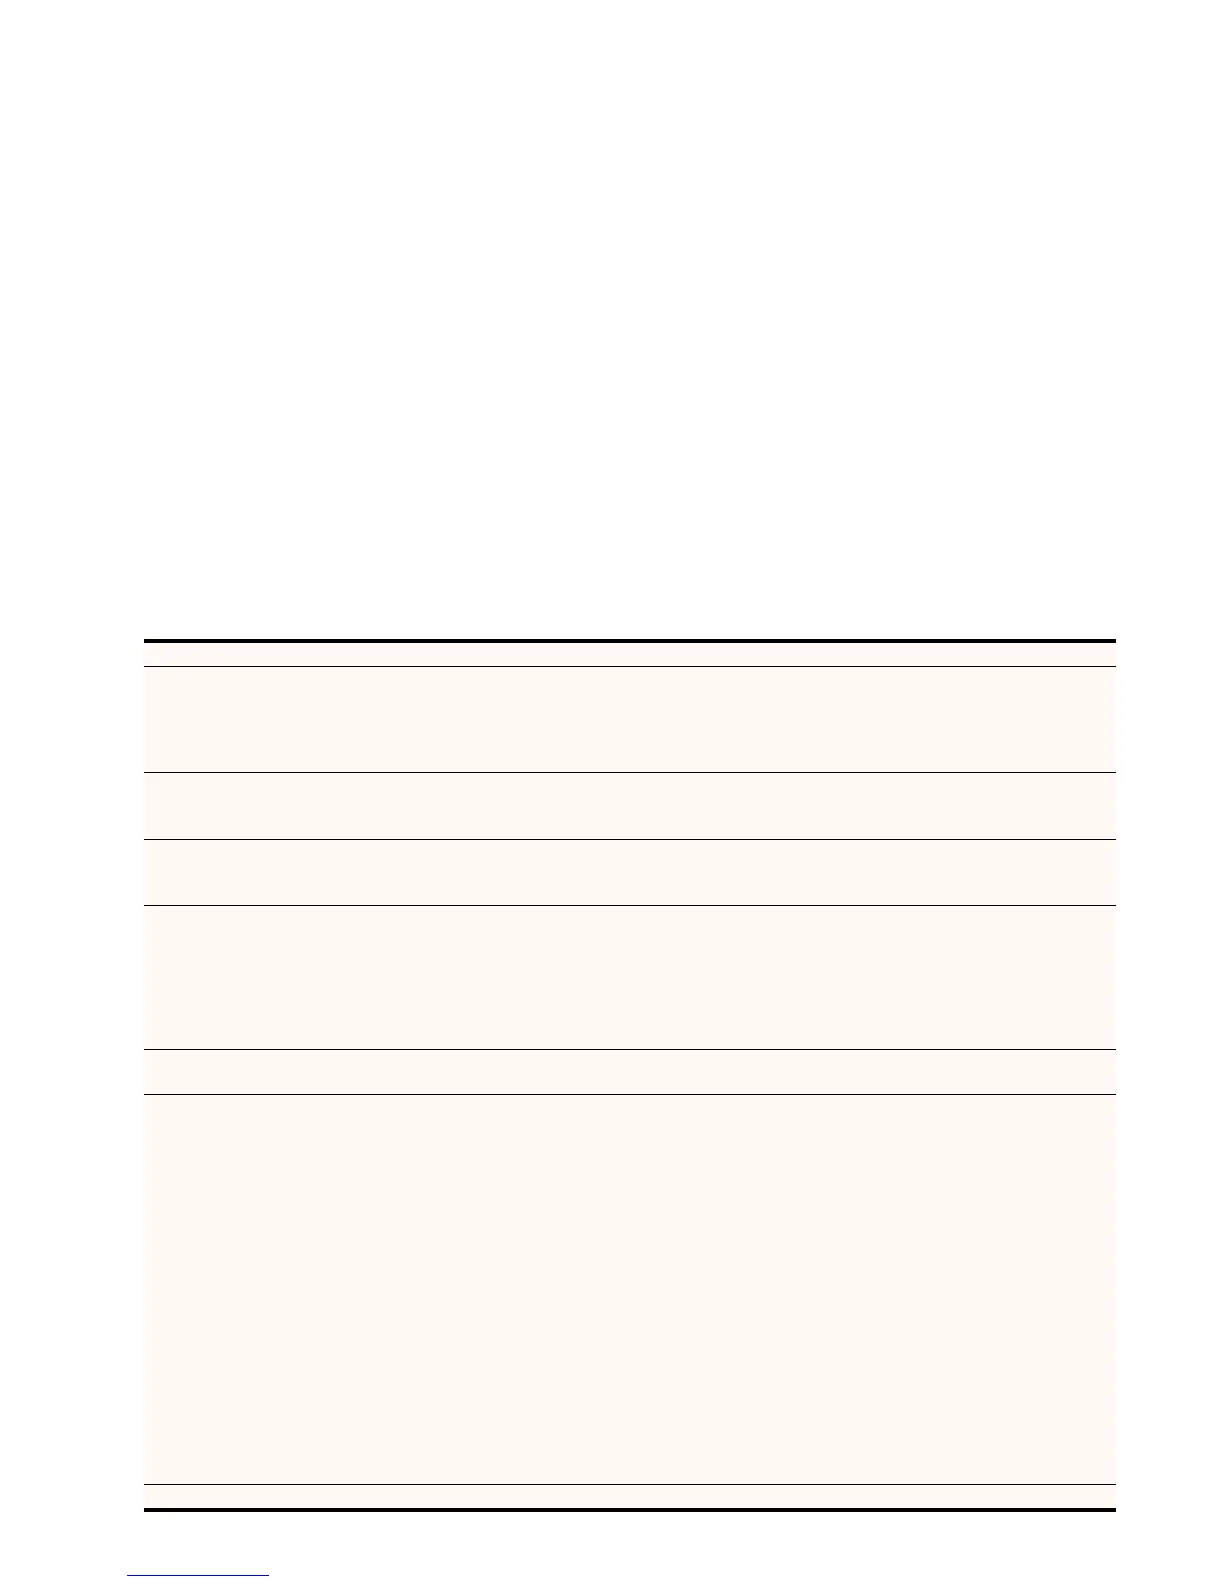
Output Setup FPD shows Description
Analog or
Digital Output
A/D Pushing the ▼ button shows the current output type. Pushing the ▼ button again selects the next item on the list
shown below. You can also use the ▲ button to cycle through the output types.
VGA Analog Output (VGA-type HD15)
DVIV DVI output for displays that require video signal levels.
DVIP DVI output for displays that require PC signal levels.
Output Format FMT Pushing the ▼ shows the current output format. Pushing the ▼ button again shows the next item on the list shown
below. The format is not selected until the Enter/Exit button is pressed. Pressing the Enter/Exit button again selects
the output timing controls, discussed in the Output Timing section.
Output
Aspect Ratio
O_AR Sets the display output aspect ratio. Press the ▲ or ▼ button first to show the current aspect ratio. Press the same
button again to move to the next aspect ratio. Currently three aspect ratios are supported: 16:9, 4:3 and 5:4.
More aspect ratio options will be supported in future software releases.
Sync Type SYNC Sets the synchronization signal type of the output format. Press the ▲ or ▼ button first to show the current sync type.
Press the same button again to move to the next sync type. Currently seven sync types are supported:
BI bi-level sync on green/luma (in RGB colorspace, sync is also present on red and blue signals)
TRI tri-level sync on green/luma (in RGB colorspace, sync is also present on red and blue signals)
CSYN Composite Sync (on the Hsync pin of the HD15 output connector)
H+V+ Positive Hsync and Positive Vsync H+V- Positive Hsync and Negative Vsync
H-V+ Negative Hsync and Positive Vsync H-V- Negative Hsync and Negative Vsync
Color Space COLR Sets the colorspace of the output format. Press the ▲ or ▼ first to show the current colorspace. Press the same
button again to select the alternate colorspace. Two colorspaces are supported: YPbPr (default) and RGB.
Frame Rate
Conversion
FRC Enables frame rate conversion. There are two sets of controls, one for 50Hz input sources and one for 60Hz input
sources. For 50Hz sources, if the original source material is progressive at 25Hz (uses 2:2 pulldown), the output frame
rate can be source locked at either 50Hz or 75Hz. The 75Hz setting will repeat each of the original 25Hz frames 3
times. You can also set the output frame rate to a specific value (unlocked mode). For 60Hz sources, if the original
source material is progressive at 24Hz (uses 3:2 pulldown), the output frame can be source locked to either 48Hz,
60Hz or 72Hz. The 48Hz setting will repeat each original 24Hz frame 2 times, while the 72Hz setting will repeat each
frame 3 times. As with 50Hz sources, you can also set the output frame rate to a specific value (unlocked mode).
Press the ▲ or ▼ button once to see the current input rate. Press the same button again to switch input rate.
50 - > 50Hz input sources 60 - > 60Hz input sources
Press the Enter/Exit button to select the input frame rate and change the output frame rate settings. Select the
desired output frame rate setting by using the ▲ or ▼ button.
For 50 Hz input sources, the available settings are:
50 L source locked 50Hz
75 L source locked 75Hz
UNLK unlocked
If UNLK is chosen, press the Enter/Exit button again to specify the desired output frame rate.
Use the ▲ or ▼ button to increase or decrease the frame rate.
Press the Output Select button again to exit the menu and complete the output frame rate conversion setting.
Display Profile DISP currently not available
Displays and Controls (continued)
Output
Setup
Menu
For 60 Hz input sources, the available settings are:
48 L source locked 48Hz
60 L source locked 60Hz
72 L source locked 72Hz
UNLK unlocked
Note: the Sync Type function
is disabled with DVI output,
because the DVI standard
requires separate Hsync and
Vsync