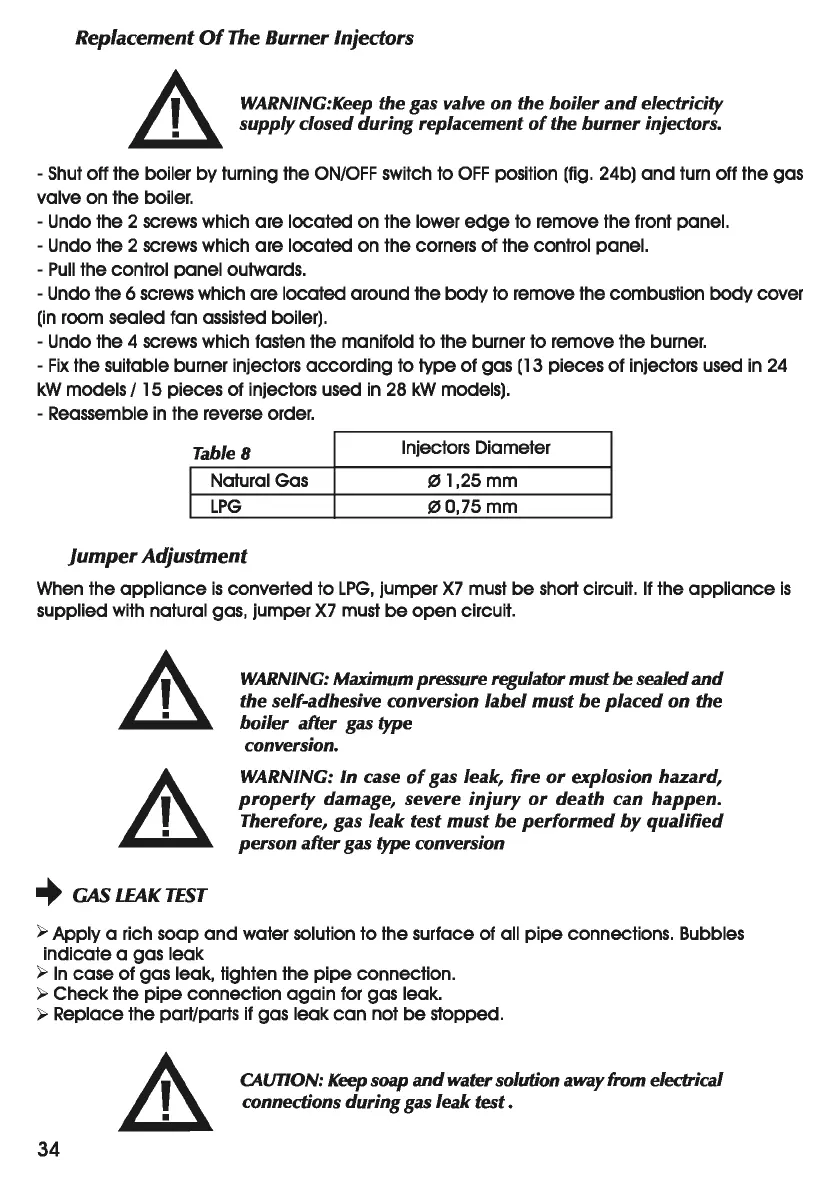
• Replacement
Of
The
Burner
Injectors
A.
WARNING:Keep the gas valve
on
the
boiler
and
electricity
~
supply
closed
during
replacement
of
the
burner
injectors.
-
Shut
off the boiler
by
turning the
ON/OFF
switch to
OFF
position (fig. 24b)
and
turn off the gas
valve on the boiler.
- Undo the 2 screws which are
located
on the lower
edge
to
remove the front panel.
- Undo the 2 screws which are
located
on the corners
of
the control panel.
-
Pull
the control panel outwards.
- Undo the 6 screws which are located around the
body
to remove the combustion
body
cover
(in
room sealed fan assisted boiler).
- Undo the 4 screws which fasten the manifold
to
the burner
to
remove the burner.
-
Fix
the suitable burner injectors
according
to type
of
gas
(13
pieces
of
injectors used in 24
kW
models I 15 pieces of injectors used
in
28
kW
models).
- Reassemble
in
the reverse order.
Table 8
Injectors Diameter
I Natural Gas
01,25
mm
I
LPG
00,75mm
•
jumper
Adjustment
When the
appliance
is
converted to
LPG,
jumper
X7
must
be
short circuit.
If
the
appliance
is
supplied with natural gas, jumper
X7
must
be
open
circuit.
+
GAS
LEAK
TEST
WARNING: Maximum pressure regulator must
be
sealed
and
the self-adhesive conversion
label
must
be
placed
on
the
boiler
after
gas type
conversion.
WARNING:
In
case
of
gas leak,
fire
or
explosion hazard,
property
damage, severe
injury
or
death
can
happen.
Therefore, gas
leak
test
must
be
performed
by
qualified
person
after
gas type conversion
~
Apply a rich soap
and
water solution to the surface of all
pipe
connections. Bubbles
indicate a gas leak
~
In
case
of
gas leak, tighten the
pipe
connection.
~
Check
the
pipe
connection
again
for gas leak.
~
Replace the part/parts if gas leak
can
not
be
stopped.
34
CAUTION:
Keep
soap
and
water solution away from electrical
connections
during
gas
leak
test.