For more information visit: www.eaton.com IB01602008E
Instructional Booklet
Page 24 Effective: March 2014
ATC-300 Breaker Based Transfer Switch
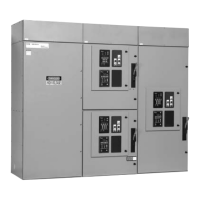
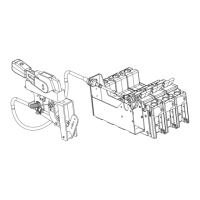
THE REAR-MOUNTED LOAD LUGS, DIP-INSULATED BUS BARS,
STANDOFF INSULATORS, GLASS POLYESTER PHASE BARRIERS, AND
METAL MOUNTING BRACKET ARE DESIGNED TO BE REMOVED AS
ONE LOAD LUG ASSEMBLY (FIGURE 23).
Figure 23.Mounted Load Lug Assembly (225-1200 A Models).
Step 5: The load lug assembly is removed by first removing the
four, six, or eight bolts securing the pieces of insulated
bus to the back of the power panel. The number of
mounting bolts depends upon whether 2-, 3-, or 4-pole
devices are installed. Mounting bolts are accessed
through holes in the load end of the molded case switches
or optional circuit breakers.
Step 6: Remove the four bolts holding the mounting bracket to the
upper rear portion of the power panel. The load lug
assembly can now be removed as one unit. Note that
there are grooves in the back of the power panel and in
the mounting bracket that keep the polyester phase barri-
ers in their proper positions.
Step 7: Turn the load lug assembly 180° with the lugs at the bot-
tom and remount the assembly by reversing the proce-
dures described in Steps 5 and 6. The mounting bracket
will now be bolted to the bottom of the power panel.
Make certain that all glass polyester phase barriers are in
place and positioned properly in the grooves. When mak-
ing any bolted connection to the bus, comply with the
torque requirements as outlined in Table 4.
Table 4. Bolted Bus Connection Torque Requirements.
Step 8: Remount the operating mechanism to the front of the
power panel with the six bolts removed previously in
Step 4.
Step 9: Position the power panel in the enclosure such that the
two upper elongated holes, one on either side of the
power panel, fit over the two positioning bolts located in
the rear of the enclosure. This will line up the four correct
mounting holes in the power panel with the pre-tapped
inserts in the rear of the enclosure.
Step 10: With the power panel held securely against the back of
the enclosure, replace and tighten the four mounting
bolts removed previously in Step 3.
Step 11: If applicable, attach the neutral strap, removed in Step 2,
to the back of the enclosure through the upper bonding
hole.
Step 12: Reconnect the P1, P2, and P3 connector plugs that were
disconnected in Step 1.
4.5 Power Cable Connections
POWER CONDUCTORS MAY HAVE VOLTAGE PRESENT THAT CAN
CAUSE SEVERE PERSONAL INJURY OR DEATH. DE-ENERGIZE ALL
POWER OR CONTROL CIRCUIT CONDUCTORS TO BE CONNECTED TO
THE ATS EQUIPMENT BEFORE BEGINNING TO WORK WITH THE CON-
DUCTORS AND/OR TERMINATING THEM TO THE EQUIPMENT.
USE OF CABLE LUGS NOT DESIGNED FOR THE ATS MAY CAUSE
HEATING PROBLEMS. BREAKER LUGS ONLY MOUNT TO THE
BREAKER, WHILE TRANSFER SWITCH LUGS MOUNT TO BOTH THE
BREAKER AND THE BUS BAR BEHIND THE BREAKER. FOR INSTALLA-
TION INSTRUCTIONS, REFER TO THE INSTRUCTION LEAFLET SUP-
PLIED FOR THE SPECIFIC LUGS.
NOTICE
POWER PANEL
SWITCHING DEVICE
TORQUE
FT-LB (NM)
Type FD 10 (14)
Type KD 20 (27)
Type LD 25 (34)
Type MD 25 (34)
Type ND 25 (34)
Type NB 25 (34)
WARNING
CAUTION

 Loading...