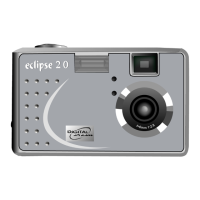
1. Shutter Button: Press this button to take pictures, or to
select menu options.
2. Built-in Flash: The flash allows the camera to take
pictures in low light conditions and can also be used
in bright conditions to remove unwanted shadows.
3. Light Sensor: The digital camera automatically
detects ambient light levels and determines
whether or not the flash is needed. Light
measurements are made with this sensor. Take care
not to block the sensor while taking pictures.
4. Viewfinder: The viewfinder helps you frame a picture.
The actual picture is taken with the lens and not the
viewfinder, however.
5. Self-Timer LED: When the mode dial is set to Preset
and the Self-Timer option is used before pressing the
Shutter Button, this LED will blink for ten seconds
before the camera takes a picture.
6. Lens: The lens focuses the light onto the digital
image capturing circuitry. For the best picture
quality, care should be taken to ensure it remains
free of dust, fingerprints, and scratches.