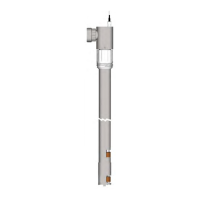
1. Loosen attachment screws (pos. 1).
2. Remove the cover plate (pos. 2) on the metering head (pos. 3).
3. Prise out stopper (pos. 10) with screwdriver
.
4. Safeguard piston rod (pos. 9) from twisting with fork wrench SW 8.
Diaphragm and intermediate piece may need to be twisted in order to get
the piston rod wrench surface into the right position
5. T
wist out diaphragm (pos. 4), intermediate piece (pos. 8) and support disk (pos. 5).
Ensure that the attachment holes are aligned when tightening the
diaphragm and the intermediate piece.
CAUTION!
Only screw in the diaphragm by hand. (Do not use a tool!)
6. Remove fork wrench and turn diaphragm and intermediate piece as one unit until the
housing holes are aligned, and leakage hole (pos. 1
1) points downwards.nach unten
zeigt.
7. The metering head should be evenly diagonally tightened.
CAUTION!
T
orque of the metering head screws = 6 ±1 Nm.
After 24 hours check the torque of metering head screws.
Maintenance
46417102233 Rev. 3-03.2019
 Loading...