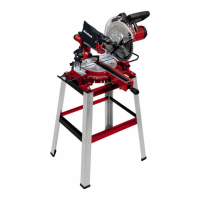
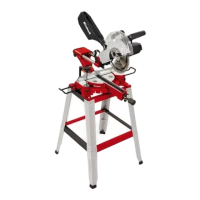
GBGB
- 45 -
•
Finally check the position of the pointer (20)
on the scale (19). If necessary, undo the poin-
ter (20) with a head screwdriver, set it to the
0° position on the scale (19) and retighten the
retainer screw.
•
No stop angle included.
5.5 Precision adjustment of the stop for miter
cut 45° (Fig. 1, 6-9)
•
Fasten the turntable (17) in 0° position.
•
Undo the locking screw (21) and move the
machine head (4) all the way to the left using
the handle (1), until it coincides at 45°.
•
Place the 45° stop angle (z) between the
blade (7) and the turntable (17).
•
Adjust the adjustment screw (30) so that the
angle between the blade (7) and the turntable
(17) equals exactly 45°.
•
No stop angle included.
5.6 Adjusting the miter angle on the machine
head (Fig. 3, 14)
•
Loosen the locking screw (21).
•
Hold the machine head (4) by the handle (1).
•
The machine head can now be tilted conti-
nuously to the left.
•
Angles to the left: 0-45°
•
Re-tighten the locking screw (21).
5.7 Adjusting the movable stop rail (Fig. 1, 5)
•
Caution! This saw is equipped with a remov-
able stop rail (34) which is screwed to the
fixed stop rail (11).
•
To make angle and miter cuts, the movable
stop rail must be adjusted to prevent collision
with the saw blade.
•
For miter and angle cuts to the left, the left
stop rail must be moved outwards. Undo the
locking screw on the movable stop rail and
pull the rail back so far that a collision with the
saw blade can be ruled out. Prior to every cut,
retighten the locking screws of the stop rail.
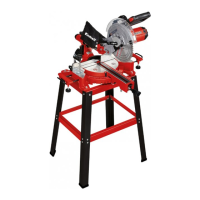
6. Operation
6.1 Cross cut 90° and turntable 0°
(Fig. 1-3, 10)
For cutting widths up to approx. 100 mm it is
possible to x the saw’s drag function with the
locking screw for drag guide (24) in rear position.
If the cutting width exceeds 100 mm, you must
ensure that the locking screw for drag guide (24)
is slackened and that the machine head (4) can
be moved.
•
Move the machine head (4) to its upper posi-
tion.
•
Use the handle (1) to push back the machine
head (4) and fix it in this position if required
(dependent on the cutting width).
•
Place the piece of wood to be cut at the stop
rail (11) and on the turntable (17).
•
Lock the material with the clamping device
(8) on the fixed saw table (18) to prevent the
material from moving during the cutting ope-
ration.
•
Push down the release lever (3) to release the
machine head (4).
•
Press the ON/OFF switch (2) to start the mo-
tor.
•
With the drag guide (23) fixed in place: Use
the handle (1) to move the machine head (4)
steadily and with light pressure downwards
until the saw blade (7) has completely cut
through the workpiece.
•
With the drag guide (23) not fixed in place:
Pull the machine head (4) all the way to the
front and then use the handle to move it
downwards steadily and with light pressure.
Now push the machine head (4) slowly and
steadily to the very back until the saw blade
(7) has completely cut through the workpiece.
•
When the cutting operation is completed,
move the machine head (4) back to its upper
(home) position and release the ON/OFF but-
ton (2).
Important. The integral resetting springs will
automatically lift the machine head. Do not simply
let go of the handle (1) after cutting, but allow the
machine head (4) to rise slowly, applying slight
counter pressure as it does so.
6.2 Cross cut 90° and turntable 0° - 45°
(Fig. 1-3, 11)
The crosscut saw can be used to make crosscuts
of 0°- 45° to the left and 0° - 45° to the right in re-
lation to the stop rail.
•
Release the turntable (17) by slackening the
locking screw (14).
•
Turn the turntable (17) and scale pointer (15)
to the desired angular setting on the dial (16)
and lock into place with the locking screw
(14). The saw has locking positions at angles
of - 45°, -30°, -22.5°, -15°, 0°, 15°, 22.5°, 30°
and 45°, at which the turntable (17) audibly
clicks into position.
•
Retighten the locking screw (14) to secure the
turntable (17) in place.
•
Cut as described under section 6.1.
6.3 Miter cut 0°- 45° and turntable 0°
(Fig. 1-3, 12)
The crosscut saw can be used to make miter cuts
of 0° - 45° in relation to the work face.
•
If required, dismantle the clamping device
(8) or mount on the opposite side of the fixed
saw table (18).
•
Move the machine head (4) to its upper posi-
tion.
•
Fasten the turntable (17) in 0° position.
•
Adjust the miter angle on the machine head
and the stop rail as described under points
5.5 and 5.6.
•
Cut as described under section 6.1.
6.4 Miter cut 0°- 45° and turntable 0°- 45°
(Fig. 1-3, 13)
The crosscut saw can be used to make miter cuts
to the left of 0° - 45° and to the right of 0° - 45° in
relation to the work surface, with simultaneous
setting of the turntable from 0° - 45° to the left or
0° - 45° to the right in relation to the stop rail (dou-
ble miter cut).
•
If required, dismantle the clamping device
(8) or mount on the opposite side of the fixed
saw table (18).
•
Move the machine head (4) to its upper posi-
tion.
•
Release the turntable (17) by slackening the
locking screw (14).
•
Use the handle (1) to adjust the turntable (17)
to the angle required (in this connection see
also section 6.2).
•
Retighten the locking screw (14) to secure the
turntable in place.
•
Adjust the miter angle on the machine head
and the stop rail as described under points
5.5 and 5.6.
•
Cut as described under section 6.1.
6.5 Limiting the cutting depth (Fig. 3)
•
The cutting depth can be infinitely adjusted
using the screw (27). Turn the screw (27) in or
out to set the required cutting depth and then
retighten the knurled nut on the screw (27).
•
Check the setting by completing a test cut.
6.6 Sawdust bag (Fig. 2)
The saw is equipped with a debris bag (22) for
sawdust and chips.
The debris bag (22) can be emptied by means of
a zipper at the bottom.
Anl_TC_SM_2531_2_U_SPK8.indb 45Anl_TC_SM_2531_2_U_SPK8.indb 45 30.06.2021 08:18:5930.06.2021 08:18:59
 Loading...