The battery condition is indicated by a symbol in the top right of the
display ( ):
4 Full symbol (orange) = batteries at full capacity
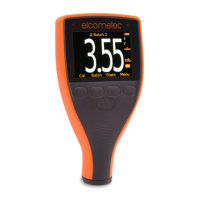
4.3 SWITCHING ON / OFF
4 Empty symbol (red, flashing) = batteries at lowest
sustainable level
To switch off: Press and hold the ON/OFF button until the screen
goes blank.
4.4 SETTING THE BEEP VOLUME
Note: The gauge will switch off automatically after 1 minute of inactivity.
é
2 Use the softkeys to highlight ‘ ’ and press ‘ ’ to select.
ê
4.5 SETTING THE SCREEN BRIGHTNESS
é
2 Use the softkeys to highlight ‘ ’ and press ‘ ’ to select.
ê
To switch on: Press and hold the ON/OFF button until the Elcometer
logo is displayed.
é
3 Use the softkeys to adjust the screen brightness and press
ê
‘ ’ to set or ‘ ’ to disregard any changes made and return to the
previous screen.
4 The default setting is ‘ ’ (Auto) .
The screen brightness can be set to ‘ ’ - the brightness is (Auto)
adjusted automatically using the gauge’s ambient light sensor - or can
be set by the user to suit the measurement conditions. To set the
screen brightness:
The gauge beeps each time a measurement is taken. To set the beep
volume:
1 Press the ‘ ’ softkey.
1 Press the ‘ ’ softkey.
é
3 Use the softkeys to adjust the volume and press ‘ ’ to set or
ê
‘ ’ to disregard any changes made and return to the previous
screen.
www.elcometer.com
en-4
4 GETTING STARTED (continued)
R