EVID
EVID
TMTM
Owner’s ManualOwner’s Manual
44
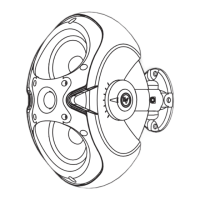
Figure 4:Figure 4:
Rotation Rotation Range Range (90°(90°))
Product DescriptionProduct Description
SAM™ (Strong-Arm-SAM™ (Strong-Arm-
Mount™) SystemMount™) System
EVID™’s SAM™ system (Strong-Arm-EVID™’s SAM™ system (Strong-Arm-
Mount™) excels at meeting the fourMount™) excels at meeting the four
requirements for mounting FGM/BGMrequirements for mounting FGM/BGM
systems: simple, quick, versatile, andsystems: simple, quick, versatile, and
reliable. Three easy steps and you arereliable. Three easy steps and you are
done: Attach the surface bracket to thedone: Attach the surface bracket to the
wall or ceiling; attach the EVID™wall or ceiling; attach the EVID™
enclosure to the bracket with the socket-enclosure to the bracket with the socket-
head bolt; aim the enclosure and tightenhead bolt; aim the enclosure and tighten
the bolt. SAM™ allows greater flexibilitythe bolt. SAM™ allows greater flexibility
for aiming than ball-type mounts that limitfor aiming than ball-type mounts that limit
range of motion when not on center.range of motion when not on center.
Typical ball designs have limited rotationTypical ball designs have limited rotation
when pointing straight ahead, and evenwhen pointing straight ahead, and even
that is reduced when the enclosurethat is reduced when the enclosure
contacts the wall and is moved off axis. Bycontacts the wall and is moved off axis. By
contrast, SAM™ allows full rotation evencontrast, SAM™ allows full rotation even
at full sweep. Figure 4 shows SAM™’sat full sweep. Figure 4 shows SAM™’s
range of rotation (note that EVID™’srange of rotation (note that EVID™’s
curved cabinet allows it to rotate muchcurved cabinet allows it to rotate much
further further [90°[90°] than a r] than a rectangular ectangular oror
trapezoidal box). Figure 5 shows the rangetrapezoidal box). Figure 5 shows the range
of sweep motion left and right on the wall.of sweep motion left and right on the wall.
All threAll three models ale models allow 100° low 100° of sidewiof sidewisese
motion.motion.
Step-by-Step InstallationStep-by-Step Installation
and Wiring (3.2, 4.2, 6.2)and Wiring (3.2, 4.2, 6.2)
Step 1: Mount the SAM™ BracketStep 1: Mount the SAM™ Bracket
to the Wallto the Wall
The SAM™ bracket can be mounted onThe SAM™ bracket can be mounted on
either side of the speaker, enablingeither side of the speaker, enabling
optimal configuration for any installation.optimal configuration for any installation.
Determine whether the bracket should beDetermine whether the bracket should be
mounted on the left or right side of themounted on the left or right side of the
speaker before you bolt the speaker tospeaker before you bolt the speaker to
the bracket. It is best to mount the bracketthe bracket. It is best to mount the bracket
on the side away from the direction inon the side away from the direction in
which the speaker will be aimed. Thiswhich the speaker will be aimed. This
ensures that the full swing angle isensures that the full swing angle is
available for aiming on that side andavailable for aiming on that side and
provides easier access to the swingprovides easier access to the swing
tightening bolt on the wall bracket (seetightening bolt on the wall bracket (see
Fig. 10, Step 3). For safety, make sure theFig. 10, Step 3). For safety, make sure the
mounting surface can support more thanmounting surface can support more than
the speaker's weight! Use only industry-the speaker's weight! Use only industry-
accepted fasteners and mountingaccepted fasteners and mounting
methods when mounting the bracket.methods when mounting the bracket.
Consult an expert if you are not sure.Consult an expert if you are not sure.
Read steps 2 and 3 before wiring theRead steps 2 and 3 before wiring the
speaker in step 4.speaker in step 4.
For standard vertical installation mount theFor standard vertical installation mount the
SAM™ bracket as shown in Figure 6. ForSAM™ bracket as shown in Figure 6. For
horizontal mounting configurations,horizontal mounting configurations,
mounting the bracket on the bottom sidemounting the bracket on the bottom side
(as in Figure 7) is easiest and safest, and(as in Figure 7) is easiest and safest, and
allows the speaker to be mounted closerallows the speaker to be mounted closer
to the ceiling.to the ceiling.
Figure 6:Figure 6: SAMSAM
TMTM
Mounted on SideMounted on Side
Figure 5:Figure 5: Sweep Sweep Range Range (100°(100°)) Figure 7:Figure 7: SAMSAM
TMTM
Mounted on BottomMounted on Bottom
90˚90˚
100˚100˚
SAM™SAM™
SAM™SAM™
CeilingCeiling
 Loading...