3/12
ACCESSING AND USING THE MENUS
The resources are organised into 2 menus which are accessed as follows:
• “Machine Status” menu: press and release the
set
key.
• “Programming” menu: hold down the
set
key for 5 seconds.
Either do not press any keys for 15 seconds (timeout) or press the key once, to confirm the last value displayed and return to
the previous screen.
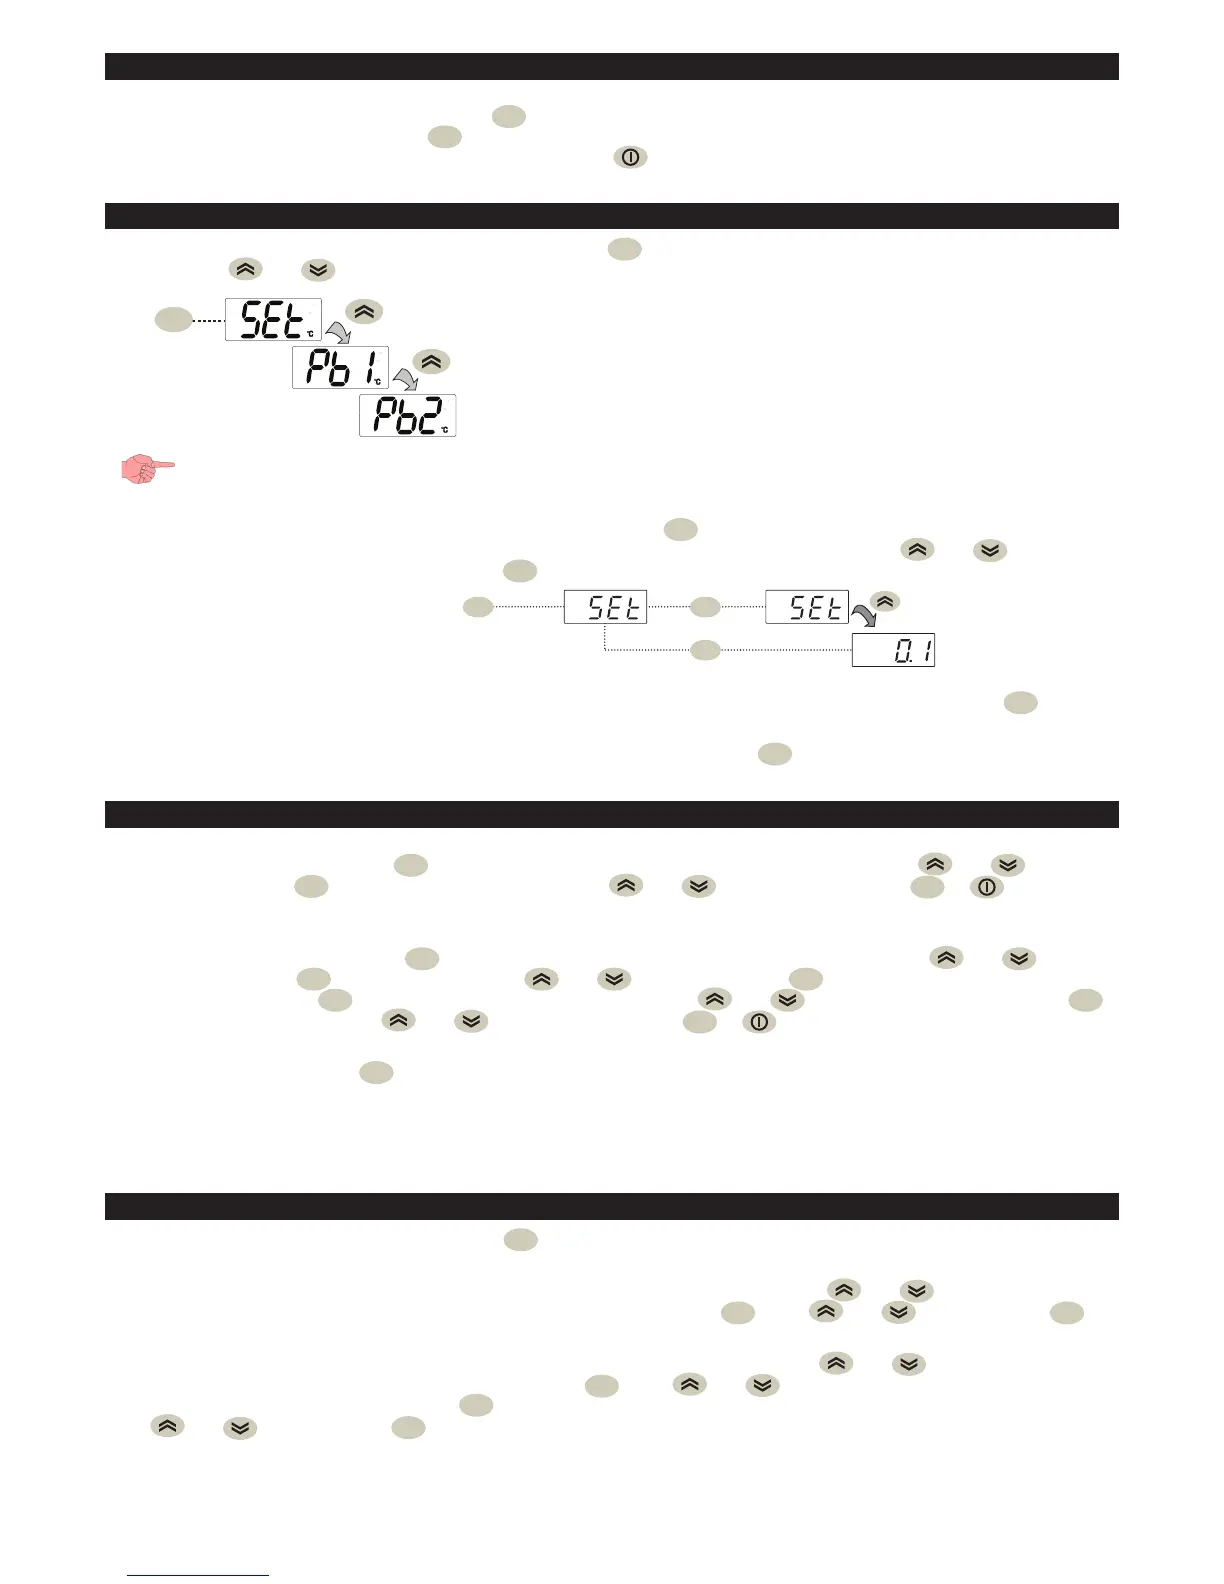
“MACHINE” STATUS MENU
Access the “Machine Status” menu by pressing and releasing the
set
key. If no alarms are active, the “SEt” label appears.
By pressing the and keys you can scroll through all the folders in the menu:
set
- AL: alarms folder (only visible if an alarm is active);
- SEt: setpoint configuration folder;
- Pb1: probe 1 - Pb1 folder;
- Pb2: probe 2 - Pb2 folder - Pb2*;
- Pb3: probe 3 - Pb3 folder- Pb3**;
* folder displayed if Pb2 present (H42 = y)
** folder displayed if Pb3 present (H11 = 0 and H43 = y)
NOTE: If “REDUCED SET” (H11 or H12 = ±2) is active, the value normally displayed is the one contained in the Setpoint
folder and will correspond to (SEt + OSP). In all other cases, the displayed value will be SEt.
PROGRAMMING THE SETPOINT: To display the Setpoint value press the
set
key when the “SEt” label is displayed. The Setpoint
value appears on the display. To change the Setpoint value, press the and keys within
15 seconds. Press
set
to confirm the modification.
set
set
set
SETPOINT EDIT LOCK: The keypad can be locked by programming the “LOC” parameter.
With the keypad locked you can still access the “Machine Status” menu by pressing
set
to display
the Setpoint, but you cannot edit it. To disable the keypad lock, repeat the locking procedure.
PROBES DISPLAY: When the label Pb1, Pb2 or Pb3 is displayed, press
set
and the associated probe value will
appear. NOTE: 1) the value cannot be modified.
PASSWORDS
Password PA1: allows access to the “User”parameters. By default the password is disabled (PS1=0).
To enable it (PS1≠0): press and hold
set
for longer than 5 seconds, scroll through the parameters using and until you
see the label PS1, press
set
to display the value, modify it using and , then save it by pressing
set
or .
If enabled, it will be required in order to access the User parameters.
Password PA2: allows access to the “Installer”parameter. By default the password is enabled (PS2=15).
To modify it (PS2≠15): press and hold
set
for longer than 5 seconds, scroll through the parameters using and until you
see the label PA2, press
set
, set the value “15” using and , then confirm using
set
. Scroll through the folders until you
see the label diS and press
set
to enter. Scroll through the parameters with and until you see the label PS2, press
set
to display the value, modify it using and , then save it by pressing
set
or .
The visibility of PA2 is:
1) PA1 e PA2 ≠ 0: Press and hold
set
for longer than 5 seconds to display PA1 and PA2. You can then decide whether to access
the “User” parameters (PA1) or the “Installer” parameters (PA2).
2) Otherwise: Password PA2 is amongst the level1 parameters. If enabled, it will be required when accessing the “Installer”
parameters; to enter it, proceed as instructed for password PA1.
NOTE: If the entered value is incorrect, the label PA1/PA2 will be displayed once again and the procedure must be repeated.
PROGRAMMING MENU
To access the "Programming" menu hold down the
set
key for longer than 5 seconds. If enabled, the instrument will request an
access PASSWORD, either PA1 for “User” parameters or PA2 for “Installer” parameters (see “PASSWORD” section).
“User” parameters: When accessed the display will show the first parameter (e.g. “diF”). Press and to scroll through all
of the parameters in the current level. Select the desired parameter by pressing
set
. Press and to change it and
set
to
save the changes.
“Installer” parameters: When accessed the display will show the first folder (e.g. “CP”). Press and to scroll through all of
the folders in the current level. Select the desired folder using
set
. Press and to scroll through the parameters in the
current folder and select the parameter using
set
.
Press and to change it and
set
to save the changes.
NOTE: It is strongly recommended that you switch the device off and on again each time the parameter configuration is
changed, in order to prevent malfunctioning of the configuration and/or ongoing timings.