45
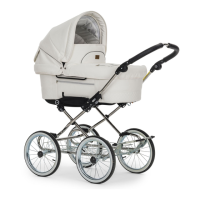
SENTO, SENTO PRO Carrycot+, ERGO+, FLAT+ v. 2.0
SE
SE
2-13
133-155
NO
2-13
110-132
FI
2-13
87-110
DK
2-13
60-86
DE
2-13
37-59
EN
2-13
14-36
SE
SE
2-13
276-301
PL
2-13
252-275
LV
2-13
228-251
LT
2-13
203-227
ES
2-13
179-202
EE
2-13
156-178
CZ
Chassis
1) Assembly of the chassis
1.1 Unfold the rear legs
1.2 Make sure the indicator is completely
green.
1.3 Make sure the automatic safety lock is
in it´s lower activated position.
1.4 Pull out the telescopic handle. Make
sure that the handlebar is at the same
height on both sides before you lock
into position.
1.5 Lock the Telescopic locks on both
sides. Make sure the Telescopic locks
are properly locked with a ”click”.
1.6 Press the handle buttons on the
inside of the handlebar and unfold
the handle. Make sure they click into
position.
WARNING
• There must not be a child in the pram
when it is folded or unfolded
• Avoid having children in the vicinity
when the pram is folded or unfolded.
• Ensure that children are kept away
from all moving parts of the pram to
avoid risk of injury.
2) Rear Wheels
Assemble of the rear wheels
2.1 Assemble the locking clip on the rear
wheel. Place the clip in open position.
2.2 Put the wheel shaft in position and
lock by the clip.
2.3 Assemble the rear wheel cover cap.
Assemble the rear wheel to the chassis
2.4 Wipe dirt from the wheel shafts before
you put on the wheels. Make sure the
rear wheel lock is in the open position,
marked red.
2.5 Place the wheel on the chassis and
lock with the wheel lock.
WARNING
• Ensure the wheel shaft is locked with
the locking clip before the wheel cover
cap is attached.
• The wheel cover cap must be attached
before use
• Check that the rear wheel is attached
to the chassis properly by pulling the
wheel. Repeat on both sides. The red
mark must not be shown.
Remove the rear wheels from the
stroller
2.6 Open the rear wheel lock and remove
the rear wheel.
Deassemble the rear wheel
7. Remove the wheel cover cap by
pressing the hooks inwards.
8. Place the locking clip in open position
and remove the wheel shaft.
3) Front Wheels
Assemble of the front wheels
1.Press the front wheel lock and push
the front wheel in place. Release the
lock and make sure the front wheel
is attached to the chassis properly,
by pulling the wheel. Repeat on both
sides.
2. Press the front wheel lock and remove
the wheel.
360° rotation/ locked rotation
3. The wheels can rotate freely through
360° when the locking ring is in its
upper position. The wheels can be
locked by pressing the locking ring
when the wheels are in the ”forward
facing” position.
4. The front wheels can be locked in a
forward position. This position of
the front wheels shall only be used
when the pram is parked. Never push
the pram with the wheels locked in
forward position.
WARNING
• Ensure that children are kept away
from all moving parts of the pram to
avoid risk of injury.
• 5. Never pull the pram when the swivel
wheels are unlocked. The pram may
wobble which can lead to a safety risk
if you are not cautious and careful.
 Loading...