49
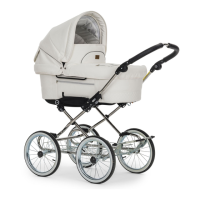
SENTO, SENTO PRO Carrycot+, ERGO+, FLAT+ v. 2.0
SE
SE
2-13
133-155
NO
2-13
110-132
FI
2-13
87-110
DK
2-13
60-86
DE
2-13
37-59
EN
2-13
14-36
SE
SE
2-13
276-301
PL
2-13
252-275
LV
2-13
228-251
LT
2-13
203-227
ES
2-13
179-202
EE
2-13
156-178
CZ
7) Folding the carrycot
Remove the mattress.Pull the bar using
the easy pull handle along the bottom of
the carrycot. Repeat both in the foot end
and the head end.
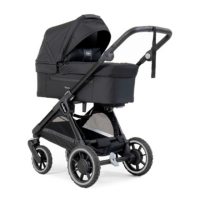
Seat unit (ERGO & FLAT)
1) Assembly of the seat unit
ERGO
1.1 Seat Frame. Press both buttons on the
sides of the footrest to unfold.
1.2 Fold out both seat attachments.
1.3 Place the seat fabric cover over the
top edge of the seat frame.
1.4 Thread the harness strap through the
seat fabric and then place the seat
fabric around the seat plate. Close
the fabric underneath the seat with
the Velcro.
1.5 Position the safety straps around the
frame and click into the buckle on the
back of the backrest. Repeat on the
left and right side of the frame.
1.6 Fasten the press studs that secure the
fabrics to the frame on both sides.
1.7 Click the back rest adjustment handle
into the bracket on both sides.
1.8 Thread the strap through the hole in
the fabric and fasten around the back
rest adjustment handle with the press
stud.
1.9 Insert the bumper bar into the
brackets on both sides of the seat
unit.
1.10 Fasten the crotch strap around the
front bar.
1.11 Attach the hood onto the seat frame
tubes at both sides.
WARNING
Pinch point - Danger of trapping.
1.12 Pull the fabric over the top of the seat
frame and secure with the lower press
stud. Repeat for the left and right
sides.
Please note:
If the hood moves up and down on
the seat frame tube this can cause
scratches. Ensure the seat frame tube
is free from dust and dirt.
FLAT
1.1 The seat unit is delivered fully
assembled. Only the bumper bar
and the hood need to be assembled.
Insert the bumper bar into the
brackets on both sides of the seat
until you hear a click.
1.2 Fasten the crotch strap around the
bumper bar.
1.3 Insert the hood in both sides of the
seat until you hear a click.
1.4 Secure the back of the hood by
using the 2 hooks. You can click
Emmaljunga’s footmuff (accessory)
into place using the eyelets/D-rings
behind the backrest.
WARNING
• Ensure that children are kept away
from all moving parts of the stroller to
avoid risk of injury.
• It is important that the seat unit fabric
is always correctly tted
• Never use the stroller without making
sure the seat unit fabric is correctly
assembled on the frame rst.
• The bumper bar should always be
tted when using the seat unit.
• Always check that the bumper bar
is correctly attached to the seat unit
before use.
• The hood should always be assembled
when the stroller is in use.
• Never carry the seat unit/stroller by the
bumper bar.
2) Attach/remove the seat unit
2.1 Engage the brake. Click the seat unit
into the chassis, make sure it clicks
in properly and securely on both
sides. The seat unit can be attached
in the direction of travel or against
the direction of travel. Make sure the
indicator is completely green.
 Loading...