Mounting Cleanfit CPA871
34 Endress+Hauser
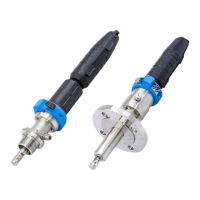
5.2.2 Sensor installation
Preparing the sensor and assembly
NOTICE
Danger of medium penetrating if a defective sensor is installed.
‣
Inspect the sensor and use a new, intact sensor if necessary.
A0030154
23 Sensor installation
1 Thrust collar with O-ring
1. Remove protective cap from sensor. Make sure that the O-ring and thrust collar
(→ 23, item 1) are provided.
2. To aid installation, immerse the sensor shaft in water.
3. Move the assembly to the service position.
Installing and removing sensors
L
WARNING
Risk resulting from temperature, pressure and chemical composition!
‣
Establish pressure compensation in the service chamber.
‣
Before removing, clean and rinse the sensor adequately in the rinse chamber.
‣
Check process seals. (There can be no leakage of medium from the rinse chamber in limit
position when rinsing is disabled)
 Loading...